by Rob Hull
Texas School Instructor
High-Key is a technique of photographic lighting characterized by bright low contrast images. Think of it as an entire genre of lighting. Today we are focusing on one particular style of high-key – images with bright white backgrounds.
What is High-Key? Before we look at how to set lights for a high-key portrait, It’s important to understand what it is. Jourdan Aldredge, in his article “Everything You Need to Know About High-Key Lighting” states, “In a nutshell, high-key lighting is a lighting style notable for the pronounced use of the key light source as a way to compose a brightly-lit scene with soft shadows, consistent lighting, and almost no contrast.”
Any lighting style needs to be appropriate for the subject being photographed. High-key lighting works well for fashion shoots, wedding photos, and portraits – anywhere you want a nice bright and airy feel that is synonymous with professionalism, and cheerfulness.
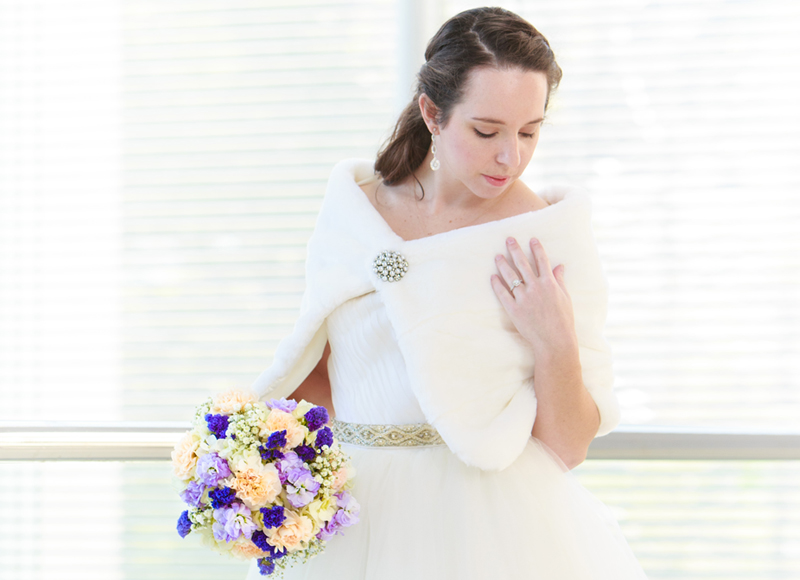
High-key is characterized by lighting that presents a brightly-lit subject with minimal soft shadows. The lighting is consistent with very little contrast or dark elements in the scene. The majority of the scene is composed of highlights. One common high-key look, especially in still photography, is the white background as shown above. But, remember, high-key does not mean white background. You can still have subject matter in the background, but it’s usually very bright – even over exposed.
Setting Your Exposure – When deciding how to set up your lights, it may be helpful to divide your scene into two sections. One is the bright white background, and the other is your subject in front of the background. Remember that high-key lighting is quite forgiving. By its very definition, there is a lot of light and having light spill over from one part of your image to another is not generally a problem.
Lighting Your Background – It’s common to place bright white, seamless background paper behind your subject, and then light the background. This can be done by a single light directly behind the subject, pointing toward the background. You just want to ensure that all of the background that is in the frame is well exposed and evenly-lit.
A single light behind the subject is effective for headshots, but if you’ve included more real estate in the frame, a single light may not be up to the task. You may have to have one or more lights on each side of the background to provide even illumination.
This is a lighting style where a good light meter comes in handy. If you’re shooting at f/11, then, using an ambient light meter, make sure you have f/11 from edge to edge and top to bottom on your background. Everything in the frame should be consistent.
For head and shoulder portraits, my favorite background is a large softbox. The softbox is directly behind the subject pointing at the camera. Here you meter from the subject’s position with the meter pointed directly at the softbox. Let’s assume your camera is set on f/11, then you want the light falling on the back of your subject to be f/11.
This is important. Many photographers want to increase the brightness of the background light to ensure that it is pure white. The problem is that if the light striking the back of the subject is too bright, you’ll get a halo around your subject, especially around their hair. The hair will be over-exposed, and the separation between your subject and the white background will become muddy.
Lighting Your Subject – High-Key is described as being bright with very low contrast. There are several light sources that can produce this light quality including ring lights, large umbrellas, a large soft box, or multiple smaller soft boxes. The determining factor is simply what look you’d like in your images. The choice is yours.
In the sample image above, I’ve used two 1’ x 3’ soft boxes, one on either side of the subject, and a reflector under the subject. This arrangement has created a very nice, albeit flat, lighting on her face. Pay special attention to the exposure on the edges of her hair. The exposure from the background light on her hair is perfect.
You may see some bright spots in the hair, but those are specular highlights – they are from the portion of light that is a direct reflection of the background light. Even though the background is a diffuse light source, the type of reflection you see is a function of the surface of your subject and not the light source. A specular highlight is simply a direct reflection, and it is the same brightness as the light source. Professional cinematographers use a variety of tools to minimize specular highlights. For metal, plastic, glass, or ceramic objects, they use dulling spray. There are even dulling sprays that can be used on food. For a model’s hair, a hairspray may be used.
Adding Background Interest • A pure white background works well with portraits, but you may want to add some interest in the background. For a high-key style to work, the background should also be bright and low contrast but it doesn’t have to be “properly” exposed. That is, you can overexpose the background to the point of only keeping obscure shapes.
