


 Boudoir photography has been a popular genre for years and this trend seems to have no end in sight. As I talk to many photographers, they express an interest in boudoir photography and want to learn more. I tell these people that the first step to good boudoir photography is to be a good portrait photographer. Applying the fundamental concepts of portrait photography to boudoir photography are a big plus. Boudoir photography extends on portrait photography in several ways, not the least of which is posing. Posing for boudoir can be challenging because often the entire body is in the image and creating an attractive result is paramount. In this article, we’ll look at some general posing principles for boudoir, then cover some specific poses that have become top sellers for me.
General Posing Principles for Boudoir Photography – Many general posing principles carry over to boudoir. For example, creating an s-shape with the body as well as the adage “if it bends, then bend it” apply here. Try to avoid presenting the backs of hands and soles of feet/shoes to the camera. In my general photography as well as boudoir photography, I try to keep hands away from the face. Opinions vary on this hand placement point – just be sure to evaluate poses based on elements other than hand placement. For legs, generally try to bend the leg nearer to the camera. This approach applies to lying and standing poses where the legs are presented one over the other to the camera. Feet and toes should almost always be pointed. Finally, try to present the body in an hourglass shape – shoulders should be wide, waist should be narrow, hips wide then knees narrow. The wider parts shouldn’t be unnecessarily wide – just wider than the waist and knees. Let’s look at some of these general principles in practice.
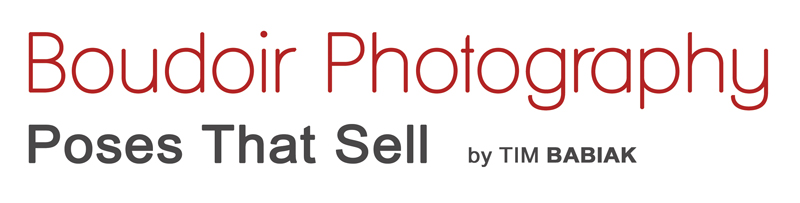
Kneeling – The kneeling pose (right) is one of the easiest to execute and it makes the subject feel comfortable while producing beautiful results. Have the subject kneel on a bed, piece of furniture or floor and turn the subject slightly away from the camera. After she is in place, direct her to place her knees apart and heels together then direct the subject to raise off her heels to show the muscles in the legs. For hand placement, ask the subject to gently place her hands on her thighs and different heights from the camera point of view. In this image, we see Afsaneh in this pose with her eyes to the camera. She may look relaxed but she is definitely working her thigh muscles to lift her body. Notice the position of her right arm (camera left) which is bent showing the right side of her body. Also notice that Afsaneh’s chin is down while opening her eyes. You can vary the kneeling pose by having her looking off-camera. This pose can also be varied to show the backside.
The Arch – The arch pose is a lying or standing stretching pose and generally works best with the eyes closed. The back is arched and the chest lifted while a hand is brought to the head. Anastacia (top photo), lies on a chaise with her feet propped on the back of the chaise. Care is taken to bring the near knee over the far knee to create an hourglass shape. This pose can also be varied to a standing pose, even with hard window light. Note Anastacia’s closed eyes, giving the viewer the impression of a glamorous personal moment.
Backside and Face – The backside and face pose can be tricky to learn. The goal of this pose is to create an image of the client’s backside that also includes her face. Let’s look at a few ways to do this. The first way is to photograph the subject on her tummy with her face toward the camera. Typically, she’ll be directed to lift her chest like a push up. Instead of kicking up her feet (which would show the soles of her shoes), ask her to let her feet drop to the bed with her ankles crossed. Select a shooting position that is off-center and have the client roll her hips by bringing the top knee away from her body. This will lift her backside creating a curve and make it more visible from the camera position. This pose works well for bridal boudoir and provides the opportunity to present the left hand to the camera showing the engagement ring.

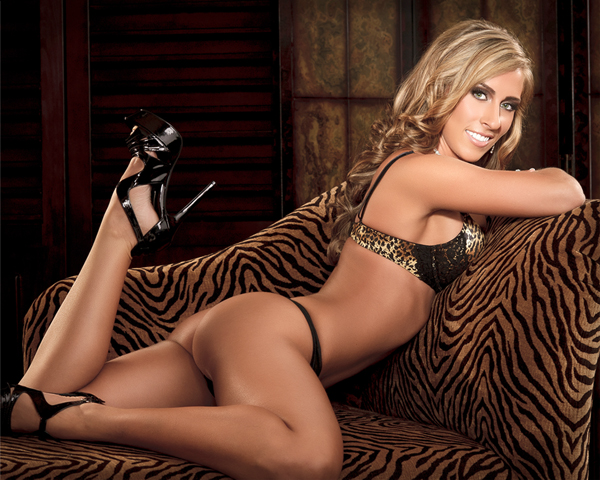
For a more modest presentation, have the subject present the side of her hip to the camera. Sophia (right photo) shows this variation while her expression conveys playfulness. This pose can also be performed standing. When doing so, make sure the leg nearest to the camera is straight and the leg farther from the camera is bent to bring the knees together and create an hourglass shape presented to the camera.
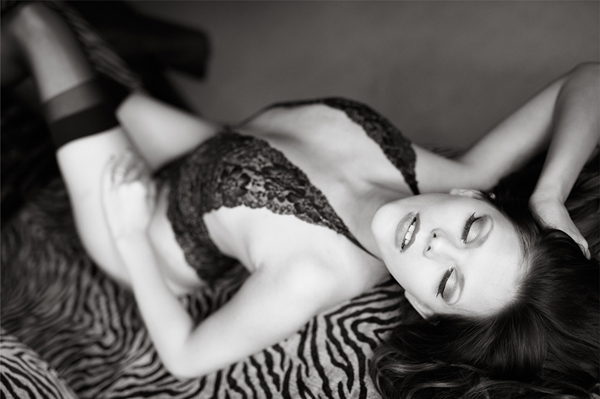
The Pretzel – The pretzel pose is a challenging pose due to the bend of the back and the position of the upper leg. You’ll need a piece of furniture similar to the chaise shown in the example photo. Ask the subject to lie on her tummy with her upper torso on the arm of the chaise. Bring the near knee toward the camera and place the near heel next to the far knee. Then direct the subject to bring the far foot up while pointing the toe. The client will work for this image yet the results are worth it. As a former dancer, Sarah Jane had the flexibility and athleticism to execute this pose (bottom photo).
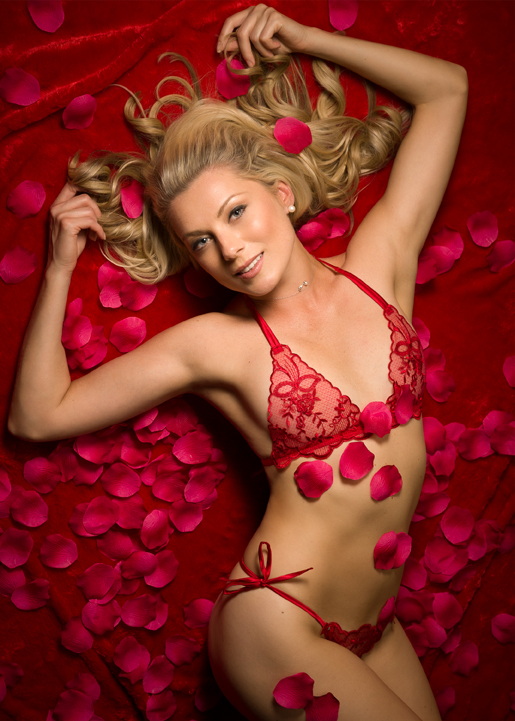
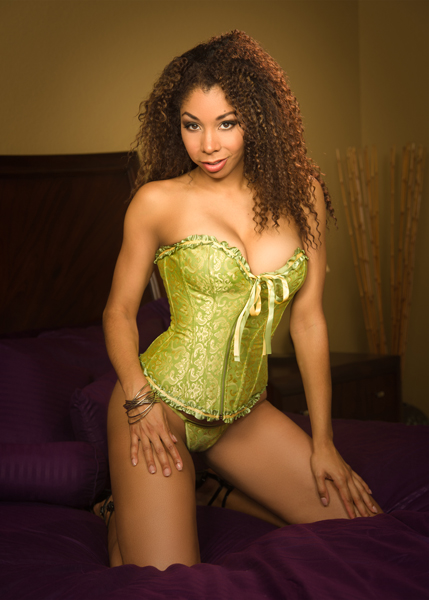
Rose Petals – After a client is tired from executing some challenging poses, virtually all welcome the opportunity to lie on their back and have rose petals showered upon them. Artificial rose petals are available from online retailers and can be reused for multiple shoots. Ask the client to lie on her back in a position that lends to a diagonal composition in the frame with her face closest to your shooting position. Turn her hips a bit to the side and bend the knees placing the knee closest to the camera on top of the lower knee. Remember to point the toes. Typically, hands will fall by the face but the pose can be varied by bringing and hand down to the subject’s midsection. In the image on the title page, Sophia renders a beautiful, romantic image in this pose.
Conclusion – Boudoir photography can be successful if you start with an understanding of the types of images clients tend to choose. If you’re starting out, pick a few of these poses and try to recreate them. Consider printing inspiration images for reference during your trial process. When you find a pose is working, consider variations such as eyes connected to the camera as well as looking off-camera. Repeated success will add to your repertoire in this genre. With a little effort, you’ll find this genre is fun and profitable.
 Tim Babiak of Exquisite Photography is one of Austin’s leading portrait photographers and educators. He is a two-time Austin PPA Photographer of the Year, two-time Bronze Medal in PPA’s IPC, and is a past President of the Austin PPA. He teaches photography to hundreds of people via his “Austin People and Portrait Photography” Meetup group as well as at Austin’s Precision Camera and Video. Tim’s passion for making people look their best as well as his friendly personality makes him one of Austin’s favorite photographers.


