


by Malinda Julien
Real estate is about location, location, location. Liquids are all about timing, timing, timing! Whether it is BBQ sauce or margaritas, liquids are exciting to photograph. It’s a lot of fun to be hitting a shutter while squirting, dropping, pouring or dripping and to see what you get! The challenges can be many and you need to have a good understanding about how liquid behaves but, with a little luck and careful planning, you can end up with some extraordinary images.
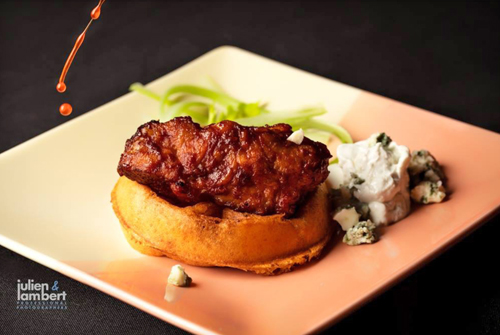
When planning your shots, the first thing to do is to determine what is the “hero” of the shot. Is it that runny egg yolk, the BBQ sauce, or the crisp looking magnum of Champagne? In the image of the chicken and waffles (next page), the “hero” is that finishing touch of hot, sweet Buffalo Wing Sauce hitting that crispy chicken wing on a sweet waffle. So, the “hero” of that image is really the final touch – the Buffalo Wing Sauce.
 Planning such a shot involves a number of factors and I use a checklist before I begin. Is the mood to be dark and dramatic or light and airy? What color is the liquid itself? Do you need a background to show off that color? What is the viscosity of the liquid? Is it a syrup that pours slowly or a water-based liquid that pours fast? What shutter speed should be used? Does the product call for a close-up shot or a larger shot showing the environment? What camera angle? …top-down? …Point of View? …or Into?
 From the product aspect, how is the liquid to be introduced? Will it come from a drip bottle, spout, bottle, or straw? Sometimes the viscosity of the liquid is a factor and it is necessary to change the rate of drop with a thickener, a thinner. Also, the timing of the introduction of the liquid is crucial and close communication with an assistant is necessary to obtain the proper results. An assistant must know where to be to avoid interfering with lights and to stay out of the frame itself. Staging is a key part of the checklist as well. What props and backgrounds will be needed to show off this liquid?
Careful planning also goes into the selection of plates, glasses and other props that best show off the liquid. It is often necessary to make frost or outside glass drips on glasses as well as warming or cooling plates. Finally, it is important to have “stand-ins” to test the shot and we typically make at least four of the dish or drink for this purpose.
Once all of this is done, you will have the final shot lined up. Yes, it takes longer to prepare than it usually takes for the final shot but it is also satisfying to get that perfect shot in just a few frames and to know it was designed and not just a product of luck. The normal time involved in a typical product shoot like this is a couple of days, with the first day going over the checklist and getting ideas together. Once the test shots have been made with all of the stand-ins and you are happy with the results, it’s time to bring in the star of the show… the “hero.”
The technical aspect can be challenging as well, so here are some basic settings which work well. First of all, shutter speed is paramount. If it is too slow, the liquid dropping will blur. Generally speaking, 1/200 sec and an aperture of f4.5 to f5.6 will stop the motion. Keep the ISO as low as possible to prevent outside light from coming through and showing too much of your background, along with a reduction of noise. We shoot mostly at 100 ISO and sometimes as low as 50 ISO. This means your lights have to be giving you a good amount of directed light. Using a strip box with a grid works well, as do very small soft boxes.
 The next concern is color. I am a Canon™ shooter so I have to deal with color profiles within the camera. I normally shoot “neutral” in camera and then I can change or shift slightly in Lightroom™. To ensure I have just the right color temperature, I use a Color Checker™ and, of course, a good light meter. Exposure has to be spot on in order for your color to be accurate. Color meters are available, and I do use one. But they are expensive. So, the best next thing is the Color Checker™.
My lighting is Flashpoint™ Pro 600 RTs. The body is a Canon™ 5D SR and usually I use the Canon™ 100mm f2.8L (for close up or macro) and the Canon™ 45mm TSE (tilt shift). I don’t use a zoom very often, however, if I have to I use the Canon™ 24-70mm f2.8L USM II. The cautionary word with a zoom is if you are shooting top down and it is older, there may not be a “lock” on the zoom and the weight of the lens can cause it to drop changing your zoom. Guess how I figured that one out?
I use a number of reflectors, from micro small mirrors to large white or black. This will help to kick light in just where you need it. A remote shutter release is used so I don’t have to touch the camera. Often, I’ll use the shutter release from either my Lightroom™ tethered or from a remote Pocket Wizard™.
Westcott™ strip banks with grids, or the Westcott™ small soft boxes are an important part of my lighting equipment. On rare occasions, I’ll use a snoot, but usually just the strips. There have been times when I’ve used Westcott™ Ice Lights™ and continuous lighting. However, continuous lighting does not work for liquid. The high shutter speed requires flash.
The other part of the equation is a solid tripod. You need to be rock solid and still. If you need to combine drips and splashes, you will want to ensure all the images line up exactly. In addition, I shoot tethered to Lightroom™ through a MacBook Pro™ so I can see the tiny details. The older I get, the smaller the screen is on the back of my camera.
In some situations focus stacking works well, especially if you are shooting macro. I love a shallow depth of field, but that is not always the preference of the client. Easier to shoot and not need than need and not have. I also bracket my exposures -1 and +1 for the high lights as shadows as well. Post production in Lightroom™ and Photoshop™ is a gem of a necessity. There are many times I want more than one splash or drip and I can easily combine from different shots. Before you begin any splash or drips, take solid shots with focus stacking and exposure bracketing of your “hero.”
 This seems to be a bit of over-kill, but you’ll thank me later. It’s easier to add that solid shot to some drips and drops than to have to prep it all over again or not have what the client wants.
The glass – oh, the glass… How beautiful you are… until you’re not! Reflections on shiny round surfaces can be distracting. The average person may never notice it but a professional photographer or art director… and especially your client… will notice it!
Liquid doesn’t have to be moving to obtain the results you are seeking. In the case of photographing liquids just hanging out and being themselves, I change strategies a bit and use continuous lights. Sometimes flash is fine, but if nothing is moving, why not? Long exposures are not a problem and you can paint in light where you want. This is where those Westcott™ Ice Lights™ come in rather handy. I absolutely love them. They act like a strip box that are continuous! Westcott also makes gels which slide over them if you need to add color. I love to use them with one on either side of a bottle or one behind and from the side of a clear glass. Of course, using modeling lights of your flash heads work well too. I go back and forth depending on what I am shooting. If I am photographing something tall and slim, I usually grab those Ice Lights.
There are also some occasions when it is important to show the color of the liquid, such as whiskey in a glass, and have it be the attention-getter. If you are photographing a bottle of wine, for example, and you don’t want to see through to the background, just cut out a piece of black board to fit behind that bottle and lean it up against it. Boom! (sorry Emeril – I borrowed that from you) There, you have it. Along with such a setup, I use acrylic ice cubes, ice gel, and frosting materials for cold beverages, as well as vape pens (we used to use cigarettes back in the day) or small candles or matches that I would light and blow out to create a steam effect for hot beverages.
In post processing, the first item of business is exposure and color. Using the Color Checker™ on the white, black or grey, I am able to set the color to be accurate. I also choose the Adobe Neutral in the drop down menu on Lightroom™. Since I do bracket both exposure and focus, it makes it easy to get just the right quality from each of the shots. While I don’t use the HDR method, I do frequently bring the exposure brackets into Photoshop™ and choose subtle areas for both the shadows and the highlights. Then, I go back to Lightroom to finish. The resulting image should be crisp, without being too crispy, sharp without being over sharpened and vibrant without over saturation.
Photographing liquids, moving or still, food or drink is challenging but extremely rewarding. Great shots are the result of careful planning, patience, and lots of practice. Once you’ve mastered some of the finer points, you’ll see a big difference in your product photography shots.
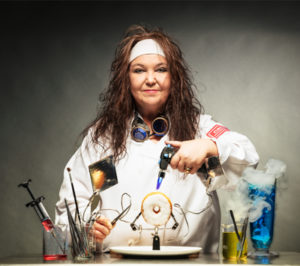 Julien is a co-owner of Julien & Lambert Photography based in Fort Worth, Texas, specializing in food and architectural photography. She is author of “The Sugar Biscuit Journey,” a cook book written and published in 2019. Julien was a speaker at IUSA 2019 in Atlanta, GA.


