


by Bob Coates, Texas School Instructor
I found my inspiration through the photographic artistry of Jim DiVitale, Julianne Kost and Thom Rouse, among others. They talked of using multiple images and layering them together using Photoshop’s blend modes to create a certain look. Admiring that technique, I never could quite get to the final image I was trying to find. Frustration set in. In Photoshop classes I teach I often exhort students to learn more about the program by playing. Taking my own advice, I began combining layers of images and learning how the blend modes worked. Combining these blend modes with masks, adjustment layers and layer styles, the painterly images I’d envisioned in my head were finally beginning to appear.
Collecting Textures – All photographers do it to some extent. We see shape and form, light and shadow that we find interesting and we start collecting them. I started collecting seriously and then a bit more compulsively on a photography tour through northern Italy that I helped sponsor with Jim Chamberlain in 2008. At the time, I wasn’t sure why I was photographing textures but I now have a couple thousand of them filed away on the computer. These assorted textures are categorized by type to make searching a bit easier. Titles of folders include, nature, trees and grasses, metal, paint, art, clouds and more. Having a set of textures is the start to building your own artistic creations.
Algorithms and Math Make Photoshop Work – Is it important to know the math? I’m more of a “Hey, if I do this it will look like that? Cool!” But if you are the type of person who needs to know the nuts and bolts you can go here to get the skinny. http://photoblogstop.com/photoshop/photoshop-blend-modes-explained. Thanks to Robert Thomas for letting me borrow a bit of text from his web site. Here is a sample…
“Because the blend modes work with brightness and darkness values, i.e., luminance levels, and because luminance levels appear as values from 0 to 255 in Photoshop (as seen with the Levels dialog box), you would assume that the math performed by Photoshop is based on these values. However, in the background, Photoshop standardizes these luminance values before applying the math. When these values are standardized, white (255) becomes 1, black (0) remains at 0, and…”
Art and Museums – To learn more about how I would like my images to look, I began viewing art from museums. This drives my wife crazy because I’ll stand in front of a single painting for five to fifteen minutes studying how the artist has rendered metal, how clothing can be painted to look so real you feel you can touch it, or how the painting looks different up close or from five or ten feet away. I’ll also study how paint is applied to give form through shadow using different values and types of brush strokes. Books on color, color harmony and mixing paints, along with painting techniques, have been added to my studies of photography.
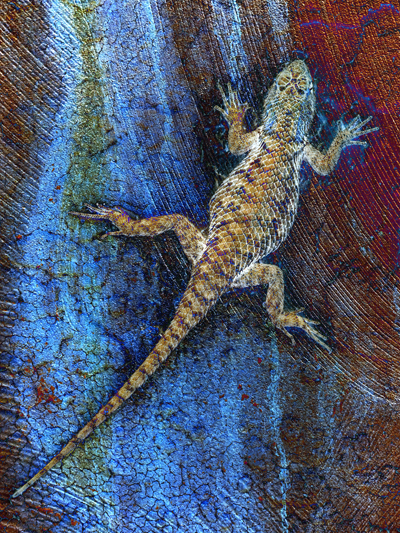
My goal is to create art that is alive. This art takes on different character as the viewing distance changes or the amount of light that falls upon the finished piece is intensified or lowered. Depending on the final intent, I will work with entire images or isolate the subject and build the background. Here is how you can create some too.
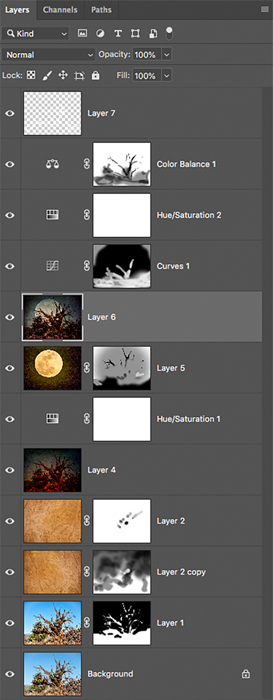
Working with Scenes – Start with a scenic land or cityscape. Open a texture or three or four. Click and drag a texture over your master image. Change the blend mode and see what happens. To quickly cycle through the blend modes, have the move tool selected by hitting the V key. For Mac hold the shift key down and pressing the plus and minus keys and the blend modes will change. Keep at it until you see something you like. If nothing grabs your fancy try it again after inverting the image by pressing Cmd or Ctrl I. Or you can switch to another texture and start again. Try a bunch. Go crazy! Add layer after layer in different blend modes. Shuffle them for a totally different look. Add adjustment layers like Curves, Hue Saturation and Color Balance. Lock the adjustment layer to an individual layer by holding down the Alt/Option key before selecting your Adjustment Layer and click the ‘Use Previous Layer to Create Clipping Mask’ checkbox. This will give you more control.
You can also apply Layer Styles like Color Overlay, Satin and Inner Shadow. But wait. There are Blending Modes in these dialog boxes also. You can change the strength, opacity and more. Go in. Don’t be afraid to push and pull the sliders to their limits and watch what happens. Some amazing math equations are functioning before your eyes. Keep what you like and move on to try more variation. If only a portion of the effect works for you, it’s time to break out the masks and keep what you want.
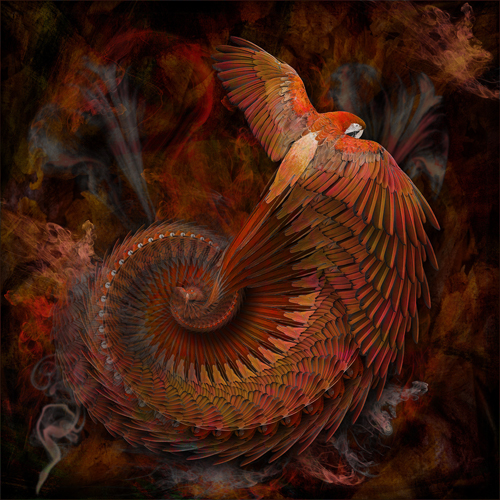
Working with Individual Elements – If a particular subject like a dead (or as I like to call them “Past Prime’) flower is going to be the subject you can isolate it and build a separate background. I’d offer advice on how to make the selections but it totally depends on what background your subject is on. Some of my favorites are the Quick Selection tool and the Magnetic Lasso to make the initial selection, then going in with the Lasso tool to correct any errors the program made in finding the contrast. This can be followed by the Refine edge tool. Once the selection is made, you can use Cmd/Crtl J to put the subject on its own layer. From there drop it onto the background of your choice. A judicious application of a drop shadow can add a lot of depth to your art piece.
It can be a little frustrating in the beginning not knowing exactly what’s going to happen as you experiment but embrace the exploration. There are many happy accidents waiting for you. In short order you can start to predict what type of texture you need and blending mode to get the look you want.
As with most things in Photoshop there are many different ways to accomplish the same thing. I’ve described how I have done things to create this art but I’ve just been alerted to the idea that using images as Smart Objects will allow for even more versatility to the process. Looks like I’ve got to go back to the playground. See you there! In the words of P.J. O’Rourke, “The more evolved an animal is, the more time it spends playing.”
 Bob Coates is from Sedona, Arizona. He has been a successful photographer for well over 20 years working on various genres including weddings and portraiture. Concentrating fully now on Commercial and Fine Art photography, he will be teaching a class on “Nature, Macro, Floral, Animal, Landscape and Travel Photography“ at the Texas School of Professional Photography.


