


by Daniel Fermaint
I have spent a lifetime wishing I could be a “rock star guitarist” touring the world stage. Though I’ve had some unique opportunities and flirted with stardom, it became clear that life as a touring musician wasn’t in the cards for me. I didn’t give up on my passion of playing the guitar, but over the years, I have developed a skill set behind the camera that allows me to merge my skills in photography with my passion for the performing arts, creating illustrations for local performing artists. Over the course of the past ten years, I’ve created promotional illustrations for dancers, musicians, and thespians. Many were for professional publication, while others were personal projects for websites and CD productions.
Recently, I was approached by a working professional musician, to create a promotional illustration for his sponsor, a custom bass instrument manufacturer. The image was needed for the sponsor’s website to highlight the bass and artist. The opportunity to create a promotional illustration can be enjoyable as long as you don’t put the cart before the horse and go straight to the camera. Planning is key and will allow your vision to come across while gaining the trust of the artist. I’d like to share a repeatable process I’ve used to create these illustrations.
Planning
Vision: I always begin with the end in mind. Like most clients, artists usually have an idea of how they want to be portrayed, but they don’t quite know how to make it happen. That’s when I start asking questions about their vision for the illustration. Are they looking for a studio portrait, an image performing “live,” or something in-between? What equipment and what type of environment should be in the overall image? The answers are usually all over the place, but invariably, as long as the performer is “wowed”, the end product will “win” every time.
Scouting: While a composite image is always an option, the idea with this particular assignment was to create something in camera and be as realistic as possible, so it was important to find a location that would work for the illustration. Though this musician plays up to ten gigs a month, he can also be found serving each week at his church playing bass. I felt his church was the perfect backdrop for this project. It was “home” and his church was a location we could explore and have the freedom to create. I chose to create the image in the backstage area with the 1,700 seat auditorium peering visibly through an opening of the stage curtains.
Posing and Lighting: It’s always a good idea to research comparable images. Seeing other images can provide inspiration on how you would want to pose and light your subject.
Sketching: To facilitate the process, rough sketches of the concept go a long way in visualizing what we are working toward. I usually draft three or four sketches so my ideas are at least on paper, and it gives me something I can share with the artist.
Camera Settings (Left)
Camera: Canon MKIII
Lens: Canon 24-70 II 2.8
f/stop: 4.0
ISO: 1600
Shutter: 1/125
Main Light: Canon 580 EXII (1/64 power) with a snoot
Background Light: Canon 580 EXII (128 power) with a colored gel
The Capture
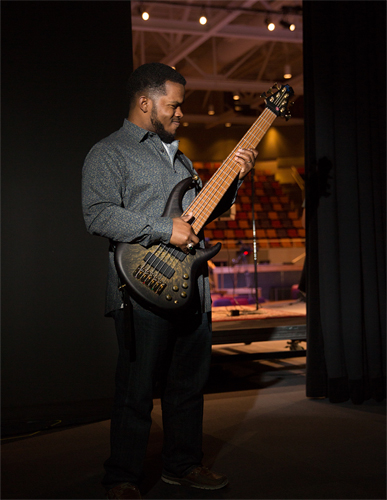
I like to create “mood” in my images to help tell the story, so I opted to use two speedlights: one with a modifier for the subject and one for the background. To ensure the main speedlight didn’t spread across the area, a Rogue FlashBender was converted into a snoot and placed on the speedlight to provide directional light. A larger-than-needed image was taken to see how the light from the speedlight was falling on the subject. As you can see in figure 1, the subject was placed in the stage opening at a 45-degree angle toward the speedlight, and the snoot contained the radius of the light beam to the subject.
With the camera metered and subject in place, a second speedlight with a blue gel at 1/128 power was placed in front of a secondary stage curtain, just behind the musician. This covered the primary stage curtain and the wall behind the musician to create some depth.
Looking through the lens, the final was going to be a horizontal orientation, and cropping could cut off part of the headstock of the instrument. So, the camera was tilted approximately 25 degrees to emphasize the leading line of the neck. I also wanted the neck to point outward toward the auditorium, so the musician was 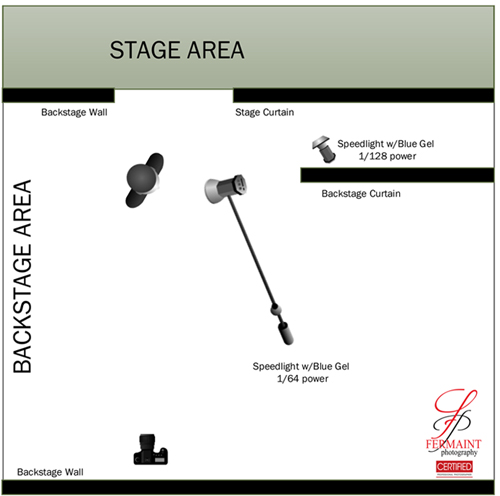 asked to pivot to his left until the desired line was visible while still being able to see his face and the front of the bass. The adjustment in the musician’s angle provided a great view of the instrument, musician, and the auditorium.
Also, the height of the camera was about waist high, and this perspective allowed a capture that showed off the bass which was the point of the session. Time to finish the job.
Final Approach
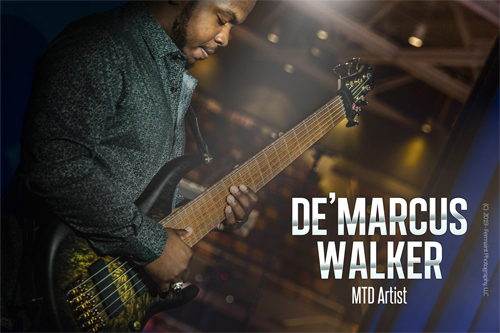
Having done most of the work in camera, the job of editing made it easier to cross the finish line. Photoshop and Topaz Adjust were the two image editing tools used. Topaz Adjust was used to sharpen the image so the details in the bridge, frets on the neck, knobs, and detailed inlays on the instrument stood out. Usually, two layers (the original and the Topaz processed layer) are used to create a blended look that is not overly processed using the blending modes and opacity options for the processed layer.
Photoshop adjustment layers were then applied for the coloring and shading, which lends itself to my style of color grading. The Photoshop sponge tool in the saturation mode was used to bring out the ornate painted design on the bass. A light beam was also added to lead the eyes toward the fretboard and body of the bass. The final step was to add the artist’s name and sponsor to the illustration.
Through some planning, scouting, and sketching, creating this particular illustration resulted in a great experience for the artist. The artist was “wowed” in the way he was portrayed so professionally and proud to have this displayed on his sponsor’s artist website.
 Daniel Fermaint, Cr.Photog., CPP, is a portrait and commercial photographer, capturing high school seniors, the performing arts, and corporate photography. Together with his wife, Jennifer, Daniel runs a successful home-based studio in Plano, Texas. When he’s not writing about himself in third person, Daniel enjoys writing music, playing his guitar, and dreaming of vacationing in the Caribbean.


