


by Rob Hull
Texas School Instructor
When you’re done shooting you have a lot of RAW photos that look great on the back of the camera. Then you download them into Lightroom and you’re presented with a gallery full of flat, lifeless images. So, what happened to what you saw on the camera? If you can’t seem to get great RAW images straight out of the camera then you may have a problem with your workflow.
And, it’s not a problem that is unique to any one manufacturer. Instead, it’s how RAW files are processed in your workflow.
 How Are RAW Files Handled in the Camera? Let’s understand what’s happening. When you shoot a RAW image, the processor in your camera not only saves all the RAW data, it also includes a JPG version of the image that is also embedded in the RAW file. It is this JPG image that is used when the image is displayed on the back of the camera.
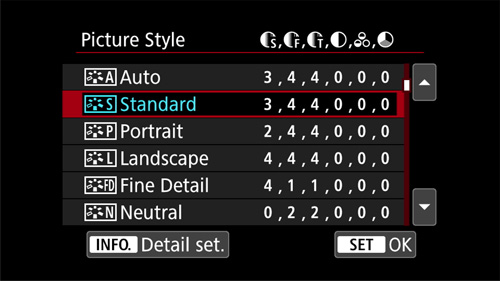
To create that JPG image, the camera reads all the RAW data and builds the JPG based on your camera’s settings. In my case – I’m a Canon shooter – it looks at the Picture Style settings. For Nikon users, it’s Picture Controls and Sony shooters use Creative Styles. It also considers all the other settings in the Shooting, Setup, and other menus in the camera.
From all this information, it builds the JPG file to match the color, tone, and style indicated by all these settings. The end result is a pretty good-looking JPG file. – and this is the file you see on the back of your camera.
Importing into Lightroom – Now you import your images into Lightroom and while you watch it build all the thumbnails, you may see it take these great looking images and convert them to those flat, lifeless thumbnails.
Then you always have to work on the color, tone, and contrast just to get back to what you saw in the camera. But why?
Raw files are proprietary. The structure in a Nikon NEF file or a Canon CR2 file is unique and often change over time. Adobe, rightfully so, does not try to tinker with any of the unique RAW information. In fact, Adobe products ignore all this RAW header information.
When the RAW file is imported into Lightroom, much of the information that determined the look of the JPG preview on the back of the camera is ignored. In my case, – remember I’m a Canon Shooter – the Lightroom processor totally ignores;
l Picture Style settings
l Lens Aberration Correction
l Color Space
l Auto Light Optimizer
l Highlight Tone Priority
In fact, it totally ignores just about all the settings in the menu system on the camera. Don’t worry, not all is lost. These settings don’t change the RAW image data. They only provide cues to the RAW processor on how to render the RAW image. (This isn’t unique to Canon. The same holds true for Nikon NEF files and other RAW formats. The only difference is that the list above may contain different items.)

The problem is that when Lightroom creates the preview image, it can only look at the RAW shooting data. It cannot see all the other settings. Hence, a flat and lifeless image.
To compensate for this, you can use the controls in Lightroom’s Camera Calibration panel in the Develop module. The default setting is Adobe Standard which creates an image that is pretty flat. But click on the Profile drop-down menu and you’ll find other options. When I have a Canon RAW file displayed, the options include;
l Camera Faithful
l Camera Landscape
l Camera Monochrome
l Camera Neutral
l Camera Portrait
l Camera Standard
Since the default Camera Calibration profile of Adobe Standard is so dull and lifeless, I select Camera Standard to match the profile set in my camera.
So, what does each of these do? You may have noticed that these names match the Picture Styles that are available in a Canon camera. Adobe has developed each of these to try and match the standard Canon Picture Styles in your camera.
There is not a link between the Canon Picture Styles and the Lightroom Camera Calibration Profiles. Lightroom doesn’t read the file information and assign an appropriate Picture Style. That would be nice. Instead, you need to assign the profile in Lightroom.
You can do this for each image you import or a much easier way is to set the appropriate Lightroom Camera Calibration settings and then save them as a preset. When you create the preset, you can include not only the camera profile but other develop settings such as the process version, white balance, any of the tone and presence settings, and even lens correction. But remember, if you set this as a default, it is applied to
every image imported from that camera.
Setting Defaults in Lightroom – In the current version of Lightroom Classic CC, the default settings are specified in the Preferences dialog box.
On the Presets tab you’ll find the RAW defaults. These can be set for all Raw files being imported, or you can specify unique settings for individual cameras.
Once you have the preset saved, you can then specify that preset in the import develop settings. Then, each image imported will have previews created that include the calibration settings and you’ll no longer be faced with a light table full of dull photos.
 At Texas School 2020, Rob Hull teams with Tony Corbell in a most informative class titled, “Between Light & Shadow.” Rob is from Coppell, Texas, and has offered commercial, portrait, and freelance services for over 22 years. Learn more about Rob at
www.GreatPhotography.com
or go to www.TexasSchool.org.


