


How Changing Technology Defines The Way It’s Done
by Ron Castle
A lot has changed for me and my workflow since the last article I wrote on photographing interiors and I’d like to share that with you. When I first started my “career” in real estate/interiors photography, I used the High Dynamic Range (HDR) technique exclusively and processed my bracketed exposures in Adobe Lightroom. The quality of my final images was very acceptable and was more than adequate for my real estate clients. I was even asked to write a book on real estate photography by Amherst Media as a result. Even though my experience level at the time was pretty limited, I agreed to do it, and it’s been selling on Amazon for the past couple of years. The title is “Real Estate Photography For Everyone” (Not my title choice!).
Another part of my workflow at the time included a super-wide angle, 11-24mm rectilinear zoom lens. This lens made even the smallest room look like a ballroom and my clients loved it! However, I eventually learned that it was not a great choice and have since sold it. The edge distortions were just too much, and in my opinion the lens really distorted the reality of the property as well.
Fast forward to today and, other than an occasional HDR image in special situations, I’m now using off-camera speedlights and combining one or more flash exposures with a single ambient exposure in Photoshop for most of my interior work. This is commonly called the “Flambient” technique. I’ve also replaced my ultrawide-angle lens with two tilt-shift lenses, a 17mm and a 24mm. These two lenses give me all of the coverage options I need for real estate and allow for much more compositional flexibility.
It’s important to mention here that my initial motivation for changing workflows was spurred by Adobe’s decision to alter the HDR process in Lightroom. It started out as a 32-bit process, but during one of the big updates a couple of years ago, they quietly changed it to a 16-bit process to speed up the HDR processing time and this fundamentally changed the quality of the Lightroom HDR files. You can still get a 32-bit HDR output file in Photoshop, but it requires the time-consuming steps of leaving Lightroom, processing in Photoshop, and then saving back to Lightroom. Since the big advantages of the Lightroom HDR process had been convenience and quality, I decided to give the flambient workflow a try. The quality difference in my images has been dramatic, so I’m glad I changed! Having said all this, I still believe that for someone dipping his/her toes into real estate photography, the HDR process is the best and easiest way to get comfortable with the work without having to buy a lot of extra gear. It’s also a way to quickly build up a portfolio and get your business started. HDR still has its place, and I know a number of real estate photographers who offer two-tiered pricing with HDR as a cheaper option to the flash process.
It’s impossible to do justice to post-processing interior images in a short article, so I’m going to limit the discussion here to some of my equipment choices and a few basic capture considerations. There are tons of free educational videos on YouTube that cover capture as well as post-processing real estate interior images. Nathan Cool and Rich Baum are two of my favorites and they offer tons of very helpful real estate photography videos. The website “PhotographyForRealEstate.com” is probably THE best online resource for wannabe and established real estate photographers. For those of you wanting to step it up to another level, I highly recommend Mike Kelly’s videos from FStoppers.com, a three-part series called “Where Art Meets Architecture.” These videos are extremely well produced and show capture and post-processing in detail I haven’t seen in any other training videos. They’re pricey but well worth it.
Let’s get into the photography discussion. The same general photographic principles of exposure, focus and composition apply to architectural interiors as in any genre. But one element is sacrosanct when it comes to making a professional interior photograph – STRAIGHT VERTICALS. Nothing screams “amateur” more than sloppy vertical lines in a composition. Sometimes it’s difficult to line things up perfectly in-camera, but if you don’t get them right onsite, take advantage of the great Camera Raw/Lightroom “Transform” panel to clean everything up in post-production.
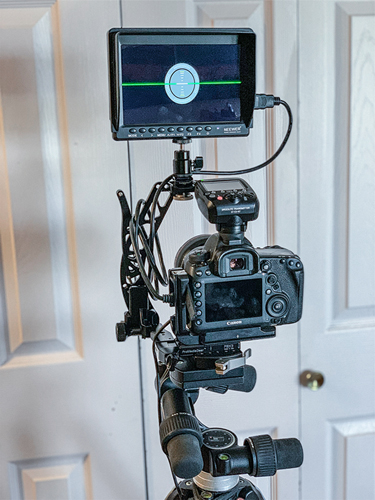
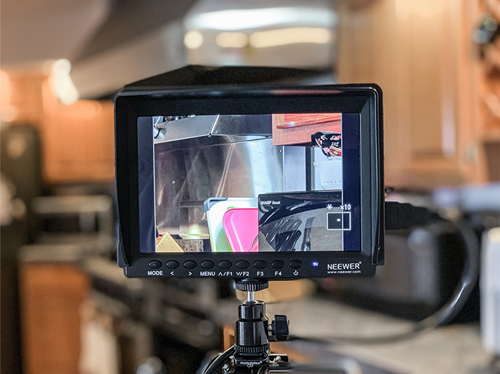
To ensure straight verticals, your camera needs to be perfectly level. I used to rely on my tripod head’s bubble level to get the camera level, but I’ve found that my Canon 5D Mk IV’s internal level feature is much more precise and reliable. A sturdy tripod (see Illustration 1), along with a good quality “geared head”, is essential to quickly leveling a shot and holding the camera perfectly steady between your ambient and flash exposures. I check level on my camera every single shot, because all floors in the same house can have slight variations, especially on tile floors. I also use Live-View with my highlight alert turned on to set up my compositions and to make sure I have all the detail I need in windows or lighting features. Since my tilt-shift lenses are manual focus only, I’ve also added a large external monitor to help make it easier to get sharp images. The combination of a wide angle lens and a 7.1 or smaller aperture make for a pretty wide depth of focus (see Illustration 2). So, as long as you set your focus about one-third of the way into the composition, you can normally count on good sharpness throughout the image.
You can go completely crazy with flash setups, but for real estate at least, I believe that two flashes can cover most situations efficiently. If lighting a third or fourth area is really necessary, it’s no problem taking a separate exposure and combining it with your base flash exposure. You can find videos online showing a simple technique used to combine these exposures by using the “Lighten” layer blending mode.
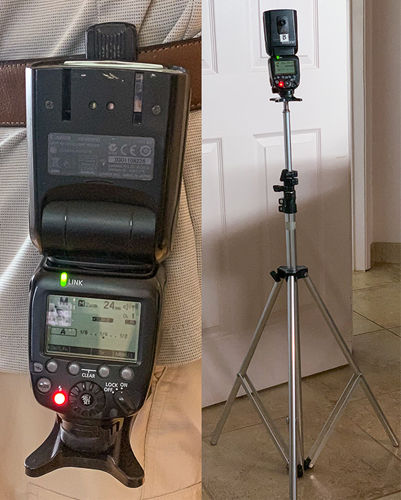 My own setup is shown in the image at left. I use two Canon 600EX-RT’s controlled individually on-camera by a ST-E3-RT trigger. It’s a high-end setup I used in my old wedding shooting days, but you don’t have to spend that much to get very reliable and cheap flash/trigger combos for real estate. I carry one flash on a quick-release belt clip which is all I need for most rooms. However, if I need to light an area in the shot that’s unreachable with my hand-held flash (aimed at the ceiling above me), I use my second flash mounted on a cheap, light-weight stand and place it in that area out of view of the camera. The title image (left) is an example where I was doing a single point perspective shot of a living room and a breakfast nook on the left was not within reach of my hand-held flash. I placed my stand-mounted flash back in the adjoining kitchen just out of sight of the camera to light up that room. Some purists would say that limiting your shots to smaller areas can make for more compelling and artsy compositions, but my practical experience with real estate agents is that they are much more interested in showing as much as possible in a photo along with the interconnections of the floor plan.
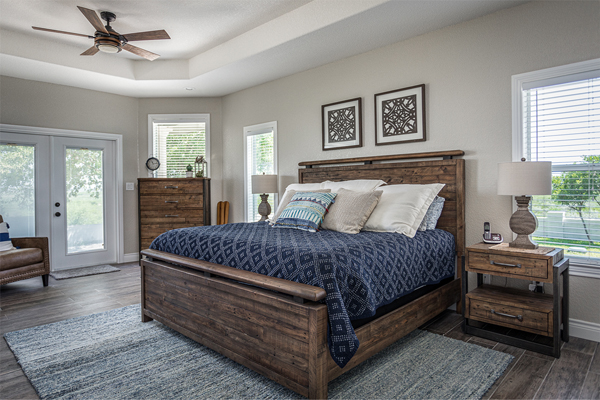
Let’s briefly discuss why a flash exposure is so essential to making a good interior photo, how to get the best exposure, and also what the ambient exposure does for your final image. Anyone who’s ever tried to photograph an interior room lit simultaneously by artificial light and sunlight coming through a window, understands the mixed color temperature problems this creates. It can be especially bad if you have more than one source of interior lighting (fluorescent and incandescent in different fixtures). Since the flash is “daylight” balanced, the flash overpowers the artificial light inside and renders the color more naturally throughout the image. The other function of flash is to fill out the exposure and balance the inside light with the exterior exposure. It’s not critical to make the window exposure perfect, since just having some detail in the scene is usually enough. It actually looks unnatural when the window view is too dark, so making it one to one and a half stops brighter, gives the image a better look (see image below).
 The downside to most flash exposures is that the light is too flat and lacking in natural contrast patterns. The ambient exposure used in the “flambient” process overlays at least a portion of this natural contrast back onto the final image while preserving the detail and color balance of the flash exposure. This is a post-processing balancing act that ends up defining your “style,” and hopefully produces more striking images for your client. It’s certainly possible to place multiple flashes (or even a single one) to mimic natural light direction which would eliminate the need for a separate ambient exposure, but this can be a time-consuming process and difficult to master. It’s not practical for most routine, low budget real estate applications. The simple combination of a flash layer and an ambient layer is a much more forgiving method which allows for more latitude and speed during the capture process. As far as making the best exposures for flash and ambient, I generally slightly under expose my flash shots, and I try to make sure I properly expose the ceiling in my ambient shot. Since I usually bounce flashes off the ceiling, the flash shot can put hotspots on the ceiling that the correctly exposed ambient layer can cover up. One last thing I’d like to pass on regarding my workflow, is that unless an agent insists otherwise, I’ve started making it a practice to turn off as many lights as I can get away with before starting a shoot. You’d be surprised how much better your images look, and how much easier your post-processing is. I’m seeing that this is now a very common and accepted practice with real estate and architectural photographers. If you want to add back some warmth or glow to a light fixture, it’s easily done in Photoshop, but the no-light look is definitely a current and welcomed trend.
Let’s finish up discussion of interiors photography with one often overlooked but important compositional consideration – how high to place your camera in a given shot. I used to struggle with how high to place my camera from one situation to another before I got my tilt-shift lenses. The problem with my old wide angle zoom lenses was that if I raised my camera level high enough to get good separation between elements of furniture or kitchen counters, I ended up with a lot more boring, unnecessary ceiling in my composition. At the same time it usually eliminated more interesting elements in the foreground or resulted in having to crop out desirable elements on either side. Having the ability to raise or lower my camera angle and then “shift” the whole composition down or up depending on the situation, has been a game changer for me. If you don’t have the luxury of a tilt-shift lens, shooting as wide as possible will at least give you better options to crop down later. The general rule for camera height is approximately 18 to 20 inches above the dominant horizontal element in your scene. For example if you have a dining room table or a counter top in the shot, you want to place your camera height around 18”to 20” above that surface. Visually, it’s easier to just look at the various pieces of furniture or kitchen counter tops and cabinets to see if there’s a pleasing gap between them in the composition or if they appear to merge together with little or no separation.
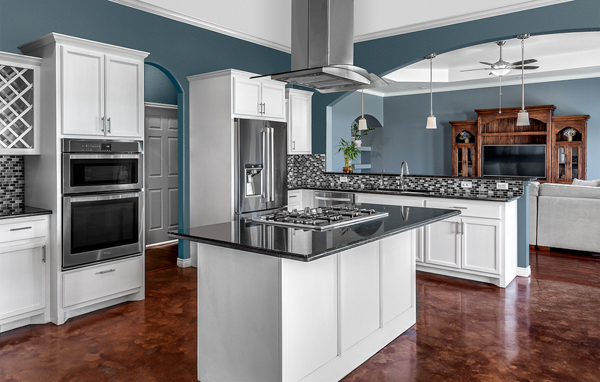
Illustration 5 (above) shows an example of a kitchen photo that uses camera height to show all elements of the composition. I caution you to NOT take the easy road when it comes to raising your camera levels by using the tripod’s center post. Take the time to extend the tripod leg segments so that you maintain the camera’s stability. You’ll be surprised how long it takes the camera to settle down after touching it while the center post is raised even a foot. When you’re using very slow shutter speeds this can ruin a shot, and it can also ruin the alignment of your separate exposures.
I know we’ve only scratched the surface of a very complex topic, but I hope I’ve been able to give you a few pointers that will help you tackle photographing interiors.
 Ron Castle lives in Del Rio, Texas. After being awarded “Best New Artist” that year by the San Antonio Guild in 2014, he entered his first competition in IPC the next year and received a Diamond Photographer of the Year Award, landing all four images in the Loan Collection. In 2016, Ron earned his Master of Photogaphy degree from PPA. Although he has done “a little bit of everything” in his photography business, he has specialized in real estate, architectural, and drone photography. You can find more examples of his real estate/architectural work on his website, www. roncastlephotos.com or some of his personal work and print sales at www.Photos OfTheWest.com.


