

")

Using Specular Highlights to Create Shape & Form
by Dave Montizambert – Texas School Instructor
In Part 01, we spent some quality time together as I went on and on about the concept of creating lighting-contrast on black to show depth, shape, and form. Well, now it’s time to get on with the exciting conclusion of this ever so poignant subject with the nuts and bolts of how the actual lighting was done on this image entitled “On Edge,” (see Images 001, 002, & 003). To get this black ball shoot up and rolling, the 8 ball was placed perilously close to the edge of the billiard table corner pocket. To heighten this sense of peril, the camera was placed low to the ground so that it had to look up from below into the corner pocket – the catch-basket for the billiard balls had to be removed from this pocket so as to give an unhindered site-line from camera to ball.
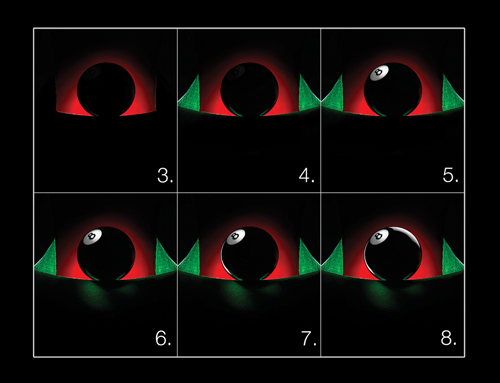
After settling upon the framing of the image I figured out what aperture I wanted for depth of field – I settled on F 16. Knowing ahead of time what the camera exposure is, makes lighting and metering way easier – every meter reading you take is compared to the camera exposure setting which, by the way, represents middle-grey. This lets you know exactly what the brightness of that light is and what ratio it makes.
To create the red glow background, a 9 foot dark grey seamless backdrop paper was positioned behind the billiard ball. Now you are probably wondering, “Why use a dark grey seamless rather than white?” Well, dark grey holds back more light than white, this really helps to minimize if not annihilate, any light spilling back onto the background paper from the subject lighting. If stray light from the subject lighting mixes into the light of the background red spot, the intensity of the red would be diminished or desaturated. Only drawback to a darker backdrop paper is, to get the brightness you want on the paper, you need more light. To that end, a fairly powerful studio strobe fitted with a red lighting gel and a honeycomb grid, was attached to a light-stand then placed behind and above the camera. Its focused beam of light created a red circular glow behind the ball on the seamless paper. I played around with different grids and with this light source’s distance to the background to get the circular glow just the right size behind the ball on the grey seamless – all decisions on the glow placement and size had to based on looking through the camera. With the background and the red glow in place, I metered the glow with a 1˚ spot reflective meter, compared this reading to the camera setting, then adjusted the power of the strobe until the red glow was 1.5 stops above the camera setting at the brightest areas and gradually darkening down to 4 1/3 stops below at the outside edges.
Next, another studio strobe was placed in front and up against the seamless backdrop paper. This back-lit everything on set except for the backdrop, and here is the really brilliant part: The actual strobe is blocked from the camera view by the 8 ball giving us a 2 for 1 special! 2 for 1 because the ball is both subject and gobo. I say gobo because the ball is blocking unwanted lens flare caused by this backlight. The brightness of this studio strobe, measured with an incident meter at the back of the billiard ball, read 1 stop brighter than the camera setting. You can see its effect on the table’s green felt-covered side-guards either side of the ball.
For my key light, I wanted to spot-light the number 8 on the ball. This is such a small area to light and any spot-lights or grids I own would make a spot-lit area much bigger than the ball. To that end I created a miniature spot-lit effect with a 1.5 inch diameter silver reflector card affixed to a small magic-arm. The card was positioned slightly above the top edge of the camera frame. It captured and reflected light spilling over the top of the billiard ball from the separation back-light onto the ball’s numeral 8 graphic and surrounding white circle. The resulting brightness on this small area was set by changing the distance of the reflector to the ball as well as bending its shape between concave and convex until the desired brightness was achieved – concave to intensify and convex to dim.
Fine-tuning the brightness in this way with these controls allowed me to make this brightness 1 stop over the camera exposure. I metered this source by taking a 1˚ spot reflective meter reading off the white area surrounding the 8. Knowing that white with detail is 2 stops brighter than middle grey and that the white paint on the ball is approximately this, I made the brightest area of the white read 3 stops brighter than the camera exposure which equals a 1 stop overexposure.
You might be wondering why I didn’t take an incident meter reading. The reason is: an incident meter is too big for metering in such a small tight area, even my miniature incident white dome goose-neck attachment for my meter sat out too far from the ball to get an accurate reading. Metering with the white dome 1 inch closer to the reflector card than is the subject surface, makes a noticeable difference in exposure when the light source (the tiny reflector card in this case) is in so close.
A second 1.5 inch diameter silver reflector card was also placed above the camera. It too caught light from the back-light strobe and redirected this light down onto the green felt below the ball. This reflector card was manipulated in the same way as the first card to fine tune its exposure. At the brightest point on the felt, it was set to underexpose by a 1/2 stop then graduate outwards into black. This was measured and set using a miniature incident white dome goose-neck attachment on an incident meter, the miniature white dome was positioned against the light pattern on the green felt and was pointed at accent
source reflector card.
The billiard ball at this point looks more like a black disk than a ball, with the exception of the subtle green felt reflections on its lower regions. To put across its roundness in a stronger way, yet another reflector card, this time a rectangle of white foam-core, was placed just out of frame behind and to the camera-left of the black ball. It too was angled to catch raw light from the back-light strobe. Its purpose was to create a form giving specular highlight on the camera-left-side of the ball. This reflection photographs with a concise in-focus edge, this hard edge identifies that the surface of the ball is smooth and shiny. The fact that the specular highlight appears curved creates a sense roundness and depth. This tells us that the object is indeed an orb and not a flat disk. Metering such a thin specular is a big challenge, even with a 1˚ spot meter since the meter’s read-area isn’t small enough and so reads a little of the black ball as well as the bright specular. At any rate, with a few readings and a little fudge-factor for the black area I got it to read 3 stops brighter than the camera setting at the brightest point.
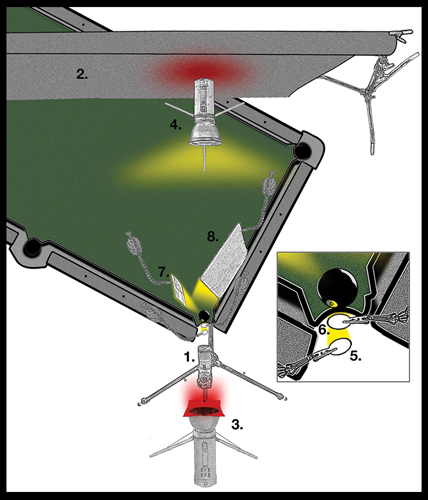
And finally, the reflection on the camera-left-side is great, but it made the ball look a little unbalanced which made me feel a little on edge, especially since I had 24 of these billiard shots to complete. Having this tight deadline to adhere to, I didn’t have time to soothe my poor nerves with a cup of tea so I reached way down inside myself and summoned what strength and courage I had left, then placed another rectangle of white foam-core behind to the camera-right-side of the eight ball. Its purpose was to create a specular highlight on the top camera-right-side. For exposure, this reflection was set to the same exposure value as the previous. In the end, this second form giving specular highlight took no time at all to create and so avoided any time conflict with the AD with my tea addiction, and so, a happy ending to the “On Edge 8 Ball” saga.
 Dave Montizambert lectures internationally on lighting, digital photography, and Adobe Photoshop. He is also a published author having written two books on lighting and digital photography (www.montizambert.com ) plus numerous magazine articles on these topics in North America, Europe, Russia and Asia. Dave produces the now free “DaveOnDemand” (www.montizambert.com) lighting tutorial based photo-training and also creates lighting & Photoshop tutorial DVDs for www.software-cinema.com & www.PhotoshopCAFE.com/video and. Dave is available for lectures and workshops in your area and can be reached through www.montizambert.com.


