


by Sandra Pearce
Texas School Instructor
There was a time when Corel Painter was the software of choice for “painting” images. Very few considered using Photoshop. In fact, the popular idea was that you did “retouching” in Photoshop but did “art” in Corel. Today, instructors are popping up everywhere, teaching classes on painting with Photoshop. When I first began many years ago, I took classes from the four top Corel instructors but simply did not enjoy the process with Corel. In 2007, I turned to Photoshop and taught myself how to use the tools available in this powerful software. Eventually, I became the first PPA instructor to teach “Photoshop Painting.”
It is important to understand the difference between “retouching” and “painting.” When you want to maintain the “photographic look” of an image, you retouch it. If you are transforming that image into a piece of art, you may wish to paint it.
In the beginning, the Smudge Tool was my tool of choice for blending. But the Mixer Brush became a game-changer for me. When properly used, this brush can remove fly-away hair, smooth skin, paint backgrounds, and much more. My discovery of its power came almost accidentally one Saturday morning after my eight year old granddaughter spent the night with me. Little did I know that, when she asked me to do a photo shoot of her, the image would one day become one of the best examples to use when teaching many of the techniques I’ve learned.
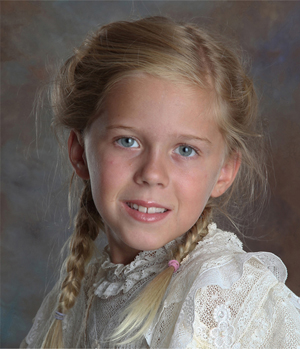 We had braided her hair on Friday afternoon and really didn’t consider that it might need to be redone the next day. However, with the Mixer Brush (not the Clone Tool), I was able to make her hair look realistic instead of the dreaded “cap head” appearance. Unlike the Healing Brush, which tends to shadow back on the hair and throws the color you are using back into the hair, the Mixer Brush gives you the freedom to mix the background into the hair.
It is worth noting that I do not necessarily use the Mixer Brush in the way it was intended to be used in Photoshop. I still paint with the Air Brush and only mix with the Mixer Brush. That is the way I learned to paint digitally and that learning curve seemed to be much easier for me. It’s not that the Mixer Brush is so much better than the Smudge Tool. It is just an entirely different tool. While I use the Mixer Brush for large areas and mixing paints, the Smudge Tool is still my detail brush, used for smaller areas. When I’m mixing colors into the backgrounds, I will use a medium-sized air type brush and set the controls at 100 for backgrounds.
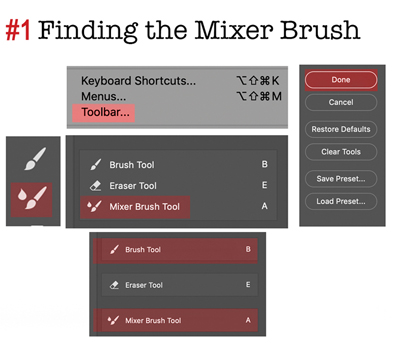 Diagram #1 How to pull the Mixer brush out of its folder so it is always visible. Go to Edit, scroll to the bottom box and click on Tool bar. It will bring up all your tools in Photoshop. You will click on the brush at the top of the enclosed box and drag it up and out of the grey box. Grab the mixer brush, the one at the bottom of the grey box with a drop of paint over the brush, pull it out at the bottom of the box. You need to exit by pressing done or it will not stay. It reverts back the way it was without pressing done. Now you are ready to work.
 Diagram #2 When mixing, not painting, with the Mixer Brush there are certain settings that you have to use. If not, it will add paint while mixing. The square box always needs to be transparent when you are only mixing. Click off the brush immediately to the right of the box as in the diagram. You will need to have an image open and mixer brush active to be able to work on those settings.
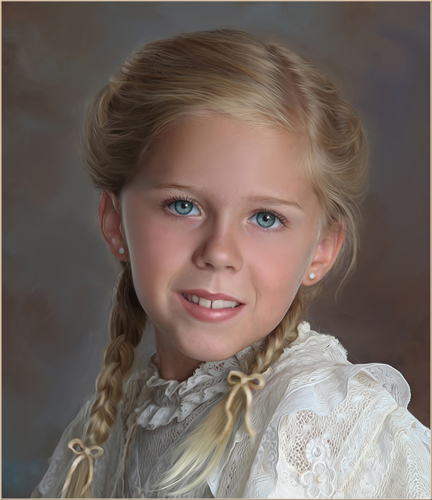 Now that you have the tools, let’s demonstrate how to remove stray hairs. First, make a copy (control J) of your original image. Choose an open spackle type brush or whatever brush works for you. Mix the background into the hair. Use shorter strokes in a circular motion if you are keeping the image photographic. If not, mix all you want in whatever pattern you choose. It is better to work the background into the image not following the outline. If you approach it that way, it will halo all around the hair. If you mix all the pattern in, choose a couple of colors, and add it back with your regular brush. Pull out some stray hairs using your smudge tool.
Digital Painting is like everything else you learn in life. Excelling at something involves a certain amount of practice with the available tools in order to become proficient. My goal as an instructor is to teach tools and technique to help others take their work to another level. If you want to add something new and fresh to your product line, consider giving your clients a beautiful painted art piece.
 Sandra Pearce lives in Okeechobee, Florida. She has been a professional Photographer for over 25 years and is a traditional painter who has embraced being a digital artist as well. Sandra has been teaching people how to turn photographs into digital paintings for approximately 15 years using Photoshop. She will be one of the instructors for the 2020 Texas School of Professional Photography. Learn more at:
www.sandrapearcephotography.net.


