


On-Location Problem-Solving
By
Dave Montizambert
I would like to put a little perspective on perspective using this image of Vancouver Island herb farmers and herbalists, Kayla and Tristan Ford, to show my technique for finding a pleasing composition between subject and background. To get things started, here is a little preamble of how this farm location was chosen. Upon arrival at the property, it was necessary to do a little recon in search of a suitable area to create a portrait of my two farmer friends. There was a delightful little apple orchard that would make for a nice portrait setting, but it didn’t really say “farm.” It was too generic and portrait-y looking. Most of my career has been shooting for advertising, and in advertising, story is everything. Perhaps that is why I think of my photography and lighting as storytelling.
The story here was as much about the farm as it was Kayla and Tristan, hence the barn and tractor. Making the farm obvious in the image was important since the couple would like to use the image for their website and social media to promote their business. Framing the shot was the first step. I wanted to show enough of the barn to sell the farm narrative, so it was a matter of finding the right size-relationship between the subjects and the barn. In other words, find the perfect perspective. I began by affixing my 70-200mm lens onto my full frame camera then moved away from the subjects until I was happy with how they filled the frame.
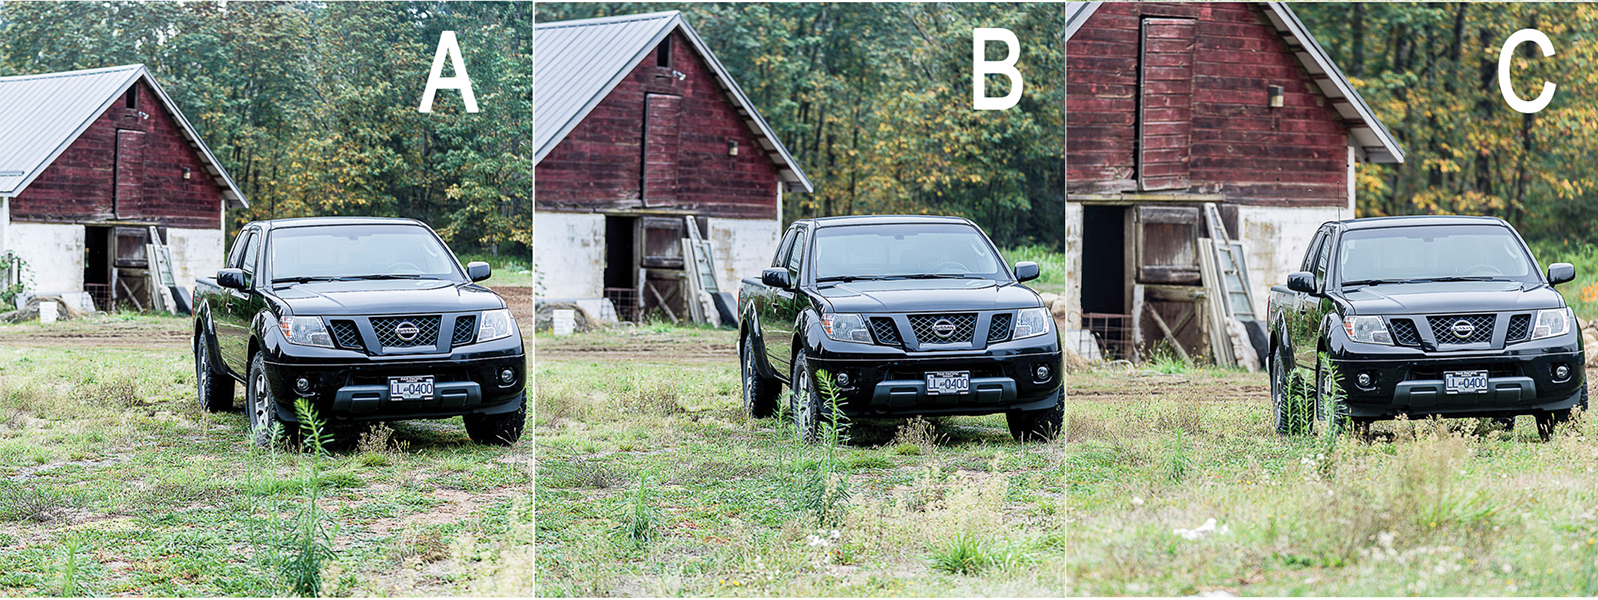
They looked good in the frame, but the barn loomed over them; I could not see enough of the barn to make it obvious what kind of building it was. My perspective technique, or trick, is this: frame the subject(s) then look at the size-relationship between the subject(s) and the background. If you find the background too small, move away from the subject(s) and zoom in with your zoom lens. Or in the case of fixed lenses, swap out to a longer lens. If a fixed lens is all you have, simply rely on cropping the image in post-production. With the cropping method, you will have to accept a bit of a resolution hit (loss). All this to say, move an arbitrary distance from your subject(s), frame appropriately, and assess the background relative to the subject(s). Then, if necessary:
- Reduce background size relative to subjects (see Image A above), move towards them.
- Increase background size relative to the subjects (see Image B above), move away from them.
- Then change focal length or crop in post to frame the image to your satisfaction.
*Note that the 3-up image (above), using truck rather than tractor, was pre-shooting problem solving due to tractor not in position. I was using my truck as a stand-in to figure out shooting distance ahead of time and doing this rather than having subject(s) standing around waiting while I messed about. Really no different than when I’m in the studio using a stand-in for the subject(s) while setting up lighting before their arrival – way less stressful!
Hopefully by now, it obvious that it is not the lens that creates the size relationships between near and far objects (subjects and background), it is the distance. Yet most photographers think that this perspective is due to lens choice. For instance, when they use a long focal length, the subject/background relationship looks compressed. But really this compressed perspective is due to the following: when you use a longer focal length you tend to get further away from your subject. And conversely when you want a wider angle perspective, you use a shorter focal length. This wider angle lens tends to make you move in closer.
 So it is not the lens that is creating the perspective, it is the camera distance from the subject(s). If you think this untrue, try this test:
- Take an image of a subject with a telephoto lens.
- Without changing distance, replace the lens with a wider angle lens or zoom out.
- In post-production, crop in on the wider angle image until its framing matches the telephoto image.
- Compare the two; apart from a difference in depth of field, the size relationships between subject(s) and background will be identical.
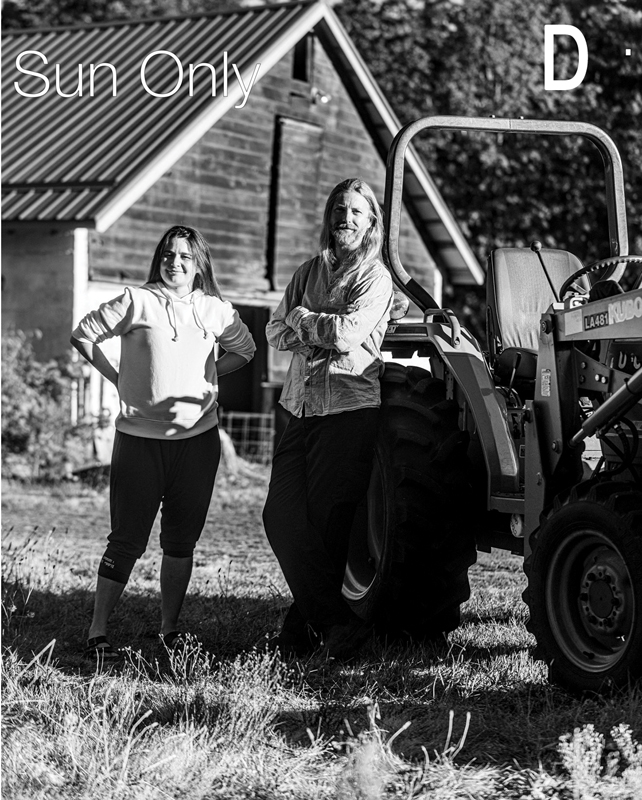
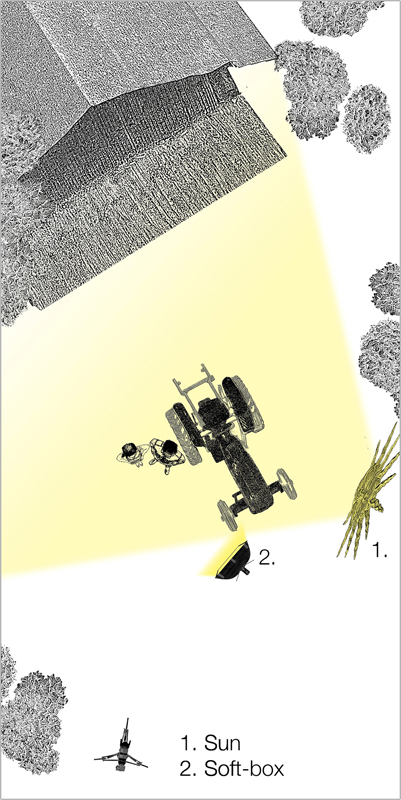
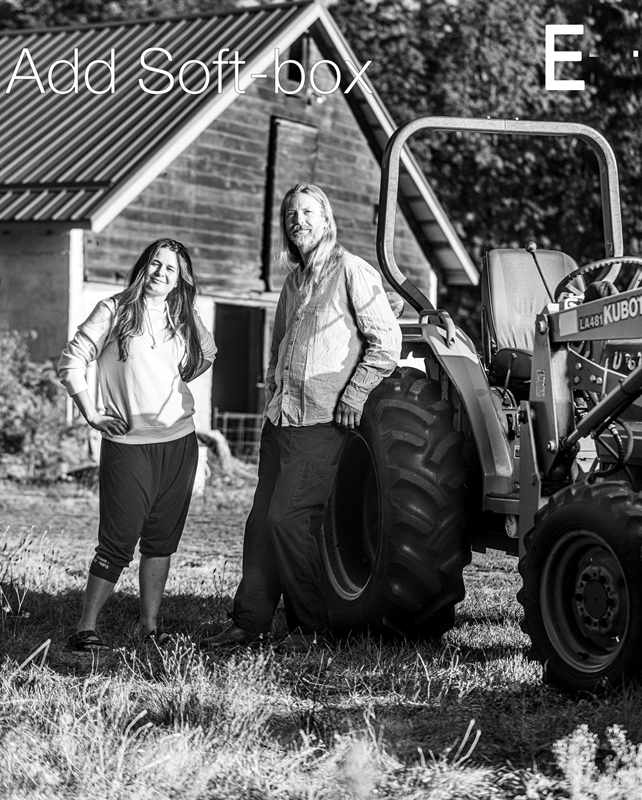 With my framing/perspective/composition complete it was time to make the lighting work. The lighting for this farmers/tractor/barn image was pretty simple. The scene was lit by end of day direct sunlight coming from the camera-right-side of the frame (see Diagram, below). This left Tristan’s face half unlit (see Image D), so I placed a 2 x 3 foot (0.61 x 0.91 metre) soft-box fitted to a battery-powered mono-block strobe from the same side as the sun, then moved it more forward in the frame just in front of the tractor. This made it look like the sun wrapped around the faces a little more than it actually was, thus lighting further into the unlit side (see Image E). This light also helped bring out the tractor and its great rear tire from the shadowy depths of darkness.
This was a pretty fun shoot, very relaxed clients and a lovely setting in which to work. Elise Rouget, a photo apprentice from France, acted as my assistant. She was invaluable as a second pair of eyes and hands since we had to work really fast. Sunlight was dropping and clouds kept rolling in and out.
On a fun note, Tristan is not just a herbalist and farmer, he is also a pyrotechnics specialist for the band Metallica. Talk about a dichotomy, but blowing things up made it possible for he and Kayla to build their herbal farm business because land is expensive here in paradise! It reminds me of my early years, my brother/partner and I trying to get into the commercial advertising photo racket. We spent the weekends shooting weddings and made some good money, only to blow it all during the weekdays trying to get our advertising photo business off the ground!
Technical Specifications:
- Camera: Full frame mirrorless set to F 2.8 1/160th 200ISO
- Lens: 70-200mm zoom set to 78mm.
- Main Light: Setting sun sunlight F 2.8 1/160th 200ISO, read with incident meter, created a +0 ratio. Positioned 98 million miles from subjects.
- Main-light Supplement: 2 x 3 foot soft-box read (with incident meter) F 2.0, 160th, 200 ISO, at subject’s faces. When added to the sunlight exposure, created a +5/10ths exposure ratio on the lit-side of subjects, positioned 12 feet from subjects.
- Fill-light: Open sky read (with incident meter) F 1.0, 1/160th, 200ISO, at subjects’ shadow-side creating a -3 incident exposure ratio.
 Dave Montizambert lectures internationally on lighting, digital photography, and Adobe Photoshop. He is also a published author having written two books on lighting and digital photography (montizambert.com ) plus numerous magazine articles on these topics in North America, Europe, Russia and Asia. Dave produces “DaveOnDemand” (montizambert.com) lighting tutorial based photo-training and also creates lighting and Photoshop tutorial DVDs forsoftware-cinema.com and PhotoshopCAFE.com/video. Dave is available for lectures and workshops in your area and can be reached through montizambert.com.


