


Using Exposure Compensation
By Kory Bumgardner
In the world of photography, exposure is a critical factor that determines the quality of your images. Exposure settings, which include shutter speed, aperture, and ISO, work in harmony to ensure that an image is neither too bright nor too dark. However, cameras don’t always get it right, especially when dealing with challenging lighting conditions. This is where exposure compensation comes into play. Exposure compensation allows photographers to override the automatic exposure settings that the camera chooses, giving them greater control over the final image.
At its core, exposure compensation is a tool that helps you adjust the exposure to be brighter or darker than what the camera’s automatic settings might suggest. It’s a powerful feature that becomes especially useful when the scene you’re capturing has tricky lighting. Without exposure compensation, your camera’s light meter will often try to average out the light in the scene, leading to photos that may lack the desired contrast or brightness. Cameras want everything at 50% gray!
Exposure compensation is particularly effective when you’re photographing subjects in high-contrast situations such as a black bear in the shadows of a forest or a snowy landscape in bright sunlight. In these cases, the camera’s meter might either overexpose or underexpose the subject.
With exposure compensation, the brightness of the subject can be adjusted manually, preserving details in both the highlights and shadows.
Your camera’s light meter is designed to evaluate the brightness of the scene and calculate an exposure that results in a “neutral” image – one where the average tone is a middle gray. However, many real-world scenes are far from neutral. For example, a bright snowfield or a white wedding dress will often trick the camera’s meter into underexposing the scene, rendering the whites as dull and gray. Conversely, dark scenes, such as a shadowed forest or a black bear, may cause the meter to overexpose the image, washing out important details.
To solve these problems, exposure compensation allows you to manually adjust the exposure to suit your creative vision. For instance, in the case of a bright snowfield, you could dial in positive exposure compensation to prevent the snow from appearing gray. In a dark scene, you could dial in negative exposure compensation to avoid a washed-out result.
Wildlife Photography Applications – Now that we’ve covered the basics of exposure compensation, let’s look at how it can be applied to specific types of photography, with an emphasis on wildlife photography. Wildlife photography often involves shooting in difficult and unpredictable lighting conditions. Therefore, exposure compensation is a critical tool for photographers who want to capture accurate and aesthetically-pleasing images.
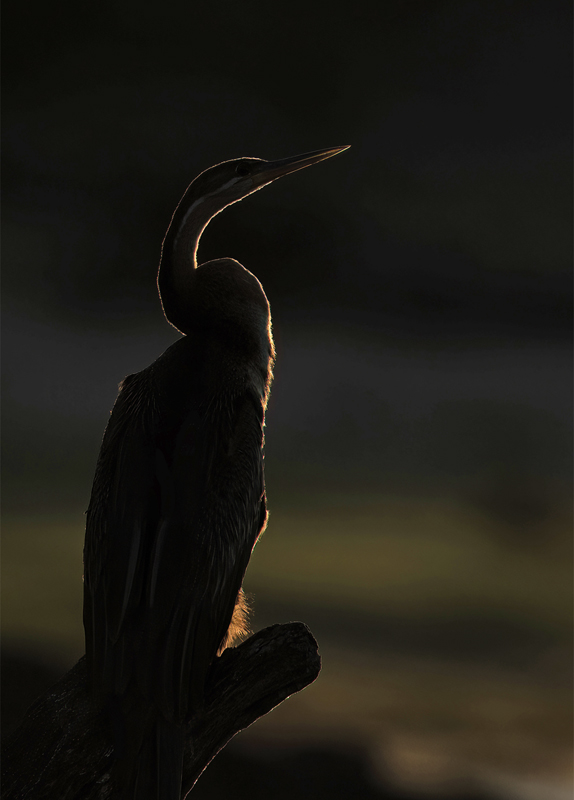
One of the most challenging lighting situations one might encounter in wildlife photography is the bright midday sun. The light is harsh, with high contrast and deep shadows. While this might not seem ideal for capturing detail, it can actually be perfect for dramatic silhouette shots. Here’s how exposure compensation can help.
Start by setting your exposure for the scene. Position yourself so the light source (e.g., the sun) is behind your subject, casting a strong light on it. Next, dial in negative exposure compensation, perhaps starting with -2 or -3 EV, depending on the brightness of the light. This will darken the subject, turning it into a silhouette. As you capture the image, evaluate the result. If the silhouette is too dark, increase the exposure compensation slightly to reveal more detail in the subject. Keep in mind that each adjustment on the dial corresponds to a 1/3 stop change in exposure. This fine control allows you to perfect the silhouette effect and create a visually striking image with rich contrasts.
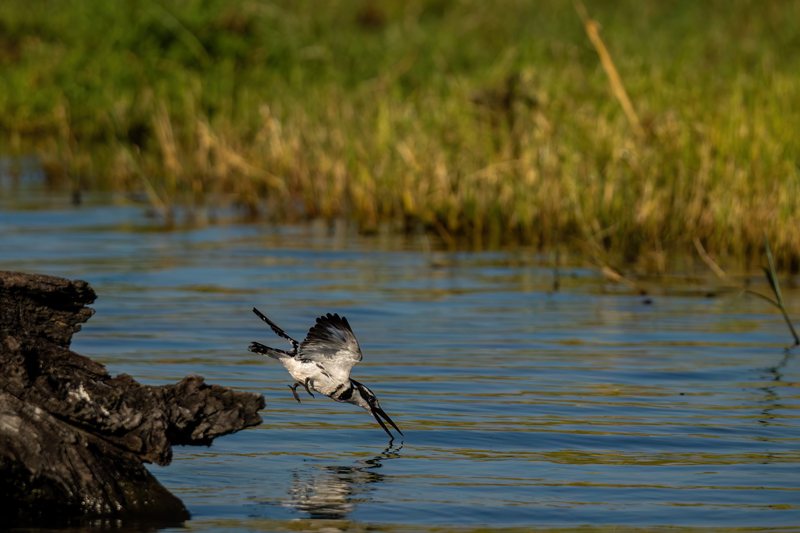
When shooting in bright, snowy conditions, your camera may struggle to expose the scene correctly. Snow reflects a lot of light, which can fool the camera’s meter into underexposing the scene and turning the snow gray. This is a perfect scenario for using positive exposure compensation. Set your camera’s exposure for the scene, but increase the exposure compensation by +1 or +2 EV. This will brighten the image and ensure that the snow retains its white, reflective appearance rather than turning gray. Also remember that snow is very reflective and can go blue from the bright sky or green from trees. Post-processing will help with those color shifts. Let’s just focus on not turning everything gray! Again, evaluate your shot and fine-tune the exposure as needed. You might discover that +2 EV is too much, so dialing it back to +1.5 EV might provide the best result.
While exposure compensation is an invaluable tool for dealing with tricky lighting situations, it’s important to keep in mind a few other factors when using it for wildlife photography. For example, bald eagles have both bright white heads and dark bodies, so expose for the scene and the body use the exposer compensation to not blow out his beautiful white head! Not all wildlife is created equal in the camera’s sensor, so trial and error is often needed, but practice can make it easier for you to dial in the right exposures. But there are other considerations for using exposure compensation when photographing wildlife:
• Movement: Wildlife subjects are often in motion. When photographing animals, make sure your shutter speed is fast enough to freeze the action. Adjust your exposure compensation around this setting, rather than using it as a way to compensate for slow shutter speeds.
• ISO Noise: In low-light conditions, you may need to raise your ISO to get a properly-exposed image. However, higher ISO settings can introduce noise. Use exposure compensation in conjunction with other settings to avoid unnecessary noise and achieve a balanced exposure.
• Bracketing: In certain challenging lighting situations, you may want to take several shots with different exposure settings. This technique, called bracketing, ensures you have a range of exposures to choose from and can help you capture the perfect shot.
In wildlife photography, where lighting conditions are often unpredictable, exposure compensation is especially useful for achieving the perfect exposure, whether you’re capturing a dramatic silhouette, a bright snowfield, or a shadowed animal in the forest. By understanding how exposure compensation works and practicing its use, you can ensure that your wildlife images stand out with the right amount of detail, contrast, and exposure.
With that background information in mind, let’s dive into some examples and real world situations to help you understand a bit more.
Using Positive Exposure Compensation: Brightening the Scene – While negative exposure compensation is often more commonly used to correct overexposure in bright scenes, positive exposure compensation also has its place in photography, especially when you’re trying to brighten an image or bring out detail in a subject that’s too dark. Although I personally don’t use it as often as negative exposure compensation, it’s a tool that can come in very handy, particularly in situations involving backlighting, high-key imagery, or subjects that are predominantly light in color.
Positive Exposure Compensation for Backlit Subjects – One of the most common situations where positive exposure compensation becomes essential is when you’re photographing a subject that’s backlit and you don’t want a silhouetted subject. Imagine you’re out in the field, capturing a beautiful wildlife scene where the sun is directly behind the animal, creating a glowing halo effect around its outline. While this can produce a dramatic and visually striking look, the camera’s light meter will be confused. Since the meter is trying to expose for the bright background (the sky or the sun), the subject itself will appear very dark, or even silhouetted, unless you adjust for it.
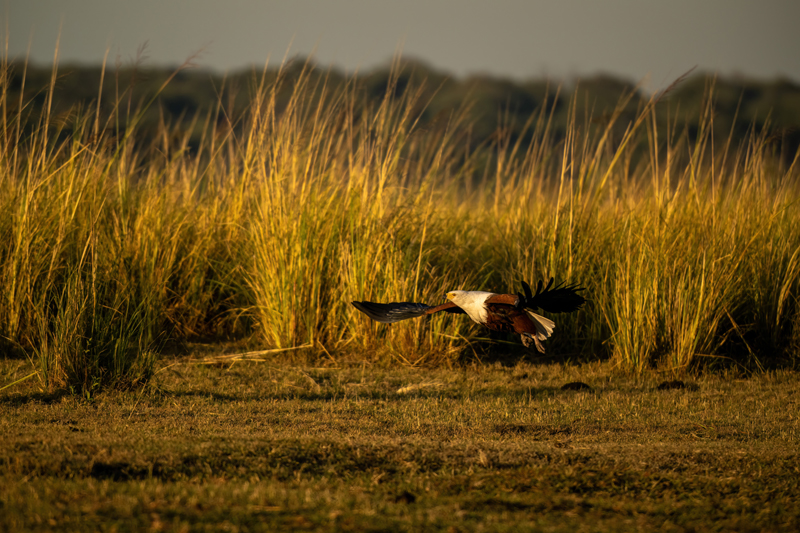
Without intervention, the animal or person will appear as a shadow against the bright background, and crucial details will be lost. For example, if you’re photographing a deer on a bright or mid-day situation, the deer might initially appear as a dark silhouette.
By using positive exposure compensation, you can bring out the details of the deer’s fur and face, while still maintaining a well-exposed background. Without it, you’d be left with a poorly exposed subject and an overly bright or blown-out background. This simple adjustment can save a shot that would otherwise have been disappointing.
High-Key Images with Positive Exposure Compensation – Another creative use of positive exposure compensation is when you want to achieve a high-key image. A high-key image is one that is intentionally bright, with minimal shadows, often used to create a light, airy, or ethereal feel. You can eliminate the background all together, making it completely white. I don’t tend to do this, but it often can look nice and it has a place also.
Without positive exposure compensation, an animal in bright light may end up looking too dark and contrasty. The camera will try to expose the dark subject properly, but this could result in a stark, shadow-heavy image. By using positive exposure compensation, you can lift the shadows and brighten the subject, creating a softer, lighter look.
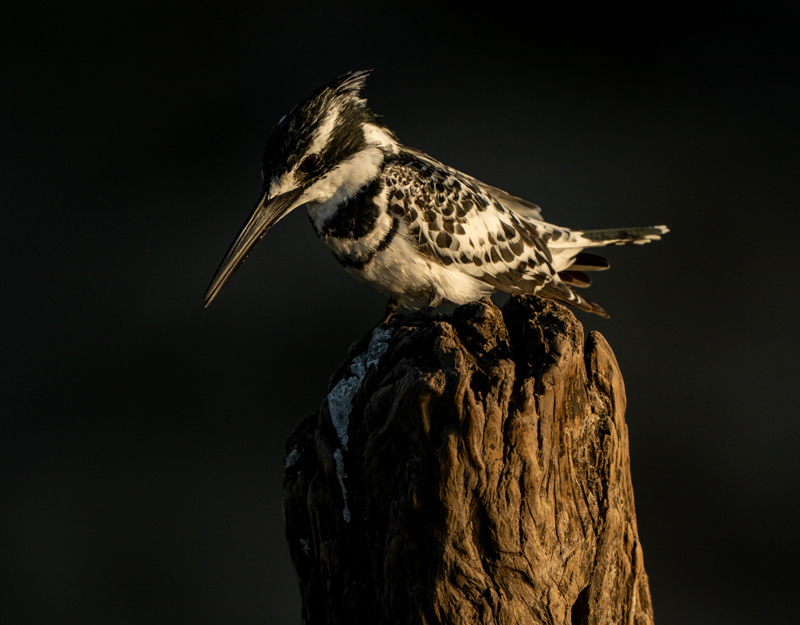
Positive exposure compensation can also be useful for managing background distractions. Let’s say you’re photographing a subject in an environment with a busy or distracting background, such as a field of tall grasses, dense trees, or a cluttered urban setting. By turning up the exposure compensation, you can blow out the background, making it lighter and less detailed. This technique is often used in portrait photography, but it can also be effective in wildlife photography, where you might want the focus to remain on the subject itself.
For example, if you’re photographing a bird perched in front of a complicated forest scene, increasing the exposure slightly can help “wash out” the background, making it less distracting and ensuring the bird stands out clearly. The lighter background will also provide a softer, more harmonious backdrop that enhances the subject rather than competing with it.
Positive Exposure for White-on-White Animals – In some cases, animals that are predominantly white can also benefit from positive exposure compensation. You may think that a white animal, like a polar bear, should naturally be captured in a way that ensures it stays white in the photo. However, cameras have a tendency to turn white objects into middle gray, because the light meter is calibrated to expect an average exposure around 18% gray. This means that even if you’re photographing a white-on-white animal, the camera will try to reduce the exposure to avoid overexposing the white fur, making it look gray. Very little detail will be kept in the snow or the animal. They will blend together.
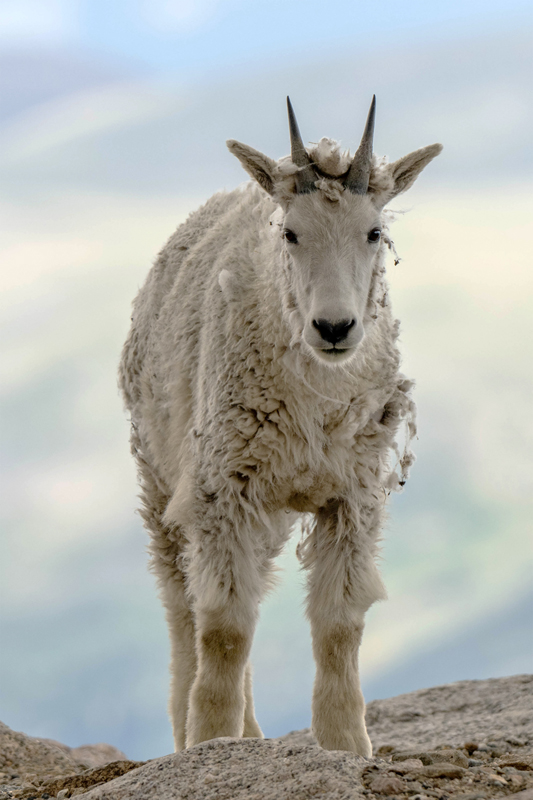
To counter this, you’ll need to dial in positive exposure compensation to bring out the true brightness of the animal’s fur. This adjustment will prevent the camera from darkening the white subject and will help preserve its details.
For instance, if you’re photographing a white snowy owl against a white winter landscape, the camera may try to expose the snow and the owl in a way that flattens the colors and reduces contrast. Using positive exposure compensation (+1 or +2 EV) will ensure the owl remains bright and distinct from its background, preserving both texture and detail. Without this adjustment, you might end up with an image where the owl is barely distinguishable from the snow.
While negative exposure compensation is often more intuitive for photographers, positive exposure compensation is just as essential for achieving certain creative effects and overcoming exposure challenges. Whether you’re photographing a backlit animal, working with high-key lighting, capturing a white-on-white subject, or dealing with distracting backgrounds, this feature gives you the control you need to make sure your images turn out just as you envision them.
By understanding when and how to use positive exposure compensation, you can ensure that your subjects are well-exposed, details are preserved, and your overall image reflects your creative intent. Although it may take some practice to master, positive exposure compensation is a powerful tool that can transform your photography and help you achieve the results you want, even in tricky lighting situations.
 Kory Bumgardner is a wildlife photographer who loves to travel the world in pursuit of exciting images. She lives in Genesse, Colorado, and is a Master Photographer, CPP, and Colorado’s PPA Councilor, and says she is married to the most supportive husband who makes all things possible. She has won some notable awards in her career but her true joy is helping other people win awards. Learn more about Kory at: www.facebook.com/korysbphotography or www.facebook.com/koryphotography. Check out her website at: www.whereskory.photography.com.


