


From Capture to Final Presentation
By Terri Butler
Texas School Instructor
When most of us started our photographic journey, we heard about the “rule of thirds” and maybe the “golden spiral,” but we probably didn’t get a good foundation in image composition. So, what exactly is “composition?”
Composition in photography might be described as the harmonious arrangement of the parts of the photograph in relationship to each other; or the pleasing organization of objects within your frame. The elements of composition include objects, points, lines, shapes, textures, color, and tone as well as balance, space, and patterns. In this article, we will cover three different workflows for applying composition techniques and discuss some tips and tools you can use to enhance both your understanding of composition and improve your overall final work. These workflows are (1) Image Capture, (2) Post-Processing, and (3) Art Composition. The first workflow to “think” composition is obviously at the point of capture. All great photographers will tell you to “get it right in camera.”
Here are a few tips for enhancing your in-camera composition:
Look for Triangles – Look for three visual points that exist in a somewhat triangular pattern. The viewer will connect the dots with their imagination and tie the elements together.
Use Frames – Shoot one object through a hole or space in another object such as overhanging tree branches or a rock formation or even a doorway.
Look for Symmetry – It’s all about finding balance in your image. Simply divide your scene in half, either horizontally or vertically – perhaps a building or a reflection into a lake or pond.
Look for Leading Lines – Create a path for the viewer’s gaze to follow to the main subject. This is one of the most underused compositional techniques at the point of capture. Use fence posts, sidewalks, stair railings, rows of anything in your scene, and line them up for the corner into your main subject. Guide the viewer’s eye to where you want them to look. And the lines don’t need to be straight!
Use Diagonal Lines – Diagonal lines convey strength and motion. The strongest diagonal line in any composition is from the bottom left corner to the upper right corner. In fine art composition this is known as the baroque line.
Find the Curves – Curves convey a sense of calm and nature. Take your view on a journey through your image.
Keep the Horizon Low – To emphasize the sky, use a low horizon.
Leave Space for Motion – When the main subject is moving, leave
negative space in the direction they are moving. Don’t crop them too close to the edge.
The second workflow opportunity to refine your composition is in post processing. Today, both Photoshop and Lightroom have an overlay tool available. You must be in the CROP TOOL first for the grid to appear on your toolbar. Use the “O” key to cycle through the various overlays and the Shift+O to change the orientation of the overlay (flip it).
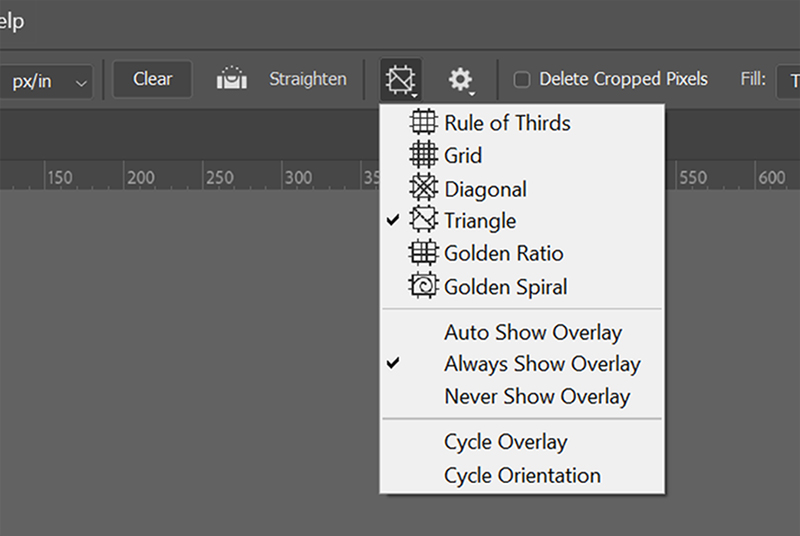
You can lay these overlays on your image and then crop the image to a pleasing composition. By placing your main subject with at points of interest, along diagonals, or within the final spiral of the golden spiral. Each overlay has its advantages and disadvantages, and you should test them out with your individual images to see which one works the best for you.
The third workflow that I want to cover in this article involves the more artistic side of photography, and that is composition. Many of us have taken our photography into the artistic world where were are practicing photo manipulations and photo compositing with our images. In these disciplines we have the added advantage of building our story and actually “composing” a layout for our image. This is were a third technique is very helpful and actually simulates what the old master painters might have done as they laid out their canvas. They used an armature grid.

You might have heard about Dynamic Symmetry as one of these armatures. The bases of dynamic symmetry diagonal lines from corner to corner with 90 degree angles (reciprocal lines) intersecting those two primary diagonals. This grid can be applied to any ratio of rectangle or square.
Baroque diagonal – The diagonal line that extends from the lower left corner to the upper right corner. This is the predominant diagonal as we read from left to right, and our eye naturally travels along this diagonal.
Sinister Diagonal – The diagonal line that extends from the upper left corner to the lower right corner.
Reciprocal Lines – A line that intersects a major diagonal (Sinister/Baroque) at a 90˚ angle.
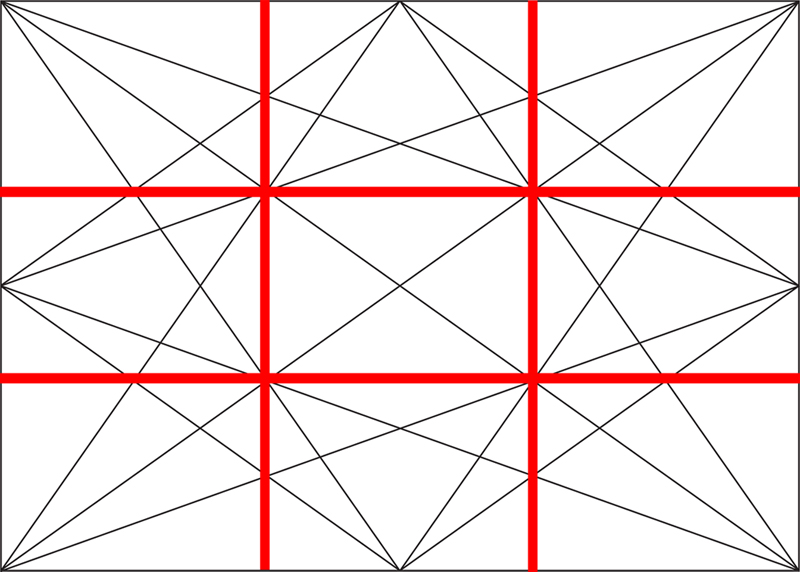
But the armature that I prefer to use in the HARMONIC ARMATURE. This overlay is comprised of 14 lines and while it has its foundation in the rule of thirds, it offers so much more flexibility for both photographers and artists to create a pleasing composition.
Using the harmonic armature you draw horizontal, vertical and diagonal lines that intersect these points of interest and ensure your primary and secondary subject follows these lines. Here are some examples and additional discussion on how to use this versatile composition grid.
As previously stated, the foundation of this grid is actually the original “rule of thirds” that we all learned as a basic rule of photography. So, you can see that this one armature grid gives you maximum flexibility to layout your composition with whatever technique you prefer.
Here are three composite examples where this armature grid was used to place the photographic elements into the scene. Line overlays have been placed on the images to demonstrate how the grid was used as a reference.
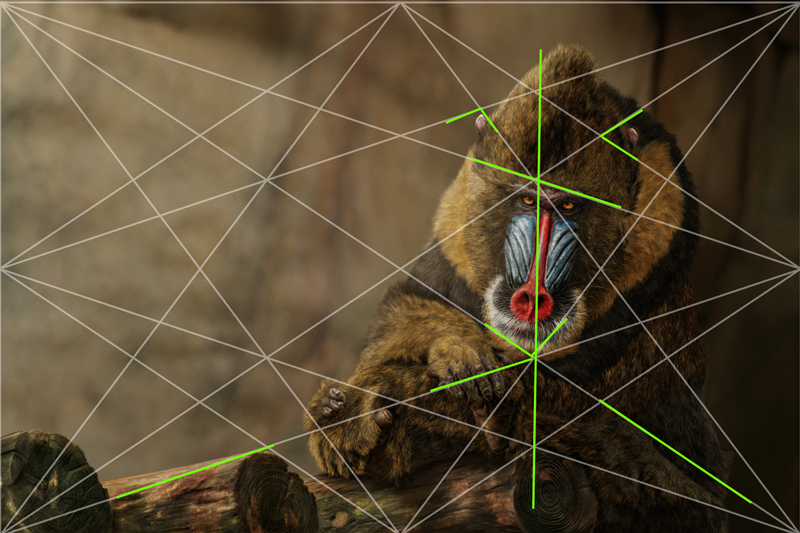
Example 1 – In example one of the armature grid, you can see that the eyes of the subject are along one of the diagonal lines, the nose is along a vertical line that intersects 4 points of interest, the knuckles of the upper hand follow one of the diagonals, and the ears are both framed by diagonals. The placement of this subject within the armature makes for a very pleasing composition.
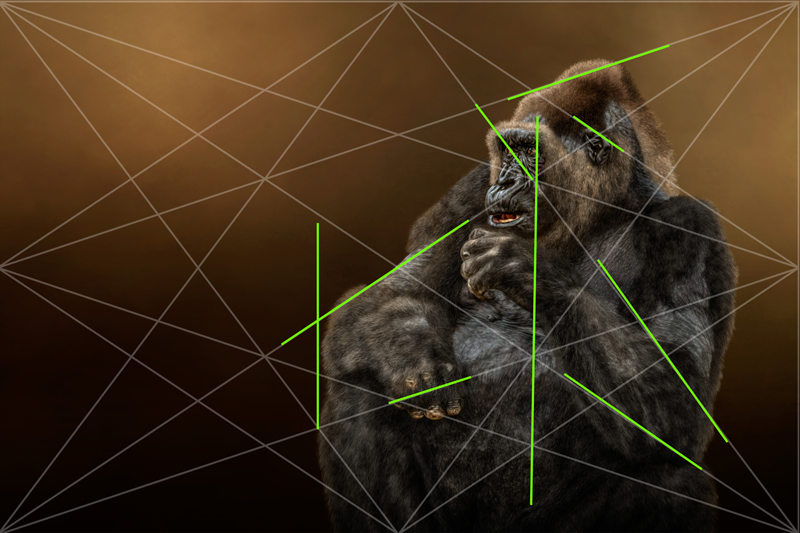
Example 2 – In this second example you can see that the subject was placed within the frame so that the eyes were either on a horizontal line or a vertical line of the armature. The knuckles again flow along a diagonal. The top of the head, the ear, and the angle of the arms all follow along diagonal lines within the armature. Again, resulting in a very pleasing composition.
Example 3 – I hope you will further investigate the use of armature grids for your photography and you will begin to think about composition at all points of your workflow; from capture, through post processing and into your artistic adventures of photo manipulation and photo artistry.
 For more than 12 years, Terri has been using and teaching Photoshop and digital painting techniques. After a 22-year career in the U.S. Navy and 18 years as an independent IT consultant, she returned to photography, capturing wildlife and nature images to use in paintings and digital composites. At Texas School 2025, Terri will be teaching a class on “Advanced Photoshop Compositing Techniques.” Learn more about her at www.pixelmixerart.com or check out her class description in the November/December issue of this publication.


