


by Randy Braun
With our aerial DJI drone cameras, we all have the choice to capture either JPEG or RAW photograph files. Each format serves its own purpose, but there are vast differences. A realtor, home inspector or hobby pilot may prefer JPEG files to save time and end up with a tidy, smart looking image straight out of the camera. My choice is to shoot RAW because I intend to spend time processing every selected image. In my opinion it is crucial to capture your photos in RAW format if you intend to work at a higher level in still photography.
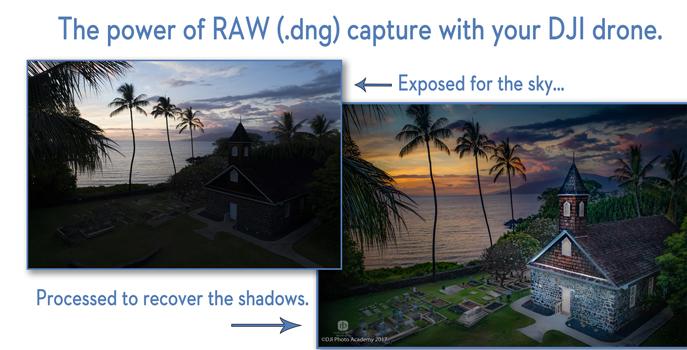
Shooting in RAW, I intentionally captured this scene with the church under-exposed by approximately 4 EV’s (exposure values or ƒ-stops). What was I thinking when I captured this original photo? Why would I intentionally capture a scene like this with a “wrong” exposure? Why not just use the camera’s light meter to make a “correct” exposure?
This is why; with experience in photography there eventually comes a gut feeling about how far we can push the exposure latitude of a digital image during capture. Sometimes, I want to override the camera’s computer to achieve a particular effect. In this case, I could have shot the curch scene with my Phantom 4 Pro in fully automatic settings and the outcome would have been a fairly average looking photo. In doing so, I would have lost most of the nice hues in the sky, and also lost the rich emotional feeling of the twilight hour. These things are important for me to convey to the viewer.
While flying the camera near this church at dusk, I knew how much shadow and brightness my RAW file could handle, and so I opted to expose the image more for the sky and later open up the shadow detail in post processing.
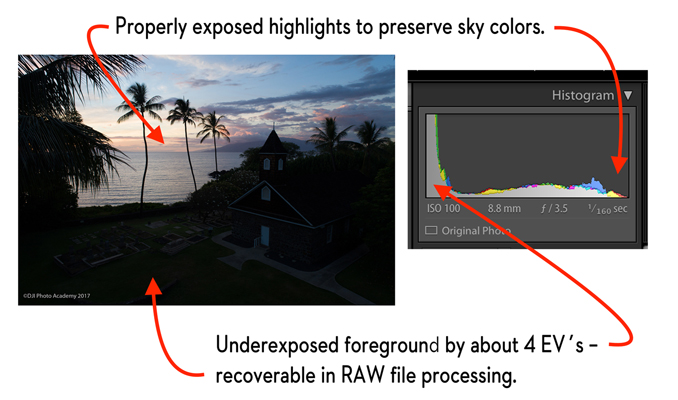
I never fly without first opening the histogram in the DJI Go 4 app. Remember that this numerically based chart represents the exposure values of a JPEG image (not a RAW file) and so in this case I ignored the heavy left side of the graph, indicating underexposure. Conversely, on the right-hand side of the histogram I was more careful to preserve the highlights because those are more delicate in post processing. An over-processed sunset leads to posterization or banding between subtle hues.
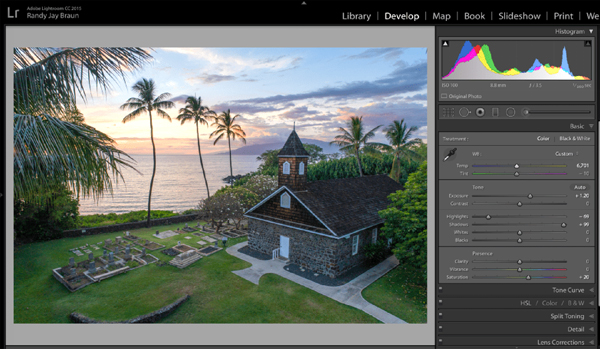
With the Phantom 4 Pro, I commonly expose a bit to the left on the histogram (one EV underexposed). This helps me retain more solid data in the sky. All of this is easier than it sounds. Let’s take a look at the basic slider settings I used in Adobe Lightroom:
In the very first panel (Basic Panel) I made 4-5 quick adjustments which recovered the shadows while preserving the highlights. It took me a total of 30 seconds. From that point I made additional adjustments in other panels to suit my personal taste. This is one of the biggest benefits. When you shoot in RAW you record all of the data from the sensor. This gives the highest quality files. And when it comes to your awesome images, you want high quality.
Look at it this way: all cameras technically shoot RAW. Yes, it’s true. The difference when you shoot in JPEG format is that the camera does it’s own processing to convert the RAW information into a JPEG. However, your camera is nowhere near as smart as your brain, nor is it as powerful as your computer. When you shoot RAW, you’re able to do that processing yourself. You can make the decisions on how the image should look, and produce way better results.
Shooting RAW has other benefits as well. You can record greater levels of brightness. JPEG records 256 levels of brightness and RAW records between 4,096 to 16,384 levels! The effect this has on your images is huge. Those additional steps of brightness let you make more adjustments (exposure, blacks, fill light, recovery, contrast, brightness) to your image without a significant reduction of quality, because there’s more levels to work with!
Another huge advantage is that you can easily correct dramatically over/under exposed images. Obviously you want to get the best exposure in camera, but sometimes things move fast (especially with weddings!) and you wind up with a dramatically over or under exposed image. With RAW you have additional information in the file, so it’s much easier to correct the image without a drastic reduction in quality. You can also recover more blown highlights and clipped shadows.
White Balance is more easily adjusted when shooting RAW. When you shoot JPEG the white balance is applied to the image and you cannot easily choose another option. With RAW the white balance is still recorded, but because you have way more data, it’s easy to adjust. Great white balance and color are essential to an awesome image, and shooting RAW lets you make the adjustments easier and faster, with better results.
There are many other benefits to shooting RAW including better detail and non-destructive editing. When you make adjustments to a RAW file, you’re not actually doing anything to the original data. What you’re doing is creating a set of instructions for how the JPEG or TIFF (another file format) version should be saved.
If you decide to shoot in RAW and learn post processing, there are several RAW file processing applications available; Adobe Lightroom, Adobe Camera RAW, Macphun Luminar, DXO Optics Pro and Capture One Pro, to name a few.
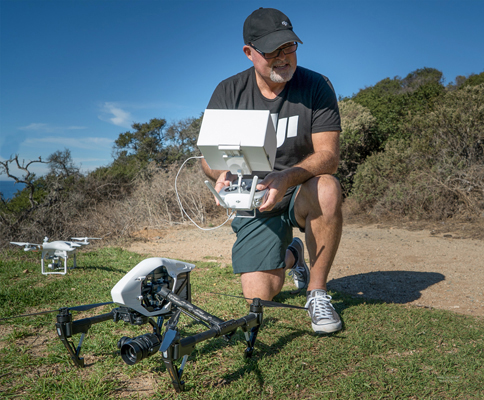
 Randy Jay Braun & Stacy Garlington are co-founders of the DJI Aerial Photo Academy, providing live city-to-city workshops guiding attendees to create better aerial drone photographs for work and for play. For more information on them, go to:
www.DJIPhotoAcademy.com


