


Grand Teton National Park
by
Alison Carlino
For over a year, a small group of friends and I meticulously planned a 17 day journey beginning in Rocky Mountain National Park, over to Grand Teton National Park, followed by Yellowstone National Park, and finishing up at Glacier National Park. Some advanced preparation went into making this a true trip of a lifetime.
Photographing the night sky at Grand Teton National Park on Mormon Row was just one of the highlights of the trip. Using the maps feature on www.darksitefinder.com, one can easily see the light and dark grays displayed in the Grand Teton/NW Wyoming area. That’s the color you want when hunting down the darkest skies. Using such a map is the first step when you consider travel plans.
“Capturing God’s creations in jaw dropping parts of the world is even more special when you plan, plan, plan.”
Next, we used Google Earth to research interesting landforms, buildings, or natural structures that would add compositional elements to our Milky Way or star trail images. Think in layers: foreground, mid-ground, and background in order to produce a more interesting story.
When photographing a night sky, it is helpful to know the phase of the moon by using www.timeanddate.com/moon/phases. In order to see the galactic core of the Milky Way well, you want to plan your visit during the new moon phase. Five days before or after the new moon still yields dark enough skies and gives you additional nights of shooting in case of clouds or rain. You’ll also need to identify the season of the Milky Way for your hemisphere. In the Northern Hemisphere, we have galactic core visibility from March through September with the height being June and July when the Milky Way is at its longest and stretches the most vertical. The Milky Way goes behind the sun in December and is not visible anywhere during that month. From March through May, the core just doesn’t rise that high, so expect to see more of an arch across the lower horizon.
The next step involves purchasing an app. But it’s the best $9.99 you’ll spend all year. PhotoPills helps me plan trips with GPS coordinates, save the data, scout during the day to drop pins for later that night. It will help you understand where and when the Milky Way core will rise and assists with focusing in the dark using the hyperfocal method.
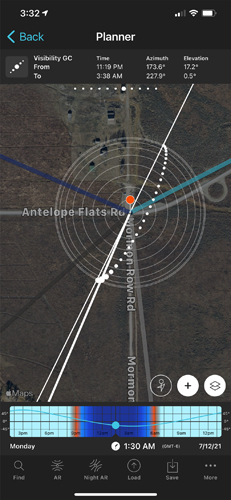
We arrived at Mormon Row during the daylight hours and scouted using PhotoPills’ Night AR (augmented reality) so we could visualize where the Milky Way would be positioned over the John Moulton Barn. We knew that the core visibility would be 11:19 pm to 3:38 am in mid-July and we understood the angle and elevation using the Map Planner feature. The white dots represented the Milky Way with the largest dots being the core in the southern skies. About 1:30 am is when we wanted to begin capture. This included light painting the barn from the side during the 20 seconds the shutter was open.
Assuming you are in a true dark sky zone under a new moon with little light pollution from nearby cities, a good starting exposure would be ISO 3200, f 2.8, 20 sec, and 3700 degrees Kelvin. The Milky Way is approximately 4800K (pale yellow) so I prefer a cooler sky (hence the 3700K). Using a cable release or time delay to fire the image will avoid camera shake and it goes without saying that a sturdy tripod is worth its weight in gold.
Make sure to turn off IS or VR when on a tripod. They will drain your battery and you need every ounce you can get for night sky capture. Turn off Long Exposure Noise Reduction as well because it takes twice the time to render the image. The camera automatically takes a second image with no light, records the noise so the camera can detect it, and then removes it. The luminance slider in Lightroom recovers the noise well enough for me. Shoot in RAW, on Manual, and use the most wide open aperture you can for your lens. On the PhotoPills app, you can use the Spot Stars feature that allows you to input your lens mm to confirm the shutter speed needed to keep from getting the “trailing” of stars (long dashes).
If your objective is to capture star trails, you want those dashes! We ran two camera rigs at night on this trip: one for star trails and one for Milky Way. To capture star trails, first identify the pattern you’d like to photograph. Where you point your lens in the sky truly matters! Remove filters from your lens and check PhotoPills to find out when astronomical twilight ends as this is when you should kick off your trail camera. This is typically 20 minutes after true dark.
There are two ways to create a star trail image. First, you can attempt a single exposure image, leaving the shutter open anywhere from 30 min to all night long. This is risky because of planes, satellites, passing cars, battery death, and lens fog. When using this method, we wrap the barrel of the lens with a lens warmer to prevent fogging.
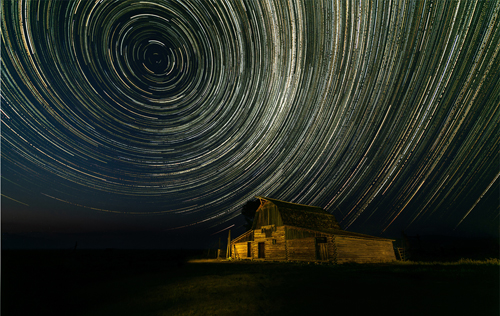
A safer way to capture trails is to shoot with the idea of “stacking” the images. Exposure settings are quite different here with the ISO at 400 to 800, f4, 20 sec, 1 or 2 sec gap for the interval. Having a camera body with a built in intervalometer, or plugging in an external one on the side of your camera, is essential for this type of capture. Take a dark frame at the beginning and again at the end and, if you do light painting, try to create those frames all at once. Trust me, it’s much easier to find the group of those files later on in Lightroom! If your battery is fresh, you’ll go home with 300-500 images that mostly look dark on your camera and then you’ll use a free software such as StarStaX.
Capturing God’s creations in jaw dropping parts of the world is even more special when you plan, plan, plan. The only thing you can’t change once you’re out there at night is the weather. We’ve waited around for hours to get 20 min of galactic core and it’s always worth it.
 Alison Carlino, Cr. Photog., CPP, is from Sugar Land, Texas. She will be teaching a class on “High School Seniors from Portraits to Sports” with an emphasis on lighting, posing, and marketing at the 2022 Texas School of Professional Photography. To learn more about Alison and her class, go to www.carlinosphotography.com or www.TexasSchool.org.


