


by Bob Coates
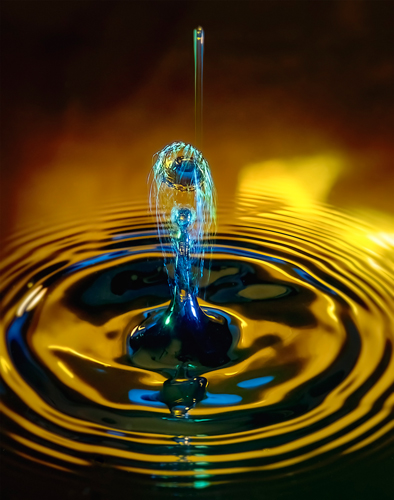
Title Image – “Orange Outburst” went Loan at Image at 2020 IPC. The image was taken with Lumix G9 with 45mm Leica DG MACRO-ELMARIT f/2.8 lens at 0.8 sec, f/11, ISO 400.
Before you attempt making images of water droplets, know that you should probably set aside at least a day or maybe two. Once you get into the capture process there are so many permutations and options with no guarantee that any one drop will be “the” drop and you’ll keep wanting to try “just one more” series. At least, that’s the way it works for me. This photography is not for the faint of heart!
The Gear – You can create your water droplets in many different ways. Some use a saturated cloth or eyedropper to create the drops with fine success. I tried that myself with no luck whatsoever. I recommend you invest in a mechanical dropper. They are made by a couple of companies. The one I use comes from Pluto Trigger. There is a unit that will fire your camera, flash and also control your water drops. The Pluto Trigger costs about $125 and allows your camera to do so many more things than just water drops. It can be used as a lightning trigger among other things. You can also get your drop dispenser tool, called a Pluto Valve, there as well for about $40. Full kit including an arm to support your valve can be had for $184.
This photography is not for the faint of heart!
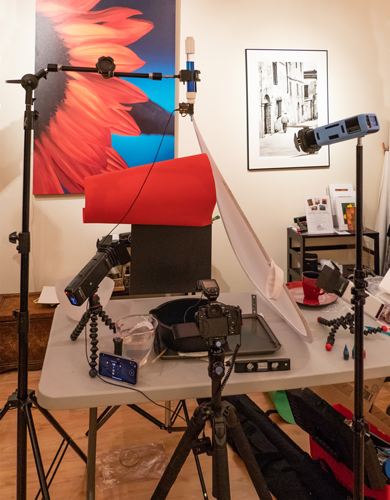
A Manfrotto Magic Arm is extremely helpful in positioning the valve in place over the water. A clamp holds the valve. When you are setting up the position of the water drops, watch where the water drop falls and put something in place to use to set your focus. Remove before shooting.
You’ll need a camera that has a hot shoe and a remote port and a lens. If you don’t have a macro lens to fill the frame with drops, extension tubes can bring the camera closer to the action. A tripod is a must, plus light stands to point your lights exactly where you would like them to point.
One to three or more speed-lights to freeze the action. If you want the little streamers, a studio flash can be added. Since it can’t fire the flash as fast as the speedlights there will be a different rendering of some of the splashes. If you don’t have enough lights, or just want to add another variable, note that you can add a mirror to the set to reflect light back from another direction. A scrim can help to keep specular highlights from becoming too dominant.
Background stand and paper. Black paper flashed with an underexposed gelled light can yield intense color. Know that adding more light to the gelled light will not increase the color. It will render it pastel.
You can use straight tap water. I find better results in adding Xantham Gum. Rather than get into detail on how to make the mixture, do an Internet search using the term “water droplet xantham gum photo recipe” and you’ll find videos on the process. Well worth the extra effort to attain smoother drops and shapes.

I used a black plastic bowl of water for the reflection and dropping pool. Black allows the color of the background to reflect fully. Fill the bowl as high as possible so the edge doesn’t show. Science says you can fill a vessel higher than its top because of surface tension. Well, let’s not get too sciency, but as a side note, know that you can put 32 dimes in a shot glass before it overflows after you have filled it with water. Make sure you have a drip tray underneath the bowl to catch spills as you work. Towels can help clean up water and dry your hands when you set something in the water where the drops will fall to set focus.
The process – Once all is in place it’s time to test. See how the lights render. Check the reflection. Start dropping water into the pool and set focus. Make sure you test the focus on a regular basis. You will be working with close tolerances and being slightly off focus can ruin an entire set of possible winner images.
If you are using the Pluto Trigger, follow the directions for starting to time the drops and camera shutter openings. I don’t recommend trying to get there quicker. We are working with micro-seconds (MS). Get set releasing a single drop. If your drops are not performing to your satisfaction a change in height may be in order. Start with 12-14 inches above the drop zone. Each time you change the height of the valve you will need to do the timing exercise again.
After finding success with a single drop the Pluto can be programmed to drop a second drop as the first drop is rising. You want this to happen at or near the peak of the rising droplet and crowns and different shapes will form. If the forms are messy you may need to ensure the valve is perfectly straight up and down to ensure the second drop falls upon the first. Even with the micro-second timing there will be a variety of shapes made. The smallest adjustments to the first, second or alignment of the drops will yield different resulting droplet configurations. Keep experimenting with all the variables.
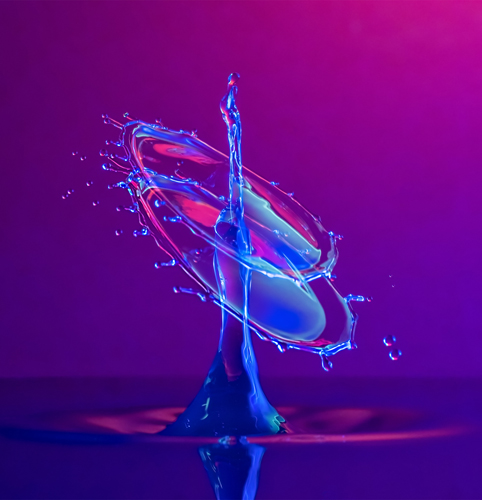
More variables – Did I tell you this is addictive? Here are some adjustments you can play with to give you even more varied results. Change the speed of the flash. Add or change gels. Add food coloring to the water. Change the height and angle of your camera. Switch lenses. Add a longer extension tube to get closer. Change the color of the background. Backgrounds are only limited by your imagination. The one showing above is with a colored Savage Paper background. Gel a flash with a snoot to vary the light. Add barn doors and feather the background light to add interest. I have also used a reflective background with a gel over it lit by a flash at various angles and directions. You can use cloth, photos, printed patterns or almost anything you like. I try to be careful not to overwhelm the droplets. Change the background to a gold reflector. Add shadows to the background. Change the valve height. Tilt the valve ever so slightly. Oh, I forgot to mention you can add a third drop at a different MS timing with the Pluto Trigger. You can also change the size of all the drops programmed by the Pluto APP.
Water has its own thoughts on how it wants to behave as well.
Working with water droplet photography is like photographing fireworks! You are never quite sure what you are going to get. You get to control many variables, but there is never a guarantee and always fun surprises.
 Bob Coates resides in the beautiful area of Sedona, Arizona, with his best friend and spouse Holly. He will be teaching a class at the 2022 Texas School of Professional Photography. You can see more of Bob’s work at bcphotography.com and coatesart.net. Read more photography articles by Coates at successful-photographer.com and photofocus.com.


