


By Malinda Julien
M.Photog.Cr,CPP
Texas is the land of BBQ and, as a food photographer, it is no surprise that I photograph a lot of it. Let’s face it, BBQ is just meat and muscles of the animals we consume. Photographing it as we taste it can be challenging. I think BBQ is pretty dramatic – the hunting, the butchering, all the spices, the fire, the big knives – so images of BBQ needs to follow suit. Drama means direct lighting, good shadows, and on-point color. The viewer needs to taste that photograph. Here are a few points I have found useful.
 Use flash • When I think of drama, I usually think of long exposures with directional lighting. However, ambient light tends to glare off the fat and moisture of the meat, creating a glow… not what we are looking for. I might drag a shutter on flash, but, generally, I use studio strobes with striplights and ISO 100/f10/ 1/125 somewhere around there). If I am trying to stop some liquid, I will use 1/160, and if I am trying to show just a part of the image, f2.8. If I am going to use a liquid, I shoot without pouring first, then shoot through and after the pour.
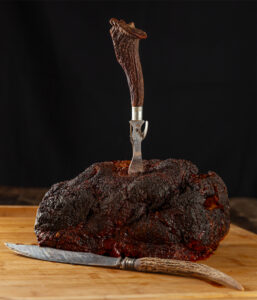 Equipment • I almost always use either a 100mm macro or a 90mm tilt-shift lens. A full-frame DSLR on a very steady tripod, shutter release, and tethering is a must. My choice for viewing images and releasing the shutter is Lightroom. This allows me to step off the set, which can be a bit tight with the lights so close, and still see the live image. Using the tether method to a laptop also keeps me from moving the camera as I move around. Food takes time, sometimes hours, to get just the right photo. Meat is no exception. The meat needs to be cooked to perfection and then allowed to rest, giving that tender look. Avoid meat that is cooked to well-done. It will look like a hockey puck. Go for 135ºF and pull the meat. This will be rare in most cases (if you want to eat it later, you can always cook it a bit more if you don’t care for rare). Note: Poultry has to be 165ºF to be safe to eat. However, still only cook to 135ºF so it will stay plump.
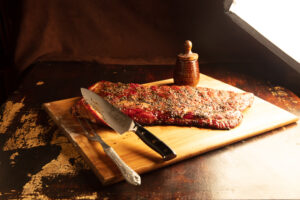
Shoot from the front with a POV (point of view) angle • I very rarely (no pun intended) shoot top-down on meat.
Light from the corner for a main light and some slight fill with fill cards or slight, small flash • I am usually about 4:1 or 5:1, depending on the client’s request. Start with light from low on the rear corner then begin with the slightest movements to rake the light across the meat showing texture. Next, add a little light raking across the other side to offer some fill. Ribs are long and low so they take a bit more lighting. The knife used belonged to the client, so it had to be lit so the logo showed. A combination of the two lights created are laxing image for a rather coarse subject.
 Temperature • The meat should remain room temperature. A lot of food is photographed cold, but meats need to sit, and the longer they are out, the better the shoot. The exceptions would be poultry, turkey, chicken, capon, etc. They will dry out more than a fattier meat. You need to work with them a bit faster.
Touching up the food • Some meats benefit from a brush of oil from time to time as the outside of BBQ is usually “bark” or the hard, almost burned edges or outsides of the meat. If you overdo this, the meat will look greasy. If you find it is a bit too wet, dot the oil off with a paper towel until you are happy with the look.
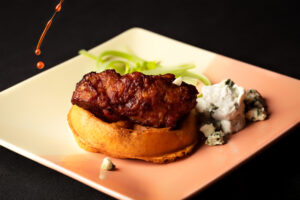
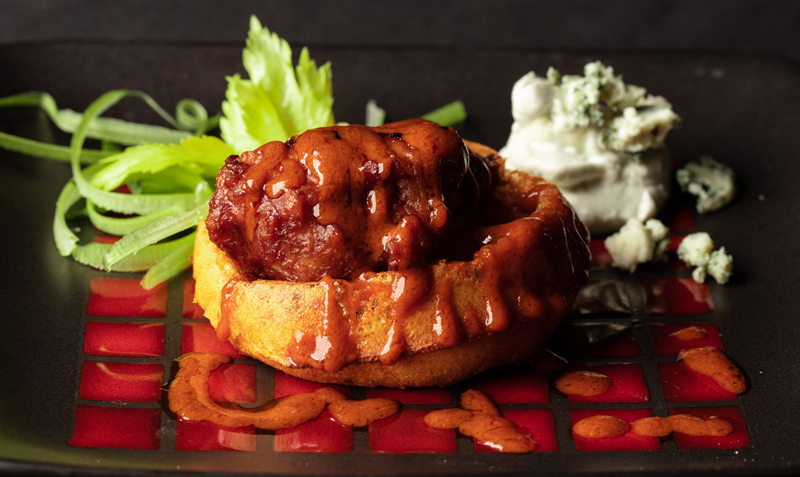
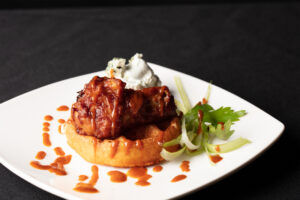 Plating • Meat needs something more than just a closeup. It benefits from a cast of characters to keep your image from just being brown. Using dishes, implements, other foods, sauces, salts, and the like can help bring the overall image to a delicious ending.
Dealing with rare meat and the juice • It should be noted the liquid coming out of rare meat is not blood but myoglobin (this is a protein which carries oxygen to the muscles). Even if we could convince people it isn’t bloody and explain myoglobin, for a lot of people, it is gross. Some are even fearful of it! Personally, I am a very rare meat eater, so I see it and it makes my mouth water. However, in most photographs we don’t want to see it. Therefore, letting that meat rest is always a good idea. As the meat rests, it re-absorbs the myoglobin and remains juicy, but not bloody This is why you never cut into freshly-cooked meat. It will loose all the juices and be dry.
How long? I rest meats for at least 30 minutes, depending on the size. A large pork shoulder might rest a full 45 minutes, chicken about 20 minutes, and beef depending on the size.
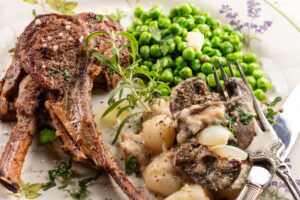 Small meats need companions • These lambchops (next page) are really small but a delicious meat to pull off the grill. I photographed this dish with traditional veggies. The green peas (which are frozen and just lightly thawed so they would stay plump and green), the pearl onions and mushrooms provide a monochromatic-style color palette. Here, the use of salt gave scale and attention while the fresh thyme added some movement. The silverware mimics the bone, creating a nice movement drawing our thought process away from the fact we are looking at a bone. Pattern on the plate is complementary with the peas and mirror the green peas between the bones of the lambchop.
Using non-edible ingredients to make meat look delicious • There was a time when food photography was more fake than it was real. The food was wasted and rendered inedible. There are still sometimes when we use inedible products to dress our food shoots. However, other than a little brush of oil all of these images are as they exist. BBQ is just too delicious to throw out – just wouldn’t be Texan.
Fire up the lights and the grill! Get started on photographing that Q!
Malinda Julien, Master  Photog.Cr.,CPP, is a commercial food photographer and owner of Julien & Lambert Photography and Phood Photo in Fort Worth, Texas. She is the author of the Sugar Biscuit Journey and Home Cooking Kitchen cookbooks, Paved Paradise, and ESSENTIAL books. Malinda is also the host of “Home Cooking Kitchen” YouTube™ channel and Instructor of photography through Julien & Lambert Photo Education.


