


by Thom Rouse
Have you tried the Color Lookup adjustment layers? Although it has been included with Photoshop for some time, it’s one of those features I’ve repeatedly overlooked until recently. Color Lookup adjustment layers are commonly used by video editors. I discovered their value when I was researching online tutorials looking for an effective method of creating a night for day look for an image. I researched a number of tutorials that I found time consuming and unnecessarily complicated. As I continued to search, I stumbled across the Color Lookup adjustment layer that I’d never used before. It is one of the many features in Photoshop that we tend to be invisible until we know about them.
A Color Lookup table (LUT file) is most commonly used for color grading by videographers for remapping the colors in an image to another set of colors. It essentially allows you to alter the color, contrast and brightness of an image with a single adjustment layer. My first use was for an easy night from day effect – a simple one click solution that was visually effective and vastly quicker and easier to use than many other relatively complicated techniques. I work visually and have no reluctance to using an easy one click solution instead of reinventing the wheel. In essence, a color look up adjustment layer allows us to store a set of multiple adjustment layers into one single adjustment layer. You can use the already available presets by adding a color lookup adjustment layer to a file and selecting a look from the drop-down menus in the properties dialog box. One click applies the look which can then be adjusted with opacity, layer blending modes, a layer mask, and even additional adjustment layers. You can add multiple ColorLookup adjustment layers as well other adjustment layers.
In these examples I used a simple fashion shot. Figure 1 is the original treatment, figures 2, 3, and 4 utilize the Night from Day Color Lookup adjustment layer with some layer masking and different layer blending modes. All were achieved far more quickly than individual treatments to each image which would likely have required three or more individual adjustment layers to achieve. Instead, a single Color Lookup adjustment layer was used on each.
There are approximately 40 different looks stored in the 3 color lookup drop down menus in the properties dialog box. You’ll find them in the adjustment layers palette or in the drop down list under the half circle at the bottom of the layers palette. Simply add a Color Lookup adjustment layer and explore the looks under the drop down menus in the properties dialog box. The examples here illustrate the NightFromDay.cube look from the 3DLUT drop down menu. In addition to those already stored in Photoshop, there are many others available for free or for purchase on the internet. Simply do a search for downloadable color look up tables for Photoshop.
But wait – there’s more!!! Have you ever spent a great deal of time creating a look for your image using multiple adjustment layers, opacities and blending modes? You get it just right and love the look, but when you try it again on a different image, you neglected to save the unflattened files and forgot exactly how you did it. Instead of working desperately to re-create a look or sliding in adjustment layers from prior projects, just get a look you like and export it as a Color Lookup table (LUT). Although you could record an action for all your adjustment layers, exporting a LUT allows you to save it with one click and apply it to any other image you wish.
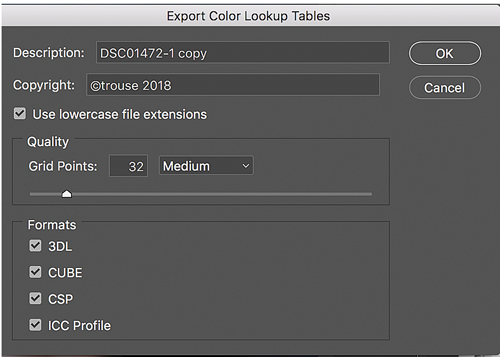
 To save a LUT, simply work on your image until you get a look you like using adjustment layers, opacities, and layer blending modes. The image must have a locked background layer (Any work you’ve done with layer masks will not be included in the file). Then, select File > Export > Color Lookup. Select any or all formats, but I would suggest saving them all – 3DL, CUBE, CSP, and ICC profile. The ICC profile allows use on other software and devices and is stored differently than 3DL, CUBE, and CSP.
A description and copyright info in the export dialog box when saving a LUT. A medium 32 grid point should be sufficient, but you can go to 64 or 128 for higher quality with significantly increased file size. Click OK and save to a selected folder. When you want to use your saved LUT, add a Color Lookup adjustment layer to an image and, in the properties dialog box, click on 3DLUT file to load your saved file. Navigate to your saved LUT folder, and press OK. You’ll immediately have the look you’ve saved with one click instead of having to drag and drop multiple adjustment layers or recorded actions.
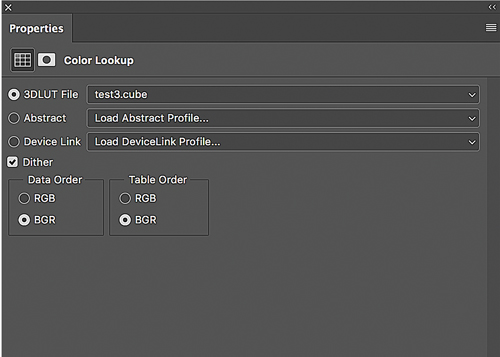
 You can utilize the layer mask in the adjustment layer as well as change the blending mode and opacities. I’ve found that using the .CUBE file allows you to change the “Data Order” and the “Table Order” in the Properties dialog box for some interesting alternatives for the look. I’m uncertain about exactly how or why this feature works but I work visually and I’m happy to leave the technical details to the engineers. If you are truly interested, I would suggest searching Julieanne Kost’s blogs. If anyone knows, she will.
To add your LUT to the drop down menu in the properties dialog box, copy your LUT file and paste into: Applications > Adobe Photoshop (CC 2017) > Presets > 3DLUTs. The next time you open Photoshop your LUT will appear in the drop down menu. Your saved LUTs can be used in any application that supports LUTs including Adobe Aftereffects, Premiere, and many others.
I would be remiss if I didn’t point out that Color Lookup adjustment layers are not the answer to saving every look you achieve in your images. In some cases, the adjustments made to each adjustment layer you’ve added may be very image specific. For cases in which you’ve done a lot of work on an image, I suggest always saving a layered file with all the adjustment layers so that you can drag and drop them into another image. In many cases, utilizing the Color Lookup adjustment layer will offer a quick one click solution and significantly speed work flow when you’ve achieved a look that works on a range of images. But for those looks you’ve created that are very image specific, having the ability to adjust each of the original individual adjustment layers may be useful.
 Thom Rouse, a Texas School ‘18 instructor, began his career as a portrait and wedding photographer in 1994. Based near Chicago, he now divides his time between commercial, fine art and commissioned fine art images with his clients as the central subject of his pieces. His conceptual fine art images utilize real world photographs, blended and manipulated to create an alternative to real world perception. Thom also lectures and teaches workshops on topics ranging from Photoshop as an artist’s tool, visual literacy and lighting and posing for figure studies.


