


The Making of “Acoustic Stage”
by Daniel Fermaint, Cr.Photog., CPP
I’ve played guitar all my life and became fond of the acoustic guitar early on. As I traveled the globe, I found the acoustic guitar was a great travel companion. With a competition season on the horizon, I wanted to create something “cool” with one of my guitars and chose one of my Taylor guitars as the subject.
The idea was to create an illustration for the Master Artist category and place a guitar player inside the guitar celebrating a fine instrument. Taylor Guitars has crafted some of the best guitars in the world, so I felt this was a great foundation for the illustration. For six months, I struggled with the best way to capture the images needed to create the illustration. I played with a few sketches to document what I envisioned, but I was still uncertain of how to capture the images. To get an inside view of the guitar, do I saw the guitar in half? Okay, that was an extreme thought, but still part of the brain storming process. Being familiar with triggering my DSLRs remotely, I wondered if I could place a camera inside the body and trigger it remotely. I then wondered how I could view the images after each capture. As it turned out, I owned all the equipment necessary with the technology to capture and view the images remotely.
The initial thought was to place one of my DSLR bodies with a wide-angle lens into the chamber of the guitar and trigger the shutter remotely using PocketWizards. I could then see the images on the iPad immediately after the capture. After removing the strings, I learned very quickly the DSLR body by itself was too large to maneuver through the sound hole of the guitar.
So, it was on to Plan B, which consisted of using a GoPro camera utilizing the RAW file capture capabilities. The GoPro app on the iPad allowed for remote triggering and viewing of the captured images. I never envisioned the GoPro RAW file format would have the resolution I required for a competition print, but I was proven wrong. The GoPro produced RAW files comparable to one of my DSLR cameras.
Camera Hero5 Black
ISO 1600
f/stop 2.8
Shutter Speed ¼ sec
Focal Length 10mm
Once the camera was inside the guitar, additional lighting was needed to illuminate the walls and bottom of the guitar chamber. Two small LED flashlights were used to light paint the captures. At first glance, the LED flashlights were too blue, so I added orange gels to warm up the overall tones. Without moving the camera, captures were taken with different lighting angles to ensure there were enough image options for post processing. Setting up the overall configuration turned out to be an involved process, so I only wanted to do it once.
To import the GoPro RAW GPR file format into Lightroom, the files were converted to the DNG format. This project was getting even more exciting once I was able to view the images in Lightroom! Having never seen the inside of an instrument I’ve owned for 18 years, I was amazed with the craftsmanship and architecture of the guitar.
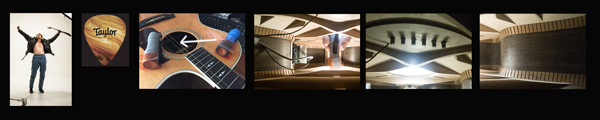 Seeing the inside of the guitar, I began to assess what needed to be edited to create an acoustic stage. The guitar’s pre-amp and wires on the left wall had wires going to a microphone and the bridge and these needed to be removed. I could have simply copied the right side and flipped the image, but because the guitar is a cutaway style body, there are curves on the right that are not on the left, so simply flipping the image would not have made sense. The wall on the left had to be rebuilt to cover the guitar’s pre-amp and wires while preserving the shape of the walls.
Another observation was the pegs and peg holes, which are used to hold the strings on the bridge, were not centered based on the camera angle used. So, the peg holes – with the pegs inserted – were centered and turned into overhead stage can lights. The guitar’s rosette sound hole was providing a backlight source, while the pegs were providing an overhead light source.
Once the stage was built, the walls looked plain, so a guitar pick was used to create sconces that one might see on a theatre wall to help add a sense of realism to the environment. With the acoustic stage complete, the guitar player was extracted and inserted. Color grading was then applied to tie all the elements together and provide the finishing touch.
The image was entered in the state PPA competition and crashed and burned with a score of 77. I sensed I had a winning image, but I was uncertain of what was missing. So rather than open a window and step out on the ledge from the studio on the first level, I opted to collaborate with a few image judges. After much discussion, I learned the judges felt the image appeared to be a cool stage with a musician and it just wasn’t that interesting. The overall presentation resulted in a score unworthy of a merit because the guide prints were not telling the story. The direction was to narrow the guide prints and draw an arrow on one of the guide prints to lead the viewer to look inside the guitar. The recommended changes were applied and as I prepared to submit the image to the IPC, I noticed my local guild had a print competition scheduled just prior to the IPC deadline.
So, because the image did not merit at state, I opted to run it by the local guild with the recent changes applied. The changes in presentation made all the difference as the image scored an 83 and received a 1st Place Distinguished Print Award in the Master Artist category at the local guild level.
Feeling more confident with the image, the image was submitted to the IPC for scoring in the Master Artist category. The image initially scored an 87 and was challenged by a judge who felt the image deserved to be in the next higher category. After a brief discussion by the judging panel, the score improved to a 92 and waited to be judged for loan. During loan judging, the image did not loan and quite frankly, I sensed the image had a good run. Fortunately, the image was brought back for another look and the judging panel graciously voted the image worthy of a loan image.
In the end, I was pleased with the journey this particular image had taken. It just seems more special when an idea evolved from a nugget floating around my thoughts to visually seeing it come together in print. Though every print that merits and ultimately loans can release additional endorphins, this one was a bit sweeter because this print represents the FIRST two merits in my journey toward the PPA Master Artist degree.
 Daniel Fermaint, Cr.Photog., CPP, is a portrait and commercial photographer, capturing high school seniors, the performing arts, and corporate photography. Together with his wife, Jennifer, Daniel runs a successful home-based studio in Plano, Texas.


