


by Steve Kozak
When asked to provide feedback on images created by photographers who are new to the business, I often hear them say, “Now, I don’t like doing posed pictures.” I have to bite my tongue because I want to say, “I can tell!”
You have probably heard it said that the camera adds ten pounds. The truth is, bad lighting and bad posing is to blame… not the camera. I think posing is scary for some photographers who are not confident to control all aspects of a session. In this short tutorial, I will show you some simple steps to help you improve your photography through attention to details that simply don’t get addressed unless you, the photographer, deal with them.
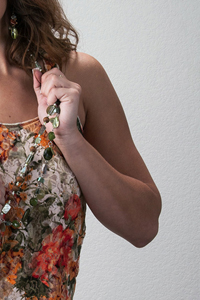
The above image represents so much that is wrong by not intervening and helping your clients create better poses. There is so much wrong with the image, it is a great place to start with learning to pose the body. Here are the issues:
- Shoulders are square to the camera
- Hips are square to the camera
- Elbow pointed straight into the camera
- Showing the back of the hand
- Right arm in tight to the body
- The entire pose is in a straight vertical line l
- Weight on the front foot.
So, what can we do to correct the lack of good posing in this image? Here are a few guidelines that will help improve this pose. Start at the base.

Turn the feet away – A pose can easily get off to a bad start with how the subject stands. With the feet turned to the camera, the body is placed in a straight line and the subject appears broader across the hips. Turning the feet away from the camera aligns the body to create an angle throughout the shoulders and hips. Placing the weight on the back foot helps this as well. Turning the body creates a more graceful line to the shoulders and more curves to the hips. Graceful lines and curves create more interesting movement to the body.Turning her feet and hips about 45° away from the camera creates curves and has a slimming effect on her hips by comparison.
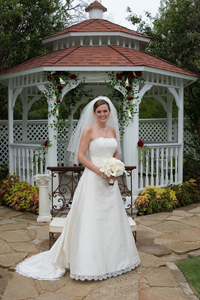
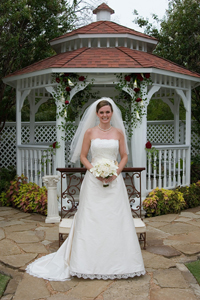
In the image (left) of the bride, she is posed with her feet and body turned squarely towards the camera. This creates broad shoulders and creates no shapely curves to flatter her upper body. In the image at right, her feet are turned about 45° and the weight is on the back foot. This creates a nice diagonal line to the shoulders and shows off her feminine form.
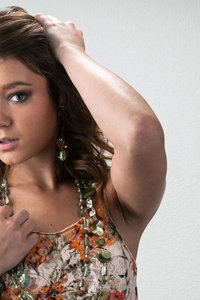
 Don’t Point Body Parts Toward the Camera – It is best to keep feet, legs, knees, arms,and fingers from pointing directly into the camera. Anything that points toward the camera appears larger and possibly distorted. The left image is greatly improved upon by not pointing the elbow toward the camera. Instead, lower the elbow and use the bent arm to create a diagonal line. One of the first rules of posing I ever heard was, “Anything that will bend… bend it.” That is still a pretty good “guideline” to use. I try to say “guideline” instead of “rule” because there are always compelling reasons to go against conventional wisdom.
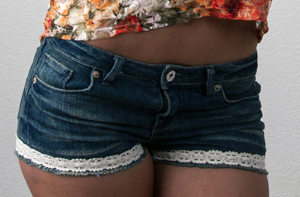
 Create Space Between Arms and Body – Arms held tight against the body tend to give the appearance of added weight. Opening the arm to create space between the arm and body has a trimming effect. This is a guideline, not a rule. For example, on a heavier subject, I often use the arm close to the body to “conceal” weight.
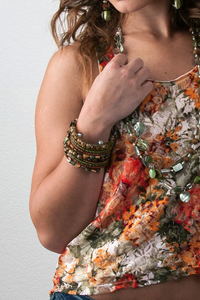
Don’t Show the Back of the Hand – The back of the hand creates a large area of flesh tones that may compete with the face. Typically, you try to photograph the side of the hand.
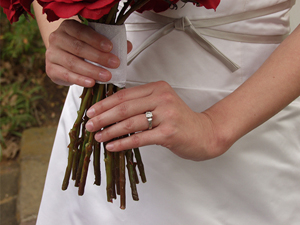
Bend the Wrist – Bending the wrist creates a thinner appearance and nice lines. Bend the wrist downward (towards the ground). In other words, lift the hand upward rather than allowing it to hang downward.
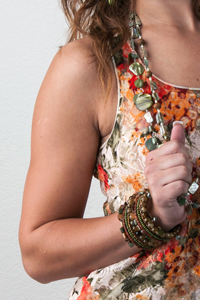
Before and After – So here are the improvements I made to the original pose.
- Turned the feet to 45 degrees
- Hips turned 45 degrees to the camera
- Elbow pointed away from camera
- Bent the wrist and photographed the side of the hand
- Moved the right arm away from the body.
These corrections create a more flattering pose.
A curvier body, leading lines and movement created by the arms and opening the arms from the body show her figure in a much more flattering way.
 Steve Kozak is the Executive Director of Texas PPA and an instructor at The Texas School of Professional Photography. Steve has helped countless numbers of photographers turn their passion into a profession and their photography into profits. With his class, you will gain a wealth of knowledge and a unique insight into creating images at a professional level and how to price and sell your work so that you can keep on doing what you love. Learn more about his class at www.TexasSchool.org.


