


By Ralph Romaguera
Early photographers used large windows on the top floor of a building to control the light on the subject. One level of windows were on an angle for the separation of the subject and for the hair light. The large vertical side window was the main light source. Windows were usually facing north to get the beautiful, diffused light. The amount of light and control of the light was accomplished with cloth shutters.
Back in the early 1970s, when I was first starting my business, there was a lab in Dallas that was sponsoring seminars every couple of months by some of the Masters of that time. Monte Zucker was one of them. He was an expert wedding photographer and an expert presenter. From the platform, he demonstrated his “Monte System” which consisted of a Smith-Victor hot light pointed into an umbrella and a Larson silver reflector for the fill side of the face. The Monte system produced a beautiful Rembrandt lighting on his heart-felt poses of the bride and groom.
Romaguera Photography is a hybrid business and we photograph studio portraits in addition to being in the volume school business. For years, we have been working with strobes to get that larger depth of field to make sure the image was sharp. The cameras we used in school work like the Camerez ZII camera were beast and definitely not auto focus like our Canon R6. The newer cameras have “eye detection” and can operate at a much higher ISO. In fact, in the studio, we are working at an ISO of 2500 with no noticeable digital noise.
Today we are using “Nanlite” constant lights on our subjects, sometimes through soft boxes and sometimes through the ‘Level Up’ system. Nanlites are heavily used by the cinematography folks but are great for the studio portrait photographer. While there are a few levels of units, the Nanlite 300 FS is our light of choice. We also use the ‘Forza 60c”’as accent lights.
The first tip of using constant lights is that you must be aware of the ambient light where you are working. If you can, turn off the overhead lighting and/or put some sort of block to the windows. It is imperative that you understand the difference between reflective and incident light readings. By using an incident reading (that’s the dome on the meter pointed from subject to light source), you will get the correct color tone of your subject, regardless of the subject’s skin tone.
Yes, you do need a light meter so that you are not guessing about your readings! Depending on the brightness of the ambient light, we sometimes use strobes to overpower the ambient. When we do, we use the Godox 300, a handy but powerful small battery strobe.
 There are many reasons to use constant lights. The first reason is, “What you see is what you get!” The next reason is to enhance the eye color. The subject’s pupils are smaller because of the brightness of the constant light. Constant lights are also an easy tool for training purposes. Of course, the next advantage is obvious… the light is constant! In the volume photography world, a photographer is usually hired by the principal upon the recemmendation of the yearbook moderator. One of the primary objectives is to have consistency in the look of his/her yearbook and constant lighting meets that objective.
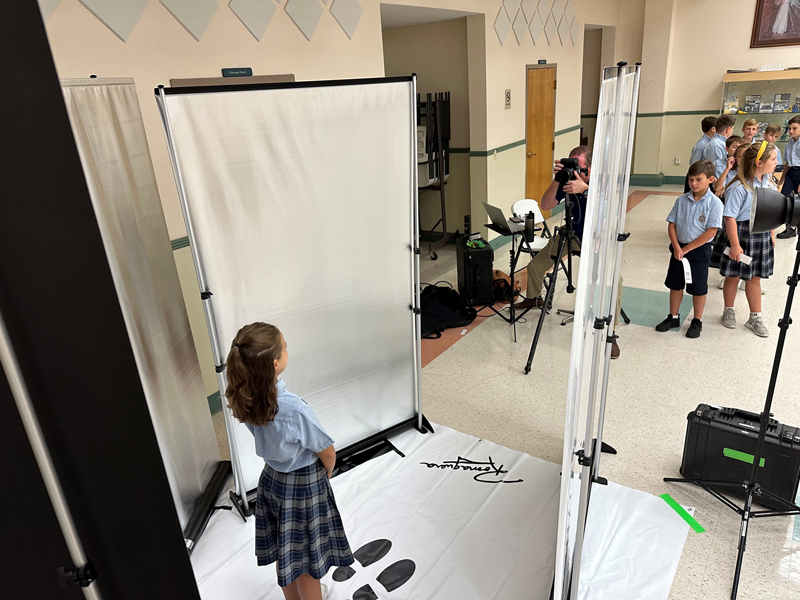
The LVL UP (Level Up) screens are a new look to an old system. In the 1980s and 1990s, Dean Collins had a system made with PVC piping and material that went over his system. On a personal note, I had the privilege to study with Dean at the Texas School of Professional Photography. The LVL UP system typically consists of four “banner” stands. One is translucent, becoming the main light. Two are reflectors and another is a background.
I usually light from the left, since we read left to right. Therefore, we put the translucent on our left with the one light about 24 to 36 inches from the screen and feathered to the right towards the first reflective screen. The two reflective screens are positioned in a “V” arrangement with the second reflective screen being used as a kicker and separation light. In order to have consistency from one location to another, we had a floor mat made with marks showing exactly where to position the stands, making it easy and repeatable for all the staff.
Another advantage of the LVL UP system is that it reduces eyeglass glare when a student has his/her face pointing directly toward the camera. It also eliminates the student’s reaction to the flash of a strobe. In addition, it is great for schools that have special needs children who may be affected by flashing lights.
The last tool in our studio/school tool kit is AI retouching by SkyLab. In just seconds, it can retouch skin, remove braces, and automatically retouch eyeglass glare.
You have everything it takes to be in the volume business. You probably have the lights and the backgrounds. What you don’t have can easily be purchased for not a large investment. Many of the labs have the necessary software and educational programs to train you.
Whether it’s 1880 in a New York studio, 1970 with Monte Zucker, the 1980s and 1990s with Dean Collins, or 2023 with the LVL UP system, constant lighting through large diffused material can produce some extraordinarily beautiful lighting.
 Ralph Romaguera of Metairie, Louisiana, began his photographic journey in the U.S. Navy in 1968. Throughout his career of nearly five decades, he has studied with world-renowned Masters, honing his craft with each lesson learned and has shared those talents with countless others around the world. Learn more about him at www.Romaguera.com.


