By Dave Montizambert
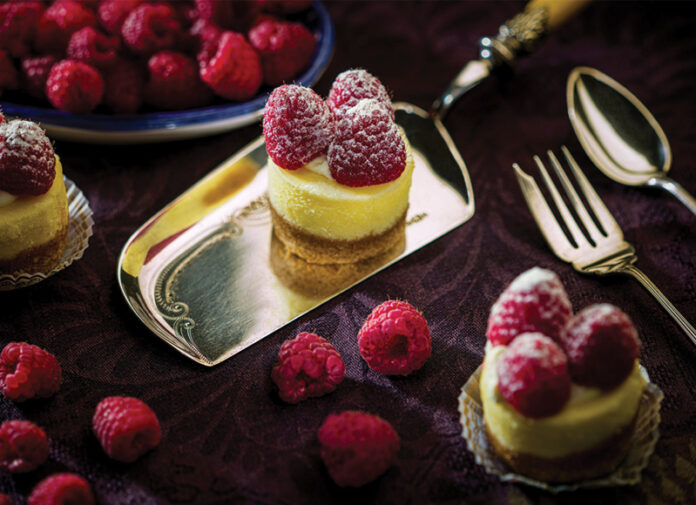
Lighting shiny objects, like the shiny silver-plate server (actually a silent butler) sitting under the main raspberry cheesecake, in the image above, requires different knowledge than lighting people. The surface of human flesh is much more textured than the surface of a highly-polished piece of silverware, and so any reflections of light sources (specular highlights) showing up on flesh are broken up by the skin’s rougher texture, giving us some sheen rather than a recognizable reflection of the light source causing it. In this session I’m going to delve into a simple control that all photographers should know but probably don’t. This simple, yet important little gem really helps for better lighting on shiny things and should alleviate many frustrations when photographing shiny objects. In short, it is the Camera F-Stop!

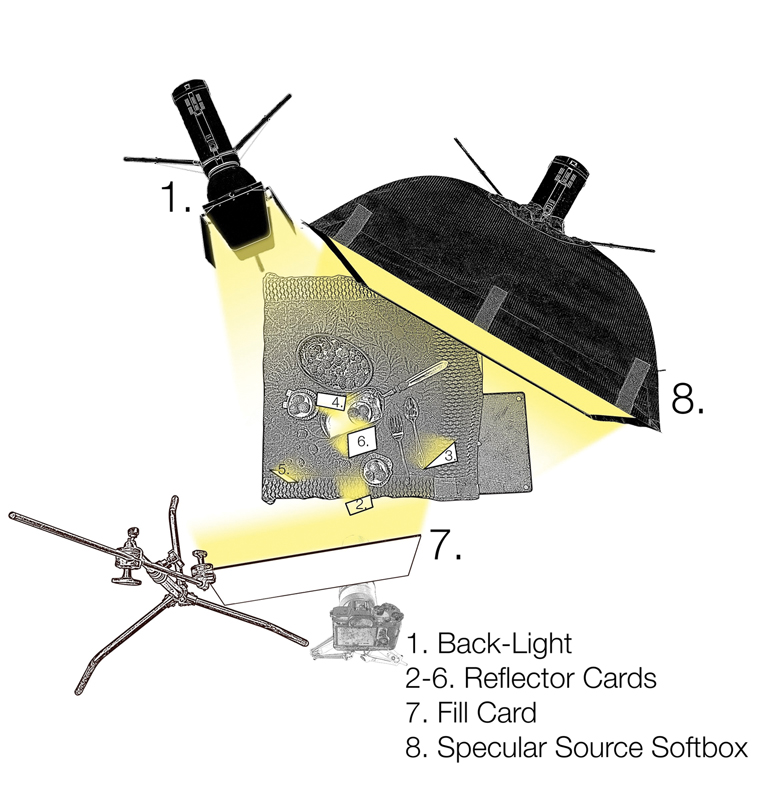
To light this shot (see diagram above), I decided on constant light rather than strobe/flash lighting because it was really cold in the studio, and I needed to warm up. Seriously, I used constant light for no good reason other than the fact that most of the time I light with strobe and thought I would change it up a bit. The subjects are lit from down low and from behind by a 650 Watt studio strobe modelling light. This light is pointed up a bit so to feather some of the light intensity off the backs of the subjects while increasing light intensity passing overhead.
Five small reflectors (silver cards) redirected this very bright overhead light back down onto the subjects to spot-light key areas. A white fill card was raised up high in front of the set. It also caught some of this stray light and directed it back down onto the set thus brightening the shadows slightly. A softbox was strategically placed to the camera-right side of the set to create specular light form over the highly-reflective silent butler. This specular highlight’s sole purpose was to help draw your attention to the cheesecake sitting upon it. To prevent this highlight from drawing all the attention, I made sure that its edge was soft because soft edge transfers draw less attention than hard edge transfers.

Controls for specular edge transfer:
• Surface Efficiency – rough or smooth subject surface.
• Camera F Stop – increase/decrease DoF.
• Incident Distance – distance from light source to subject.
• Reflective Distance – distance from camera to subject.
• Motion of Source – shake light source to blur specular.
• Distance of Origin to Diffusion Source – distance of light producer (ie. strobe tube) to light-source fabric (ie. white material stretched over scrim).
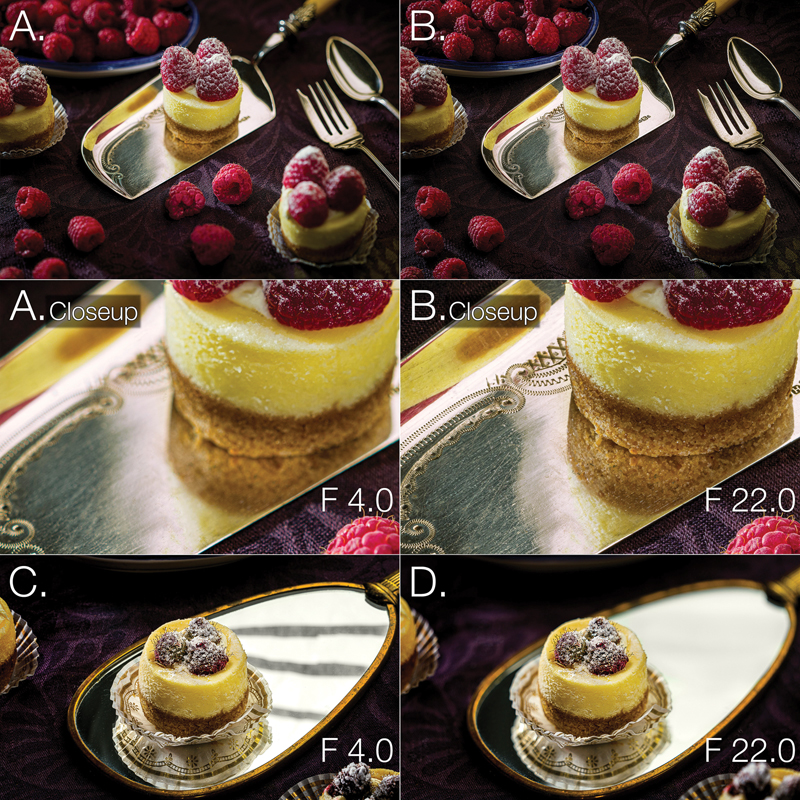
If you set your camera to a small aperture opening such as F 22 like I did in Image B, there is a much greater chance that the specular highlight – in this case a reflection of my soft-box on the silver server – will appear somewhat sharp as we see here. Now look at Image A Closeup – which was shot at F 4 – then compare it to Image B Closeup. The edge of the specular highlight in former is more out of focus or, we could say, more soft edged than the latter. To express these differences in proper technical jargon, we would say that Image A has a “Soft Specular Edge Transfer” and that Image B has a “Hard Specular Edge Transfer.”
A silent butler is a fancy little dustpan with a miniature broom-like brush. These were used in earlier times to sweep crumbs and other food debris off tablecloths between courses by a butler or waiter. They are mostly out of use today, but these antiques can still be found. My silver-plate crumb catcher, in Image B, is quite old and so its shiny surface is a little tarnished despite my heroic cleaning and polishing efforts. The reflection of the softbox on its surface is well within the depth-of-field created with my F 22 aperture setting, yet it does not appear perfectly sharp. Also, its surface is a little rough and distorted due to poor craftsmanship and so is not quite as smooth as a mirror. This slight surface roughness breaks up the reflection a little, thus slightly softening the edge of this specular high-light. In lighting technical speak we would say that the silent butler has low “Surface Efficiency.”
Setting your aperture to F 22 increases the chances that a given light source will appear sharper on the surface of your shiny subject. When you focus on the surface of an object, your depth-of-field doesn’t just stop at that surface. It extends into the reflection. So, if a light source were 12 inches away from the “focused-on” shiny surface, the distance of that source would also be 12 inches away from the surface inside the reflection. At F 22, the DoF would extend out much further from its surface than at F 4; the specular highlight would appear much sharper (harder edged) on the subject’s surface at F 22 than at F 4.
Larger aperture openings are a viable solution for hiding light-source imperfections such as wrinkles, creases, and stains as well as fabric texture and soft-grid modifiers; these unwanted spectacles can show up as part of the specular highlight on the shiny surface of your subject.
To better demonstrate this and to make it really obvious, check out Image C and Image D, I’ve added some tape over the softbox’s front fabric to represent wrinkles. I also swapped out the less than perfect surface of the silent butler with the distortion-free surface of my wife’s antique hand-mirror so you can see a per-fect reflection of the taped-up light-source. Notice how the tape shows up in the specular highlight at F 22 and is all but gone at F 4. At this wider aperture, the depth-of-field is so shallow that the tape is way out of focus, almost gone! As you can see, this camera F-stop control is a great way to help reduce light source imperfections, thus reducing your frustration making you wrinkle free too! Better than Botox!
 Dave Montizambert lectures internationally on lighting, digital photography, and Adobe Photoshop. He is also a published author having written two books on lighting and digital photography (www.montizambert.com) plus numerous magazine articles on these topics in North America, Europe, Russia and Asia. Dave produces “DaveOnDemand” (www.montizambert.com) lighting tutorial based photo-training and also creates lighting & Photoshop tutorial DVDs for www.software-cinema.com & www.PhotoshopCAFE.com/video. Dave is available for lectures and workshops in your area and can be reached through MontiZambert.com


