


Using Today’s Continuous Lighting
by
Doug Hansgate
Hollywood glamour images from the 1940s and ’50s are very popular now and with good reason. The masters of the age knew and breathed light into every image. They didn’t have strobes or soft boxes – only harsh hot lights and the will and knowledge to control that light for cameras that most modern photographers may struggle to understand.
This lighting genre has intrigued me since my early photography days in the 1970s. I love creating images that sing of the harsh contrast lighting of the period. For many years, I used only hot lights to create still images and have studied the masters throughout my career. After teaching this style of lighting around the country to many students and professionals alike, I’ve seen the problem has always been getting the appropriate equipment into the hands of would-be aficionados of the style. Until recently that would have entailed hauling hot lights to locations and then having the appropriate power to be able to use them. (15 amps per light!)
Then came the advent of continuous lights. I used and taught with some of the “new” 2005 continuous light systems from Westcott including the TD5s and then the Westcott SkyLux which was a 1000-watt second continuous light with a Bowens mount. Terrific for the time, but costly: originally around $2,000 per head. Add in light modifiers, snoots, barn doors, flags, gobos, and soon you could easily spend $15K in a studio setup… well beyond what most wanted to invest for a stylized shot.
The savior to this genre… modern day continuous lights and higher ISO capabilities of our camera systems. Although there are quite a few on the market made by a variety of manufacturers, I have personally used Nanlite products for the last five years. They have proven themselves to repeatedly produce the quality of light that I want (CRI index of 95) with the adjustability that I need and a price that is affordable for a piece of professional gear.
Yes, you can buy a cheap knockoff, but these lights take a beating and just plain work. I use a variety of these lights including the FS series that have a standard Bowens mount and the Forza series that have two different mounts. The Forza 60 and 150 come with an FM mount that looks like a Bowens mount and acts the same with the classic quick snap rotating lock and the newer Forza 300, 500, and 720 that have a true Bowens mount.
Why so much discussion about what mount they use? The last thing I want is to have a bunch of different mounts when I am looking for that perfect modifier. Even the Forza 60 and 150 come with a very nice adapter to use standard Bowens mount modifiers. I don’t know about anyone else, but I have more modifiers than you can shake a stick at. Mostly grids, snoots, grids for my snoots, barn-doors, Fresnel lens, and even some custom smaller snoots when I need just that small point of light. And I’m never without Cinefoil to make my own modifier.
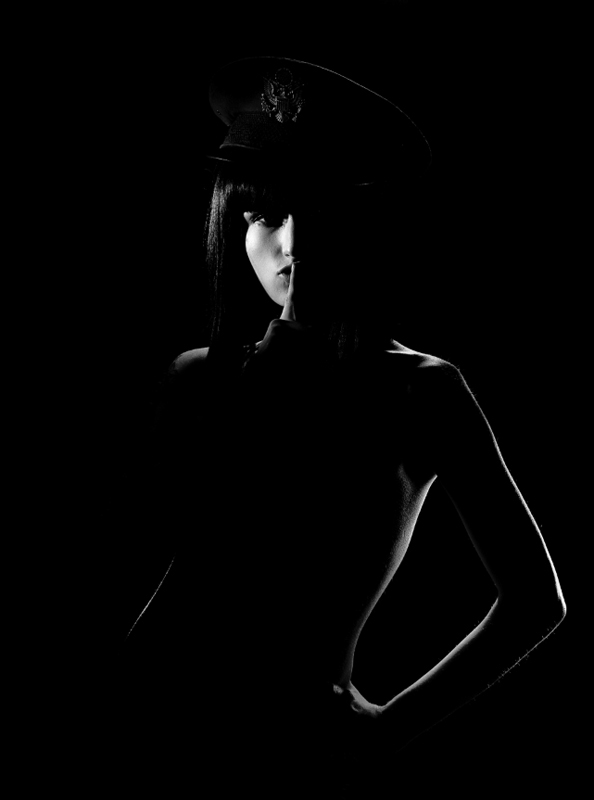
Why all these modifiers? Take a close look at the image above that was taken with a series of modifiers, and tell me how many lights you think were used. Let me help you. Obviously, the split light on face, the top of the hat and left shoulder, her left side, her right hip, and finally a small snoot to light the emblem.
I usually build my images one light at a time – measuring each light output with a Sekonic light meter, then moving on to the next light. One of the things that I love about the Nanlite system is that I can control all of the lights through an app on my phone. No more running around the set trying to set lights or having assistants do that. The app allows you to control multiple lights and to assign a name to each light so it is easy to find (e.g., stage left key, stage right background, etc.).
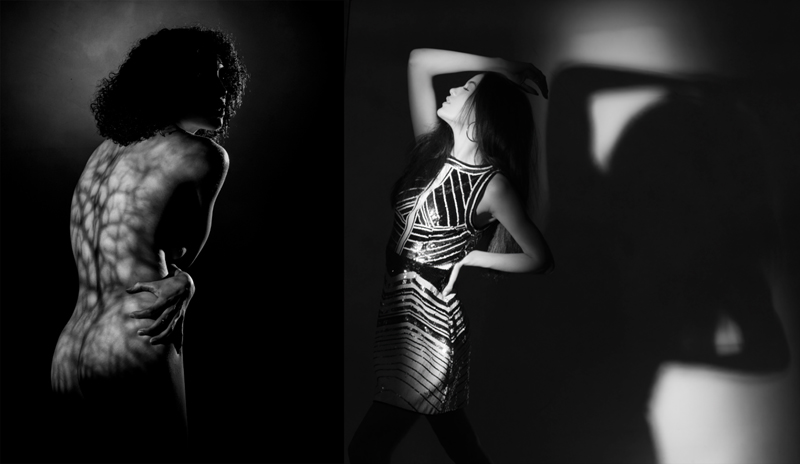
Look at the image below and notice that the diffused shadow area (between full dark and full light) area is very small. That area is called diffused shadow and is generally a great indicator of how small the light source is that is hitting your subject. The harsh shadows (like the shadow of her nose) tell me that a small light source or a light source very far away is responsible for lighting our model.
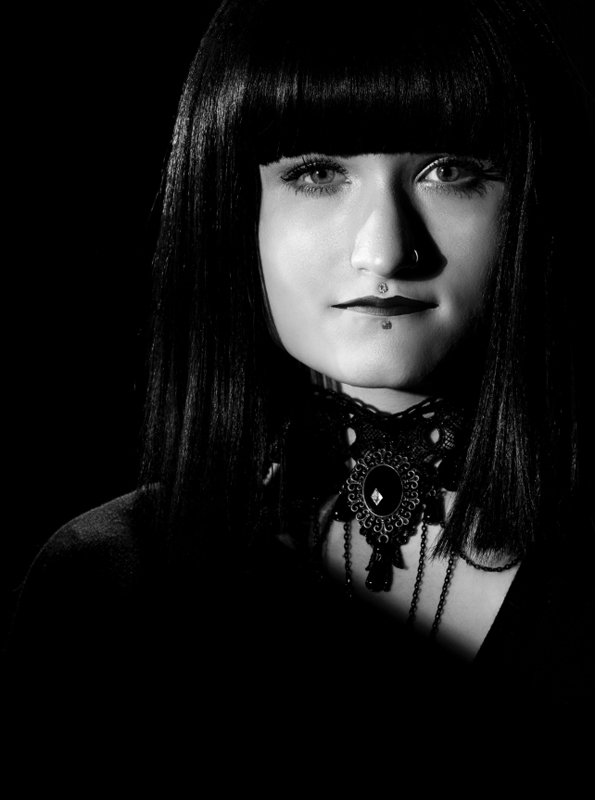
This is very typical in the 1940s and 1950s style: small lights relative to the subject size or very far away. We would never want to put a hot light within feet of our subject just due to the brightness and potential danger. Has anyone seen a hot light explode? Trust me, it is no fun! That’s why we had steel screens over these lights if not projecting through a Fresnel glass to prevent a possible explosion from hitting the talent.
All that being said, we can now use more modern LED lights to replicate this look in a very cost-effective and safe way. Grab a Forza 60 II, the least expensive in the Forza line for under $300, and bring it within several feet of your model, modify it down with a snoot or Cinefoil, and you will have the harsh shadow look. Tight controlled light in a very harsh shadow pattern. Exactly like the old masters would have done. In this image, a flag was used to prevent light from hitting her chest. See the more subtle diffused shadow running across her chest. Because the flag was out of the frame and not far from the light source, you have a softer diffused shadow.
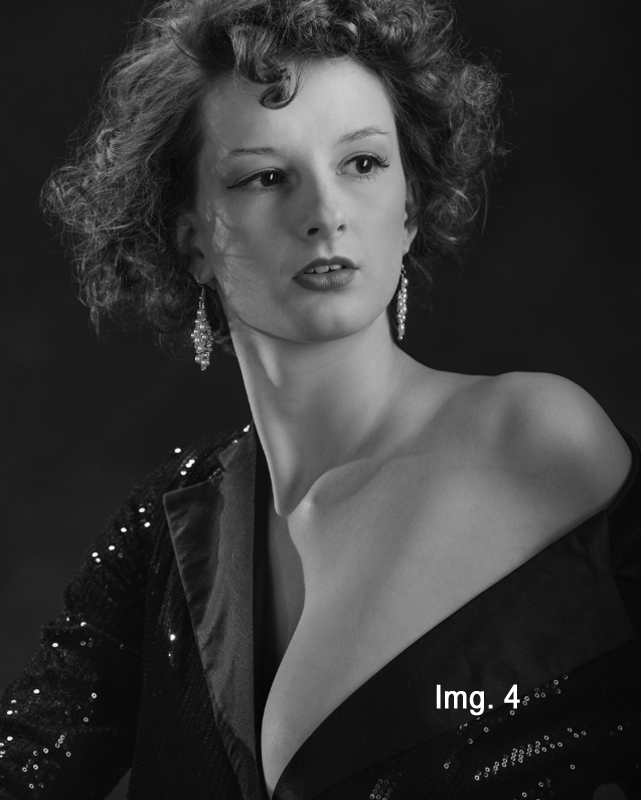 Let’s look at image 4 on the next page. It has obviously been created with a larger light source than the previous image. Look at the shadow transitions and how much more gradual they are. This was done by using a larger light source on the model’s left and a simple large reflective wall (3’x 6’) on her right. The potential harsh shadows are diminished by the reflective wall. An easy way to soften the harsh lights of small light sources.
Don’t get me wrong. You could still put a 3’x 4’ soft box on this light, but then you are not necessarily staying in the style of this genre.
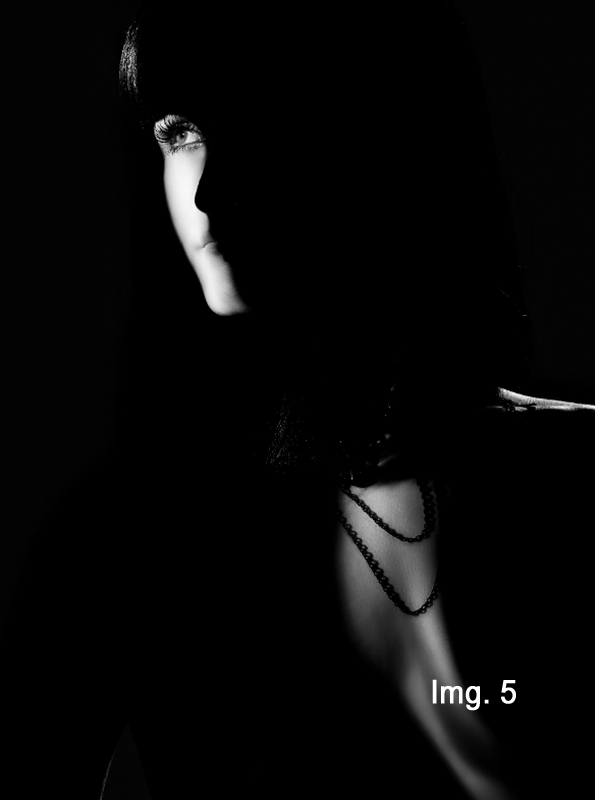 Now let’s look at the image 5. Obviously, a small light source or at least a very close gobo or flags that are close to the subject. The diffuse shadow is near non-existent, except for her chest again. Yes, there is a light on the subject’s left shoulder but other than that, the only light is created by a strip of light coming through a narrow opening of light. This was done by placing two flags vertically, one on either side of the subject, and only allowing light to infiltrate a small crack between the flags.
But there is an easier way now. Below you see the Nanlite Forza PJ-FMM projector attachment (less than $300). It has some very useful purposes. First, it has a built-in Fresnel lens that can focus the light output of your Forza 60. Second, notice the blue flag holders on each side and top and bottom. These internal flags control the light output and allow you to create an image by simply keeping the top and bottom flags out and pushing in both sides until you have the desired narrow field of light.
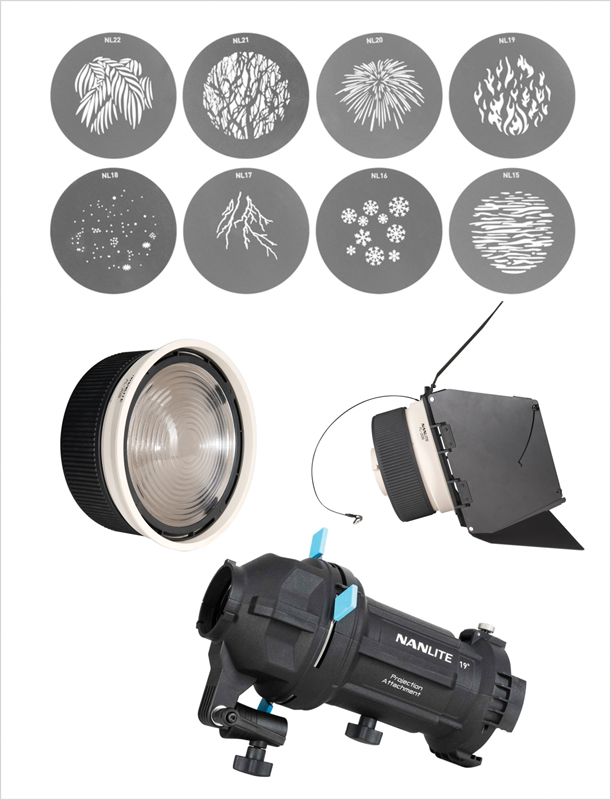 If that were not enough, what if Nanlite thought of allowing you to place a cookie in the projector like an old-fashioned Photogenic projector? They did! Not only can we use the old cookies that we used 30 years ago, but they have also come out with a whole new series of laser cut stainless steel cookies in patterns we never imagined (under $60).
This is a game-changer. My only question is why they call them gobos? In the truest sense of historical photography, a gobo is a device or cutout, if you will, that is placed between your subject and/or background and a light, while a cookie is projected through. Regardless the projector holds cookies or a cucalorus. Whatever they choose to call them, the results are quite extraordinary. Not only can you use them for projection on the background, you can also use them for projection on the subject for an intricate use of patterns online and form.
Finally, the Nanlite system is complete with Fresnel focusing lens and barn doors that have largely been forgotten with our current lighting equipment. Here you have a light source that can be legitimately focused and, with the use of barn doors, once again control light like no other.
This lighting style has been a passion of mine for many years, and with the advent of these new tools, I hope many more people will create images that give homage to our past while creating life for new fashion ideas. It is great for those creative juices. Enjoy the journey!
 Doug Hansgate is a New York based photographer working predominately in the fashion and commercial fields, while teaching as much as he can.


