


How to Pre-Visualize Your Exposure
by Gary A. Meek
When we look at visible light we need to be able to accurately analyze what is there for us to use. There are six elements of the visual light that we work with. They are Brightness (Quantity), Diffusion (Quality), Color (Kelvin temperature), Direction, Specular, and Contrast. Three of the elements are basically fixed once we “push the button.” They are Specular, Diffuse, and Direction. Yes, we can “fix it in Photoshop,” to some extent, but it is really better to get it right in the first place and not catch the Photoshop disease. Photoshop disease makes us look like an average scene histogram… a large hump in the middle (I’m not going to tell you how much weight I’ve put on because of Photoshop).
 Three of these elements can be altered after capture, whether we are traditionalist and use film or we thrive in the digital world. They are Brightness (Quantity), Contrast and Color. We can also describe these three elements in numerical terms because our eyes cannot be depended upon to objectively evaluate them. Brightness can be described by footcandles or exposure value. Contrast can be evaluated by the use of a ratio such as 3:1 or 5:1. The color of light can be related to in Kelvin temperature such as 3200K or 5400K.
Let us take just a few moments, which could revolutionize the way that you look at photography, and look at just one of these elements of light… Brightness. But let’s call it Quantity.
We measure the quantity of light with a light meter. There are basically two types of meters, hand held or in the camera. The Incident meter measures light that falls on the subject, Illuminance. This is done by placing the meter at the subject spot and metering back toward the camera or light source. Most incident meters measure light at a 180 degree angle of view. Some incident meters use a flat dome that meters light coming in from one direction.
The Reflected meter measures the Luminance, the light reflected or emitted by a subject. The meter is pointed at the subject to record the brightness of the scene. This meter usually measures light in a 30 to 50 degree angle of view. A special type of the reflected light meter is the SPOT METER. This meter measures light in a 1 to 5 degree spot on the subject. The reflected light meter is the type of meter that is in your DSLR cameras.
It is a good idea to understand what your meter is actually measuring. All exposure meters are trying to make your reading an 18% middle grey, 128 in digital, the middle of 0 to 255. Zero (0) is the blackest black and 255 is the whitest white, therefore 128 is in the center. This is also Zone V in the Zone System (see the illustration on the next page). Zone 0 is the blackest black and Zone X is the whitest white. Each zone is one stop difference from the adjacent zone.
The incident meter really does not care what the subject sense consists of as far as brightness levels. It measures the LIGHT that falls on the subject and therefore, if properly used, can give you a more accurate exposure and not require exposure adjustment because of the brightness levels in the scene. The reflected light meter is trying to make everything in the scene 18% grey. That is okay if the scene is average in tonality. But what do you do if you have purchased a new Sekonic meter (a great meter, by the way) for $500 to $600 and the battery goes out when you are in a photo session? To be prepared for this, buy an 18% grey card (be sure to get a “Kodak” grey card). There are a number of “grey cards” on the market, all colors and densities and filled with gimmicks as a selling point. There are even some with a nice gloss or semi gloss surface. There is no way that you can get a good exposure reading from some of these and forget getting a good white balance.
When you get your Kodak grey card, photograph the grey card without anything else visible and fill the frame with nothing but the gray card. Your histogram should have a spike in dead center if properly exposed. That is what that screen on the back of your camera is for – not to look at after every exposure. Now, over-expose by one stop and mark the cover on the back of your camera. Next, over-expose two stops and mark. Then, go the other direction and mark one stop and two stops under. Take the cover off and mark it from underneath so the marks will stay visible.
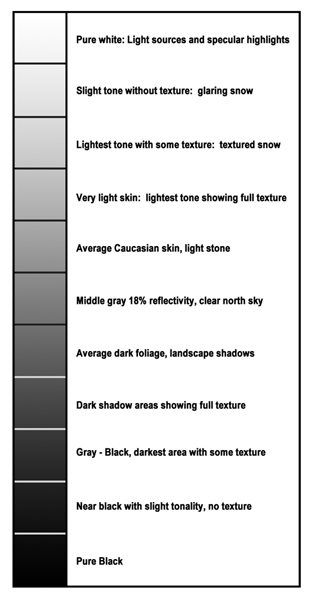
Most photographers who might have heard of the Zone System think it is only for OLD photographers who photographed only in black and white. However, knowing just a little about the Zone System will help you understand the brightness levels and therefore the quantity of light. In the Zone System, light quantity can be divided into eleven segments or zones. There is one stop difference between each segment.
So why did we do all of this? According to the Zone system, zone V is middle grey, one stop over, Zone VI is light grey and Zone VII is the whitest white with FULL detail. Likewise going the other direction, Zone IV, one stop under exposed, is dark grey and Zone III is the blackest black with FULL detail (see diagrams above).
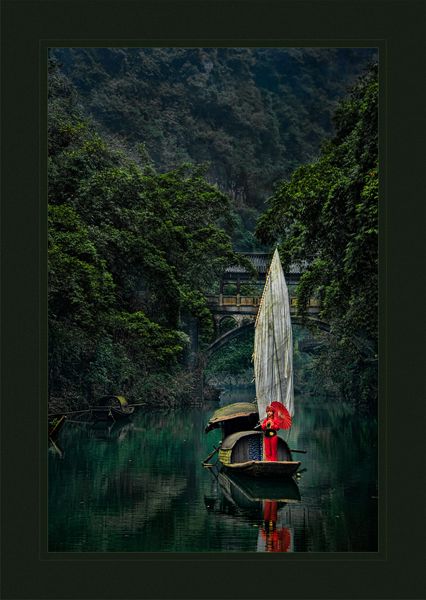
One of the MOST important things to do is pre-visualize the scene. By doing this you can pre-determine what the histogram should look like. If you have a subject on white sand or snow you know that your histogram should be about 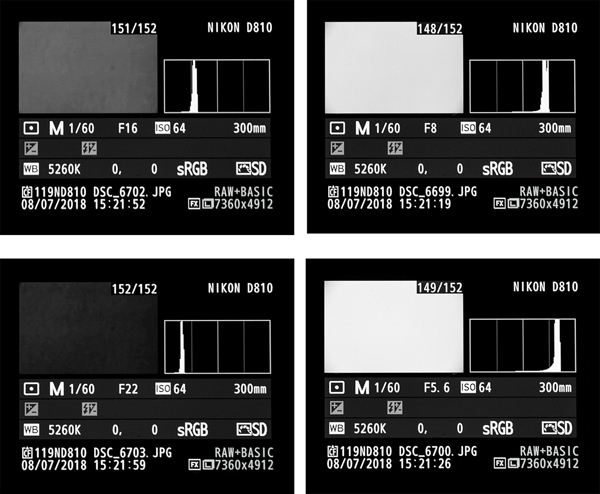 two stops greater than 18%, 128 or Zone V. Since your reflected meter is going to try to make everything 18 % grey, you are going to need to open up about 1 ½ to 2 stops to make the scene white. You can verify this on the back of your camera because you have marked one stop over and two stops over, Zones VI and Zone VII. The opposite holds true for let’s say a black dog on a dark background.
 You can pre-visualize your histogram as being Zone III. To achieve this (if you metered on the dog), stop down about 1 ½ to 2 stops to make the scene and subject dark. You WILL have FULL detail in the dog’s hair. Again, this can be verified on the back of your camera since you have marked Zone IV and Zone III.
With this being said, remember that we only have about a five stop range, Zone III through Zone VII, to get FULL details. Not every scene has all eleven zones. But knowing what you have in the scene, pre-visualizing and capturing the most important parts and exposing for that part of the scene will help make you a much better photographer. PRE-VISUALIZE and always start with the proper exposure and you will cut down your time that you are using to “FIX IT IN PHOTOSHOP.”
 Gary Meek, of Hot Springs, Arkansas, will be teaching “Don’t Gamble with Your Certification… Prepare, Prepare, Prepare” at the 2019 Texas School of Professional Photography. Gary has been teaching Certification Preparation Classes for 25 years and is a PPA Approved Photographic Instructor.


