


by Jamie Hayes
Lens compression is the ability to change, manipulate, blur and compress the foreground and background to create depth and dimension. This is a tool that makes our portraits look natural and, more importantly, different from the pictures that our clients create with their own cameras. Our eyes view in about 60mm, so it is unnatural for us to think and see in telephoto, but a telephoto view of a portrait subject can make the difference between an average and a great image.
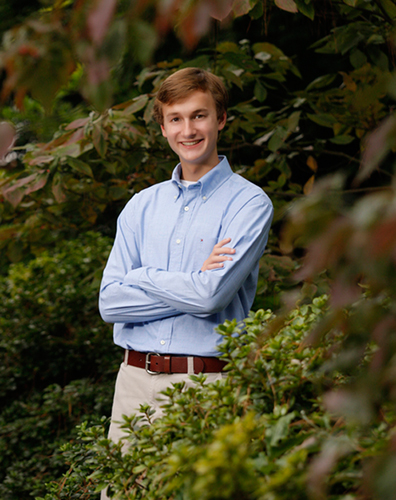 When planning a location portrait, I usually choose the background first and the exposure last. Because I use a strobe outdoors almost all of the time, I don’t have to worry about the available light being too weak or too strong. The image above was created on a very rainy and overcast day in the late evening by using additive light. So lets look at exactly how I made this image.
For this location, the subject was placed just off the side of the driveway and slightly into the bushes lining the pavement. I used a Profoto Acute 600B strobe in a 17×17 inch Larson Soft Box as the only light source on the face and metered the ambient light with my Sekonic L-358 light meter and set my strobe about 1/3 of a stop under the available light. I did this to add a little light to the dark eye sockets caused by the direct overcast clouds and also to keep the face color warm and natural. Slightly under-exposing the main light keeps the background from looking too dark and the face from looking too “flashy.” The soft box was used to lower the contrast and make the light very smooth and soft which means less retouching needed for the final image and less money or time spent retouching your own images.
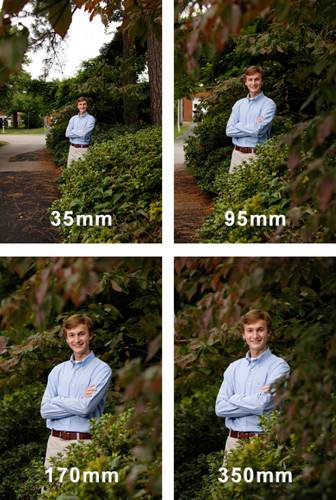 To illustrate various focal lengths, I made some sample images at various focal lengths from 35mm to 350mm. Notice the distraction of the house in the background in the wider shot and also notice that the foliage in front of the subject has no real depth. It all looks like just a bunch of greenery and you can only see a little of the leaves in the upper left hand corner. As the focal lengths become longer, the image takes on an entirely new look.
To me, the 170mm shot is my favorite because it is a perfect balance of scale between the leaves in the foreground and the background. It also provides the leaves with just enough of their shape to look very natural. In addition, they “frame” the subject well. The 350mm image has too much compression. Notice how the leaves on the right side of the image now intrude onto the arm of the subject and how much it blocks the shrub that is just in front of the subject.
Using the right tools can make a photo shoot stress-free, easy, and fun… not to mention the fact that using one lens certainly lightens up your load! A high quality lens with the widest zoom range possible is sure to become one of your favorites, too.
 Jamie Hayes and Mary Fisk-Taylor are regular instructors at the Texas School of Professional Photography. Learn more about Jamie Hayes at www.hayesandfisk.com.


