


By Terrence Campbell
High Dynamic Range (HDR) refers to the range of luminosity between the brightest area and the darkest area of an image. It allows us to increase the dynamic range of captured photos and videos beyond the native capability of the camera. It consists of multiple frames of the same scene but with different exposures and then combining them into one image with a “dynamic range” that is higher than those of individually captured frames.
HDR photography has developed over the years, going from inception to over processing and now back to quality utilization in making landscape and real estate photos pop. The human eye’s dynamic range is far superior to any camera on the market, HDR photography helps photographers achieve that dynamic range with some processing. The challenge that many photographers face in the field is (1) setting up the bracketing quickly when a scene is ever changing, (2) recording the bracketed frames within the thousands of shots that have been and will be taken during the outing, and (3) retrieving those images quickly for post processing.
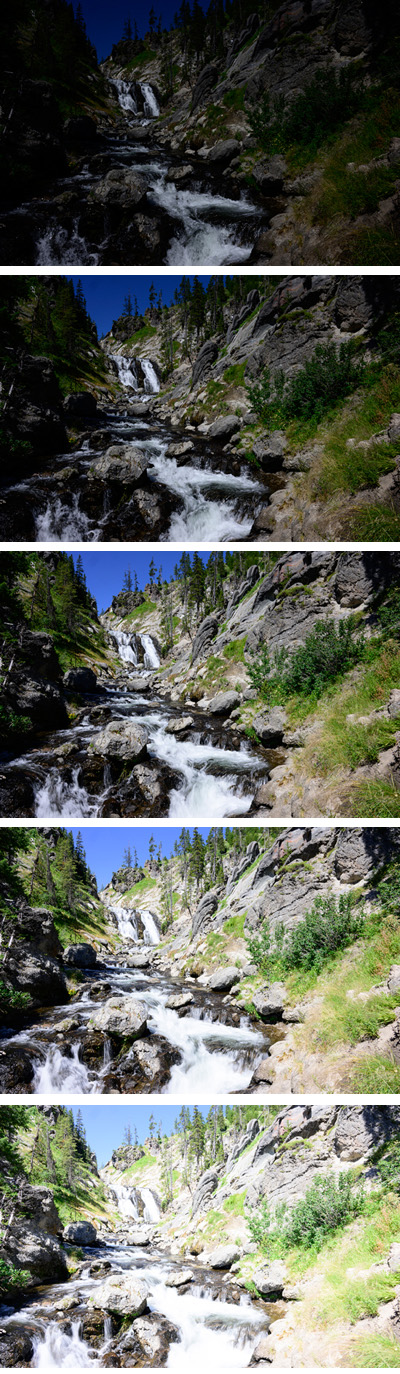 Nikon addresses each of those issues and makes it easy to shoot, store, and find images after they were captured. During a trip to Yellowstone National Park this summer I was able to utilize this method to capture images of Majestic Falls during the middle of the afternoon. It was not the ideal time to be at the falls and the sky was bald but this opportunity allowed me to utilize quick bracketing access within the Nikon Z9 to capture more details in the shadows, maintain the highlights and add extra movement to the flowing water. My wife and kids were on the hike with me as well so every second counted as patience tends to run thin with my teenager.
The built-in intervalometer is included within most Nikon DSLR cameras and all mirrorless models. However, the Z30, Zfc, Z5, Z 6 & 7 series, and Z9 offer an additional menu option called “Options.” This is where the photographer can choose to bracket a Time-lapse movie or shoot AE bracketing. The setup process is simple. In the Shooting menu, select the option called Interval Timer Shooting. Once in the menu option, choose the start date and time desired or choose to shoot now. Once that is decided, access the Interval Time Selection and adjust it down to .5 seconds for the quickest interval option.
Once the Interval Time is chosen, either select the number of shots per interval (by selecting the Intervals x shots/interval and choose 1 x 3, 5, 7, or 9) or go to the Interval options and choose the AE Bracketing option. Then choose the number of shots in the bracket and the EV Increment desired. There is a limit to the increment steps depending upon how large of an exposure shift you want. The options are .3, .7, 1, 2, and 3 variable stops. When choosing a variable stop greater than 1 EV, the camera will limit the number of shots to a maximum of 5 frames. Choosing a variable exposure value of 1 EV and below allows for a maximum of 9 frames in a series.
Once the desired frames have been chosen, the camera will adjust the Intervals x Shots/Interval option to match the frames per interval. When the AE Bracketing option is selected, the camera will allow changes to the number of intervals via the Intervals x Shots/Interval option but it will not allow for adjustments to how many shots are taken during the intervals. The AE bracketing must be deactivated first before the camera will allow changes to the frames per interval.
The final step in setting up the menu option is to activate the Starting Storage folder to allow the camera to put each of the intervals into their own folder, making them easy to find when downloading to the computer. Choose the Starting Storage Folder option and then check the New Folder box. This will create a new folder each time an interval shoot is required when “All” option is selected in the Playback folder option in the Playback Menu. Afterwards, the camera will display all images in normal sequence on the back of the camera. But they will be stored in their own folder for easy access.
Now that the Interval Setup is complete, the next step is to make the option for easy access. The recommended process is to setup U1, U2, or U3 as a HDR/Landscape option or with the Z9 utilization the Menu Banks. Set up a Shooting Bank for the Timelapse setup and a Custom Setting Bank for the “i” menu quick access. To set up the user settings, the Shooting menu and Custom Setting menu will be tied back to the user define mode dial. When selecting banks within the Z9, any adjustments that are made to the active bank will be set until they are modified. Changing from bank to bank will not impact the settings of the other banks.
The cameras with User Defined setting require the user to save the setting to that specific Mode Dial options. In order to ensure that the desired setting are saved, the process is: select the desired shooting option between Program (P), Aperture (A), Shutter (S), or Manual (M). Make all shooting menu option adjustments. This includes file naming, image area, quality, size, and format, ISO, white balance, picture control, color space, active D-Lighting, noise reduction and more. Access the Custom Setting Menu and make the desired changes to any of the A-G options.
The specific option to set the Interval Timer Quick Access in the “i” menu is to go to the Custom Setting Menu and choose option f Controls. Then choose f1 Customize “i” menu, select which Quick Access option to be replaced, choose the Interval Timer Shooting option, and press “OK.” The camera has replaced the original option with the interval timer shooting option. To save this to U1, U2, or U3, go to the Setup menu and then choose Save User Settings, select the specific user setting, press to the right and then select Save Settings. Now the Interval Timer Shooting option will be easy to access with the turn of the Mode dial and a push of the “i” button. Once pressed, simply select the Start option. There will always be a slight delay to allow any shake that may occur from touching the camera.
The camera will shoot the sequence and then be ready for another frame until the Interval Timer option is activated again. The menus can be reset to the standard shooting option by going back to P, S, A, or M and choosing the Reset Custom Setting option in the Custom Setting menu. The shooting menu can also be reset by selecting the Shooting Menu and choosing the Reset Photo Shooting menu option. This will allow the camera to be set up for other user defined options and shooting styles. I have U1 set up for Monochrome, U2 Portraits, and U3 Landscape. This allows me to keep my P, S, A, and M setting for normal shooting. One of the shooting options that I make sure to change with each user defined set up is the file naming as this ensures no duplicate naming when using multiple cameras.
 Terrence Campbell started with Nikon as a Technical Sales Representative facilitating classes and trainings throughout the United States. He and his family reside in central Texas while he continues his work with Nikon as a District Account Manager, working with amazing photo retailers and photographers.


