


Knowing the Difference
By Steve Kozak
Using light to sculpt the subject requires a degree of directional light that skims and rakes across the subject to create form, shape and texture. This will be true when working with natural light or artificial lighting. In either case, the efforts of the photographer to create a directional light pattern also creates shadows. In that the photographer is responsible for creating or directing the light onto the subject, so too is the photographer responsible for handling the shadows that are created. In some cases, the shadows may be too strong or too deep that additional light will be required to provide some degree of illumination of the shadow area. Photographers refer to this technique as Additive Lighting.
In the studio environment, Additive Lighting is usually handled by using a “fill” light. Where the main light is used to create the directional pattern of light on the subject, the fill light’s job is to take care of the shadows. This Additive Lighting controls the shadows by adjusting the intensity of the fill light and therefore determines the lighting ratio of light on the subject. Too much fill light can result in lighting that is too flat. The objective should be a pleasing ratio with a nice lighting pattern to show form and shape but still have good detail in shadow areas.
Control of the shadows in the studio can also be handled with various types of reflectors or with natural light. In some lighting scenarios, the main light may be provided by light bounced off of a reflector and the ambient light may be used as the fill. The degree to which the shadows are filled is strictly a matter of taste. By feathering the reflector, you can increase or decrease the intensity of the reflector fill.
In the images of the groom (above), the sample on the left was taken with natural window light but the lighting had too much contrast and the shadows were particularly deep. In the corrected image on the right, a strobe was bounced off the wall and ceiling to the photographer’s left to add lighting on the shadow side of the subject. This raised the illumination of the shadows just enough to provide detail and a nice balance to the lighting pattern.
In some cases, a photographer will need to keep light from reaching the subject in order to create a more desirable or a more directional lighting pattern. Photographers refer to this technique as Subtractive lighting. The purpose is to block unwanted light to reduce the amount of incoming light in order to achieve the desired result.
In the image of the bride (below-left), there is so much overhead light, that
it compromised the directional lighting pattern. The light from above also caused deep shadows in the eyes and strong highlights on her cheeks, forehead, and the top of her dress and flowers.
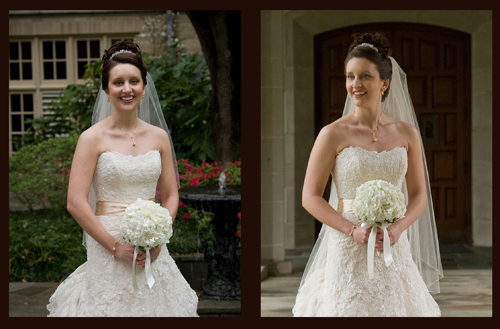
While adding a bit of flash onto the subject to create a directional light pattern that would eliminate the dark circles under her eyes, a Subtractive Lighting method was used by using a nearby canopy to block the overhead light, thus redirecting the light to the side and providing a wonderful directional lighting pattern. (above right)
The canopy allows the side lighting to rake across the body, providing texture and detail in her dress and flowers. It also provides nice illumination to the eyes and face. The architecture of the church provided the canopy to block the overhead light, but this could also be done in some instances with a large black reflector or scrim.
Subtractive Lighting can also be used on the background of an image. In the studio, a scrim can be used to eliminate some of the light from striking the background and/or to feather some of the light striking the subject to darken portions of the subject.
While Additive Lighting is probably the most used of the two, there are many situations where Subtractive Lighting can produce even better results. By understanding the difference between Additive and Subtractive Lighting and having a working knowledge of both, you will be able to produce more stunning images that set you apart from the competition.
 Steve Kozak is the Executive Director of TPPA and is an instructor at the Texas School of Professional Photography. Over the years, he has also produced an extensive CPP Study Guide to help photographers navigate the process of becoming a Certified Professional Photographer. Using Additive and Subtractive Lighting is just one lesson in that study guide. Learn more about Steve and his class, “The Secrets to Success When Turning Pro” at Texas School.


