


By Bob Coates
There are times when being a photographer leads you to “engineering land” when trying to photograph a subject in a specific way. Part of the challenge and fun of commercial photography is coming up with ways to represent products in a unique way that catches the attention and imagination of those who view the image. That process often involves more than simply placing the product in front of a neutral background and lighting it for detail. In the case of photographing the vodka bottle, I had an idea in mind and set about creating that image with the materials and resources already in my studio.
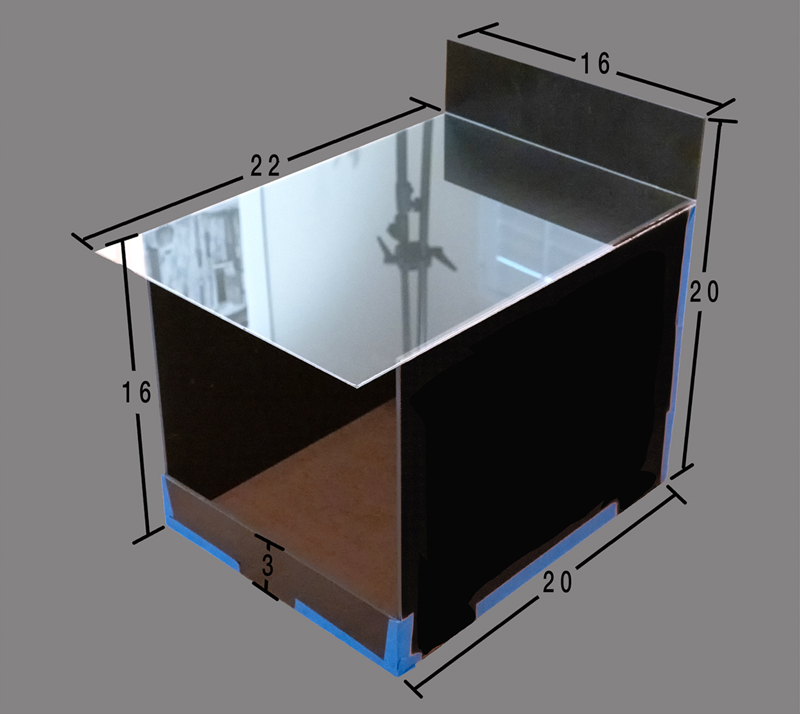
The photography “box” I used allows for a tremendous amount of creativity. The first time I made such a device, I made it from wood covered with white matte formica. If you are going to build a permanent set, that is definitely the way to go. Since I don’t have the space to store a fully assembled set, I like the ability to knock the set down to a storable size. However, measurements and layout will be the same no matter which way you build this.
For this article, we will go with the economy version. I pulled this set together using bits and pieces from around the studio. I used mat boards from 16×20-inch image polystyrene competition boards. If you don’t have these in the studio, you can order precut 16×20-inch foam core boards for a very quick set that you will throw away after a few uses. If you want a stronger set, you can use polystyrene boards. Polystyrene boards cost a bit more but ultimately will hold up better.
If you are using wood for a permanent set, glue and screw it together. In the case of the foam core or polystyrene, you can use tape to assemble your stage. If I’m only setting up for a day or two, I will use blue painter’s tape. This will hold your set together well but be easy when removing the tape for storing the pieces. Otherwise, Gaffers tape is my next choice.
The materials list for constructing this particular box includes: Four 16×20-inch panels, a 3×16-inch panel, a roll of 1.5-inch blue painters tape or Gaffers tape, one sheet of clear glass (slightly larger than 16×20 inches), a scrap of 2×4 wood, a 1/4-inch threaded rod, 1/4-inch wing nut, 1/4-inch nut, and two washers. If you’re building it out of dark materials, you’ll want white paper to line the box for a different look and vice versa. You can also line the box with white matte board.
To build the box, tape the three-sided box into place as shown in the diagram above. The open side is for placing your product and adding light. For my box, I’m using old matte boards. Depending upon your clients, you might want to use virgin materials for a more professional look.
Since I have a black shooting box, I lined the inside with white poster board. If you use white foam core for building your box, you can skip this step. Place Tulle or other white fabric in the bottom on which to rest your product. Set your product and camera angle. Make the product exposure. Note that many product labels have metallic/reflective surfaces that need to reflect completely to read well. Because the bottles are curved, think in terms of multiple captures. You can reflect various portions of the label and blend them in post production.
I had one packet of acrylic ice cubes. Rather than invest in enough to surround this 1.75-liter bottle, multiple exposures were made while shifting the ‘ice cubes’ around the product.
To add the water droplets, glass is placed on top of the shooting set. To ensure the water beads up rather than spreading out, treat the glass with Rain X (Note: Rain X is volatile. Do not use near open flame and make sure you have plenty of ventilation). A deeper water droplet will allow for focusing on the shape of the product below inside the droplet. Droplets will reflect the product but it will be reversed. No problem. That’s taken care of in post-processing.
Take multiple variations of the water droplets, focusing at different levels. You might even want to bring the camera closer to the droplets to have larger sizes. These variations can be selected and added to the final composite in post-production.
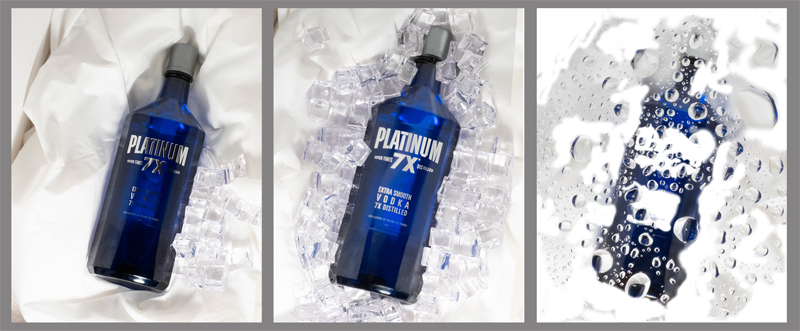
To assemble the image pieces, I started with the raw bottle capture with the most amount of label showing the reflection. Next, I selected additional images that are needed for filling in the rest of the label that were lit by using a reflector card. All of the images were processed for color and exposure tweaks using Adobe Camera RAW (or Lightroom, if that is where you do most of your processing) and loaded into Photoshop Layers. Once that is done, select a layer and change the Blending Options. Under the FX menu, use the “This Layer” black slider to leave only the brightest areas in the label. Add masks, and use a black brush to refine the changes.
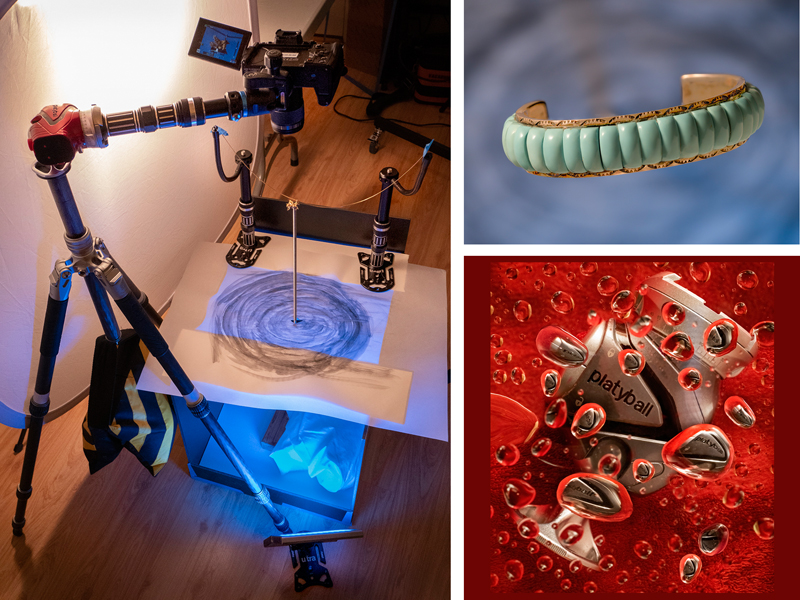
Results of floating set used for bracelet
Alternate set for water droplets
Next, take the full water droplet photo, place at the top of the layer stack, and fill the mask with black. Bring back the information you want using a white paint brush. Select and add individual water droplets as needed so you can highlight the product underneath.
To finish off the ad, the label was placed on its own layer with a soft drop shadow added to lift and separate it from the image below. Product manufacturing was placed in a similar fashion in the top-left corner.
To demonstrate another versatile use of this commercial photo box, the glass was removed from the original set. In its place, a 2×4 block with a 30-inch threaded rod is set on the floor of the box and a piece of vellum treated with black watercolor paint is suspended on top of the set. A hole in the middle of the vellum allows the rod to come through.
The camera is then mounted above the rod with a straight down view and the product is mounted on the top of the rod using Tacky Wax. Because of the camera placement, the rod is not visible because it is covered by the product. This gives a completely different look since the jewelry in this case appears to be floating on a cloud of color.
The vellum watercolor paper is lit from below with LED lights. Many LED lights are fully color controllable so the variety is endless. Control of the amount of texture shown in the vellum is done with depth-of-field. If you want more detail, stop the lens down. The product is lit separately. In this case, I used an LED light and placed a scrim in front to create a larger light source for softer shadow edge transitions. A white card was added on the shadow side for fill and defining edges of the product. Alternatively, strobe lights can be used. Color gels would then be needed to add color.
I made an image of the Platyball Ergo using a similar technique with water droplets but a different set. Any two boxes can be used to support a piece of glass. As before, the product is placed under the Rain X treated glass. In this case, I added 50% glycerin to the water. Using glycerin thickens the water and allows for even stronger deeper shapes in the water droplets. Having a deeper shape makes it easier to focus on the product within the water. For me, the camera works best when directly over the water drops. It’s also helpful if using a macro lens and trying to accomplish some focus stacking as part of your capture process.
The shooting set and alternative sets should spark some cool product photography ideas. Almost any product can be photographed using these concepts.
 A commercial, fine art, wildlife, and night sky photographer and photo educator and author, Bob will be an instructor at Texas School this year. Learn and see more of Bob’s work at successful-photographer.com • coatesart.net • bcphotography.com


