


by Cris Duncan
If you have been in the photography industry for a while, you most likely have heard of the concept of “consultations” or “planning sessions.” No doubt, they are valuable tools for a studio to help educate a client about clothing, color harmony, locations and what products we have to offer. This time also affords us a time to truly understand what the client wants from the session. We do them in our studio as well and they most definitely benefit both the studio and the client, when the day of the session arrives.
One of the questions we have learned to ask in these planning sessions is, “Where would the client like to display their portrait?” This will help me while photographing so I can give Deanna the best opportunity for greater sales. In portrait situations, very rarely does the image layout play a deciding factor in the image creation process other than a vertical or horizontal orientation and this is easily done with a quick rotation of the camera. Provide two options and the problem is resolved.
In commercial photography, knowing the layout or the “end use” is extremely important. In fact, it can make or break the assignment. Thus, in the world of commercial photography, the “planning session” is critical. Unlike a portrait client that may make several image selections, a commercial client has a specific message to portray and many times your client only needs one image, so make sure the image you provide is the image they need. To ensure this, it is imperative that you know the “ending.”
Other questions I ask any commercial client include how will the image(s) be used? Do you have a layout? What ratio will the final piece be? Will it have copy (text)? Is it for packaging? A magazine cover, spread or 1/3 page banner? Is it for a website header, window film, direct mail, point of sale, etc.?
One thing I have learned is that all of these require a different approach. For example, I was asked to photograph images for tea dispensers that would be in their local delis and convenience stores. The client already had a concept for the images. They wanted it to appear as though a fresh glass of tea was being filled at the dispenser. My questions were, “What are the dimensions of the dispenser? Where is the nozzle? Where will your copy be?”
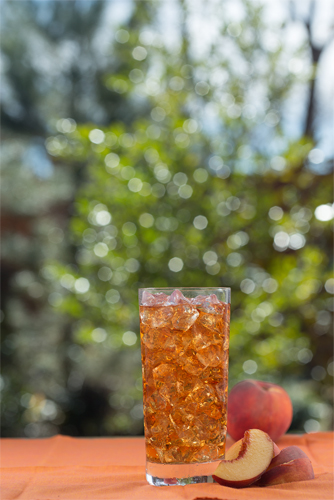
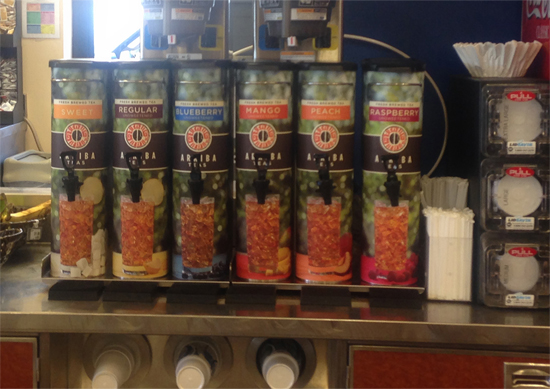
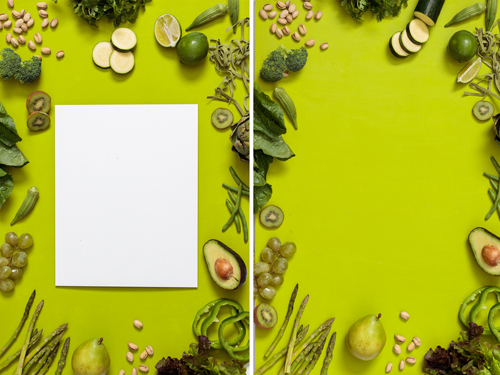
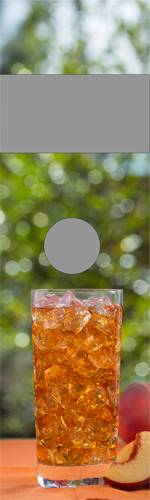 I photographed the following image (Image left) at our studio and immediately opened the image in Photoshop and created a mock layout with the art director. (Image right). The final ratio was 6” wide by 21” tall and the dispenser valve was placed at 10” from the bottom. After some minor tweaking of the scale and camera position, we began to photograph each glass, knowing that they would work for the intended purpose. You can see the final product here. (Image below).
Many of the commercial assignments we do are for promotional pieces and they seem to never have the same layout design. One in particular is for a year long promotion for a chain of Supermarkets called “Color Your Basket.” The marketing team had a concept of a piece that would feature all the fresh and healthy options their stores had to offer and is approx. 6 feet tall and 20 inches wide.
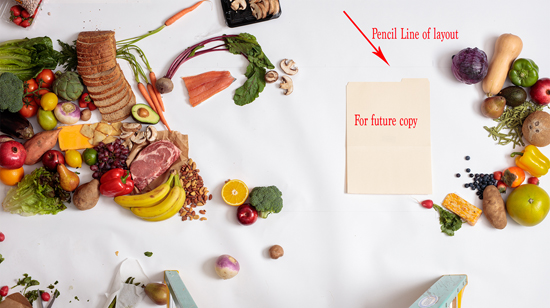 The final design will also have copy in the top-middle portion, or about eye level. On the floor of my studio, we drew pencil marks in the exact size of the final layout and I then placed a manilla folder in the layout where the copy would be placed (Image above). I will often do this technique when we are designing an image to make sure I leave room in the design for the ad-copy. Once again, I photographed tethered and created a crop preset in Lightroom so we could see how the layout was working.
 Once we had a design that worked, I removed the manilla folder and photographed the final image (Image left). I have also included another image from the same shoot using the same process (Image 6).
One of my favorite parts of commercial photography is the collaboration with the client. Often, they will have a general idea and I have the opportunity to help them in bringing their idea to life. It is so much fun working through the process with your client and creating an image that serves their business. I encourage you not to be afraid to have productive discussions with the client. You are the expert and oftentimes will think of something they may have overlooked and together will create the image they are needing. One thing I was taught by Joe Glyda is that a commercial photographer must be a problem solver. Your ability to find a way to solve the issues you encounter will greatly serve you in this field. In the previous images, we all worked together arranging and moving items around, thinking about color harmony, balance and scale.
One final example is a job for a print house that was in need of some website header images that portrayed what they do. Again, I asked the same questions so that the images I created could be used in the way the client needed (Images below).

 In hindsight, I understand that this seems like a common sense approach. However, early in my career I was asked to photograph over 10,000 items for a product catalog. From a design standpoint it was fairly simple. All items were to be photographed on a white background. After the first shoot, the sales manager and art director called me and asked me to re-shoot some items because they “could not use these.” Needless to say, I was embarrassed and frustrated. It wasn’t that the images were bad, it was that they didn’t fit their layout design. I was photographing from a portrait mindset… some vertical, some horizontal, some close ups, some farther away, etc. What I had failed to do was ask some important questions.
The client was very gracious and we had an extensive planning session and I asked to see a draft of the catalog, they obliged and I finished the assignment and all parties were satisfied. This was a valuable lesson.
I hope that you will not have to go through what I did on that shoot so here are a few action items to help:
1. Always ask about the end use and for a layout. Ask for final sizes and where the copy will be. As you photograph, continue to make sure that images will work with the final design.
2. Photograph commercial assignments tethered. This will help give
you and the art director a way to communicate and make sure you are
on the same page when it comes to their layout and needs. I will often create a crop preset based upon the finished size to ensure my perspective though the viewfinder will translate to the final design.
3. Ask lots of questions. Many times, the client has a general idea and through a series of questions you will begin to collaborate and come up with a solid concept. This has many benefits, one obviously being that the image will serve the client, but also it shows the client that you care about their business and are there to help them succeed and that will build a long lasting business relationship.
4. You are an expert, do not be afraid to add your opinion and ideas to the shoot. Oftentimes, your input is something they did not think of.
5. Provide your client with images that require little post processing on their end. Many times, your client will have a marketing team that will do all art work on the final design. The less they have to do to your image, the better. That saves them money and they always appreciate that.
6. Have fun and happy creating.
 Cris Duncan and his lovely bride, Deanna, own and operate CjDuncan Photography in Lubbock, Texas. They offer both portrait and commercial services. Cris is the current President of the Texas Professional Photographers Association. They are also Texas School Instructors and founders of Find Your Focus Photographic Education. Learn more about Cris at
www.cjduncan.com.


