


by Dave Montizambert
I love lighting. For me, it is the most exciting part of any shoot! To this end I almost always shoot tethered, even outdoors on location. Tethered shooting allows me to create stronger images faster. Seeing my lighting immediately on a high-end laptop screen, greatly speeds up the process and allows me to fine tune my lighting to a much higher degree. And no exception to this, is this image of mine of Californian model Kara Duenas striking a pose on a Hawaiian lava beach. This image was an attempt to capture the vibe of a smokey sensuous B&W 1960’s beach image of actress Brigit Bardot that had caught my eye and imagination as a wee lad.
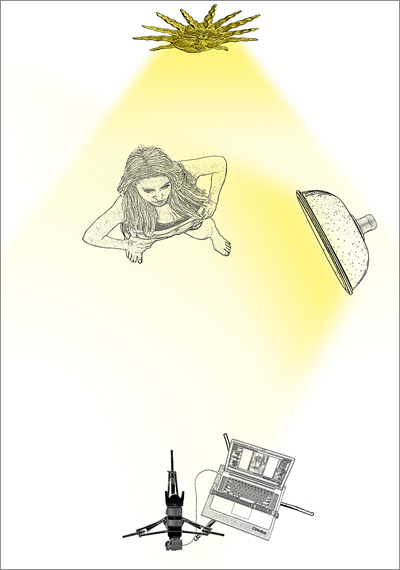
The lighting for this image is a combination of available and artificial light. Since there was so much great scenery to choose from, I could shoot in just about any direction. I live and die by back-lighting and so I chose a background that would require Kara to stand with her back to the sun (see diagram, right). This back-lighting adds so much depth and beauty to the image plus it means that I don’t have to create the backlight with a strobe. And it has the added bonus of beautifully backlighting the whole entire background, not just the subject!
Once camera position and background were decided upon, an incident meter reading was made for the open-sky lighting that would fall on Kara’s front. I generally set this to underexpose the subject by 2 – 3 stops turning it into a fill light rather than a main-light. It read F 9.0 at a 1/40th of a second at 100 ISO, and so set my camera exposure to F 9.0 at 1/160th of a second 100 ISO — effectively underexposing this frontal existing light by 2 stops. The sun, which struck the camera-right backside of Kara, was lightly veiled by clouds and so was greatly diminished. An incident meter reading of this back-lighting read F 9.0 1/160th of a second at 100 ISO making it the same as the camera setting but as you can see it looks brighter than a correct exposure because the light is coming from behind, that is, beyond 90˚ from the camera and so appears brighter than the incident meter suggests. If I had captured an image at this point, Kara’s front would appear in shadow, in other words under-exposed. At this point everything is in place except for the main-light. To that end a battery powered studio strobe fitted with a 22”/56 cm beauty dish was placed a little in front and to the camera-right side of Kara. I chose this smaller sized light source to mimic the light quality of the very-hazy sun. The reason I placed this source on the same side as the sun was to wrap artificial “sunlight” onto Kara’s front, that is to fool the viewer’s eye into thinking that the sun actually wraps around the front of the subject. A great cheat I use all the time, it allows me to have great backlighting and dramatic side-lighting that appears to all come from one source!
The power on this light was set to give an incident meter reading of F 9.0 at 100 ISO, in other words a correct exposure on Kara.
The beauty dish was chosen for its circular eye catchlight, once again helping to mimic the sun. In retrospect, a fabric-and-rod octa-box would have been a more practical choice since it folds up small for travel, is flexible rather than rigid making it okay with getting banged and squished by baggage handlers, and the eye catchlights it creates appear round even though they are actually an octa-shape. On the other hand, beauty dishes are typically rigid, making them delicate to travel with – mine now creates very nice crescent moon catchlights.
So the formula is pretty easy: To back-light the subject and entire foreground and background, choose a scene that puts your subject’s back to the sun. For fill-lighting, under-expose the existing light striking the front of subject from open-sky with your shutter-speed. For a main-light, match strobe brightness on subject with camera aperture, I usually position this light to the same side as the sun.
Being able to see your images pop up on a large profiled screen, as your camera captures them and with your process settings applied, is such luxury. But, how does one figure out their process settings before shooting? This lighting/processing paradox is the photographic equivalent of the chicken/egg paradox. Which comes first? Does one light to their RAW process settings or do they shoot first and process later making do with what they have already captured? And if you subscribe to the former of the two, how do you know what process settings to light to if you haven’t created them yet? My solution is as follows, I first shoot a test with lighting characteristics I think I want. For this I often start with the RAW processing software’s default settings then tweak them to the look the way I want, then optimize the lighting and reshoot the test — and if necessary fine tune the settings once again. If time and/or budget allow, I like to do this well before the shoot. Once I have settled upon a processing recipe, I save it as a preset and often use that preset again and again in the future. Now I most often work from one of my pre-existing presets and build my lighting to it. Not so different from the old film days where we would pick different film types for their unique characteristics and then create our lighting to those characteristics, only now with digital, I have an infinite number of processing looks rather than handful.
Setting up to shoot tethered makes little difference in terms of time and effort when you are already spending time lighting, but it does make a big difference to the outcome of that lighting. Seeing a little preview on the back of my camera with, not mine, but the factory’s process settings applied doesn’t cut it for me – I want my preview big and with my process settings applied so I can really see it and see it as it will be. Especially on this image of Kara at the ocean (see Image 001), the B&W settings are quite unique and so being able to tweak lighting on the fly based on instant preview of how those process settings are affecting contrast is absolute heaven – a camera histogram can’t help you here. Also, I love being able to have the use of a densitometer which resides in my RAW processing software to double check that localized brightnesses are in range for reproduction. For lighting centric assignments, shooting tethered removes a lot of the stress of creating lighting and it provides better communication with art directors and clients! I even shoot tethered to a projector during workshops and lighting demos!
 Dave Montizambert lectures internationally on lighting, digital photography, and Adobe Photoshop. He is also a published author having written two books on lighting and digital photography (www.montizambert.com ) plus numerous magazine articles on these topics in North America, Europe, Russia and Asia. Dave produces “DaveOnDemand” (www.montizambert.com) lighting tutorial based photo-training and also creates lighting & Photoshop tutorial DVDs for www.software-cinema.com & www.PhotoshopCAFE.com/video and. Dave is available for lectures and workshops in your area and can be reached through www.montizambert.com. He is also an instructor for the 2020 Texas School of Professional Photography.


