


by Don MacGregor
Family groups are recognized as a key component of any portrait business. Groups are also thought to be the hardest to pose. Nothing could be further from the truth if you follow some basic principles. First of all, a group of ten is simply ten groups of one, linked together. Build groups “one person at a time.” Start with the anchor people, usually the parents. This is usually the center of the potential group. Then, add one person at a time and finesse their individual poses.
Secondly, when scouting environmental locations, look for natural lines or designs and try to repeat that pattern with the people in the group. Keep a sharp eye out for diagonal lines and natural posing aids such as rocks, benches, logs, etc. But do not hesitate to start posing groups from the ground up. Try to avoid having two heads side-by-side or one above the other unless a third person is involved to form a triangle. The exception to that rule would be couples (parents).
When visioning your group, look for “open” space to add people using triangles and diagonal lines. This concept allows you to create a design rather than an ordinary “team” style of image. Then, extend those groups horizontally (not with depth). Compressed groups (people clumped together) do not show any skill in composition. They look like candids and clients are reluctant to pay professional dollars for candid photographs. They may love the emotion in the photograph but will likely ask for the digital file because it is perceived as limited value.
Finally, everyone in the group should be roughly equidistant from the camera position. This will insure sharp images (edge-to-edge) even with apertures like f5.6. I always carry a 50 inch nylon cord and tie it to my tripod to measure the distance edge-to-edge for larger groups. This is by no means a trivial exercise. As professionals, we must create sharp images of a group. Depth of field is NOT the solution to sharp image edge-to-edge. It can help but careful posing is the professional approach. Also, be sure to give everyone in the group equal representation, unless you are hiding weight issues, by keeping them equidistant from one another. .
This process starts with understanding the number of people in the group. You should know in advance how many adults and how many children (and pets) will be in the group. Ideally, you need to have a good idea of each person’s height, too. Once you have a sense of the people you will be photographing, it is time to select a location that has the needed space and a sense of a background as well as the opportunity of natural light control or electronic flash. Study those natural posing aids (rocks, logs, park benches, etc.) and carefully plan how you can use them. Next, take your notes of the group and visualize where people might sit or stand. This starts with sitting on the ground followed by sitting on posing aids and naturally standing.
When it’s time to meet the family, start out by taking control of the people and explaining what your plan is and the potential of a dynamic portrait. Remember, you work first with the easiest to pose (parents and grandparents) and finish with those who have more limited attention spans (young children). When posing each person, demonstrate to them what you want them to do. Clients are not trained models and, when you demonstrate, you also build respect for your skills as a professional. That translates into financial respect for your services.
It is also a tremendous advantage if you have an assistant who can help keep the childrens’ attention and also be your “clothing assistant.” This allows you to focus on the final posing, technical issues and, of course, expression. Most groups today are composite groups where heads are changed, so keep that in mind. When you have a group with one or more cranky children, it is a good idea to make a good series of the cooperating people and then another series on the ones who are being a problem.
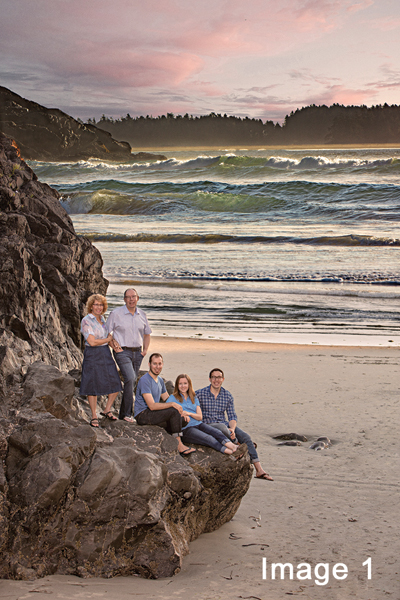
Image 1: When scouting I saw this very interesting rock formation and chose to add people to the group such that it repeats that design. Everyone has roughly equal representation. This is important in groups. You MUST avoid having only the head of a person showing while the others might show their full body. Think like a customer… how would you feel if you were a “bobble-head” in your family portrait.
Image 2: The shoreline “flows” from upper right to lower left. The people repeat that pattern and conforms to the undulation of the shoreline. Everyone has equal representation. It is also important to pose your groups with family UNITS within the larger group.
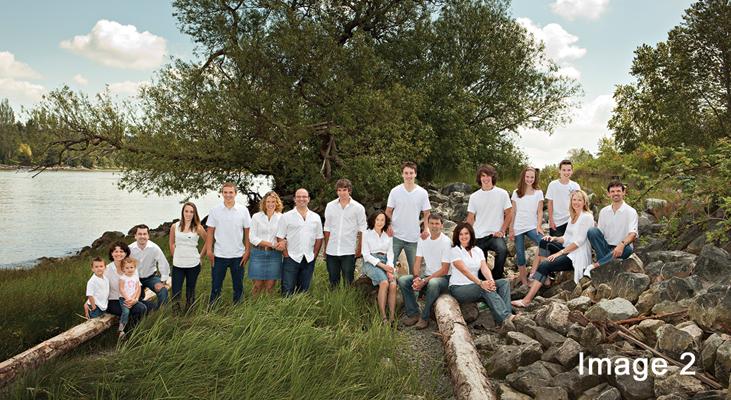
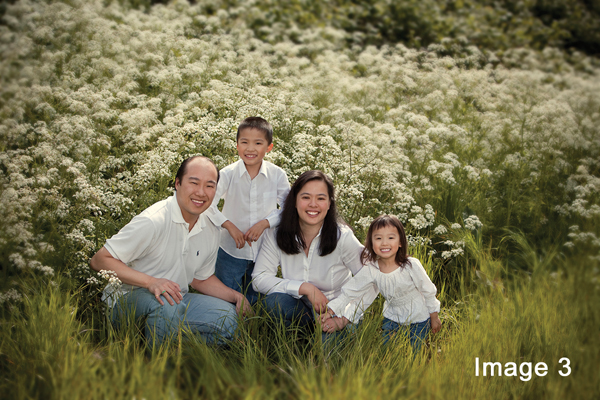
Image 3: When photographing smaller kids, try to bring the adults down to the child’s size such that the family is together. Note the family is linked together by design, size and a triangle.
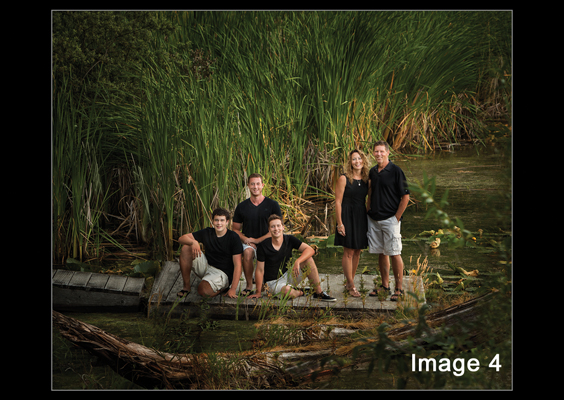
Image 4: There is open space between the parents and the kids and that is by design. Notice that the parents are in a relaxed and traditional couple pose and the kids form a triangle yet the whole family forms a diagonal line.
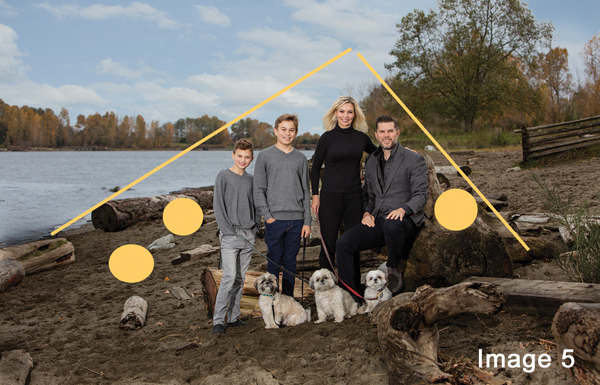
Image 5: When designing groups, extend them horizontally (not with depth) Keep the side elements lower if possible. Notice where we would extend this group. The goal is to create visual balance as it relates the scene. There is a triangle that is the foundation of the composition.
Making professional-looking family group portraits involves some advanced planning. Obtaining as much information as you can about each one of the subjects in advance will give you time to design a grouping in advance so that your skills take center stage on the day of the session. These basic guidelines and more will be just a part of what we will discuss at Texas School 2020. Join myself and 35 other amazing instructors for an incredible, game changing experience.
 Don MacGregor is from Vancouver, BC, and an instructor at the Texas School of Professional Photography and a frequent contributor to this publication. Learn more about Don and his work at
www.MacGregorStudios.com.


