


By Mark McCall
I have always been a real big fan of doing things as quickly as possible with the tools on hand, if possible. One of the things I have to do a few times a year is to create a “Fraternity Composite” or “Class Composite.” You’ve seen them… a large print with a shot of each student or member along with the school’s name and logo.
They can be very tedious to create, requiring a stand-alone program to do most of the work. But did you know that Photoshop can automatically do the majority of the work designing the composite? You’ll still need to add their school name and logo manually, but Photoshop will do 90 percent of the work of laying out the composite! What’s even better is that if your photo file names are the person’s names, Photoshop will place the person’s name under their photo… automatically.
Years ago, I noticed that a fraternity composite looked a lot like a contact sheet, so I wondered, “Could Photoshop create a class composite using the Contact Sheet feature?” I gave it a try, and it worked beautifully! You’ll find Contact Sheets II inside Photoshop under File>Automate>Contact Sheets II.
A few things to remember before you get started:
 1. All of your images must be the same aspect ratio. Crop them before starting this process.
2. Rename the images using the subject’s name before starting, IF their names are to appear below the photo. This saves lots of time later.
3. The vertical spacing needs to be roughly twice the size of the horizontal spacing as we are working with vertical images
(See graphic right).
4. Photoshop only lays out the images, not the school’s name or logo. Those will be added after the images are laid out.
I suggest a trial run or two to get your feet wet before beginning the process of making a customer-ready composite. Don’t expect to get it right the first time, but it’s OK. Photoshop will redo it quickly. You’ll need to guesstimate how many rows and columns you’ll need on the composite. Remember, school name and logo will be added later so leave room on your composite to add that when the time comes. For this composite, I have 60 images to create a 16×20.
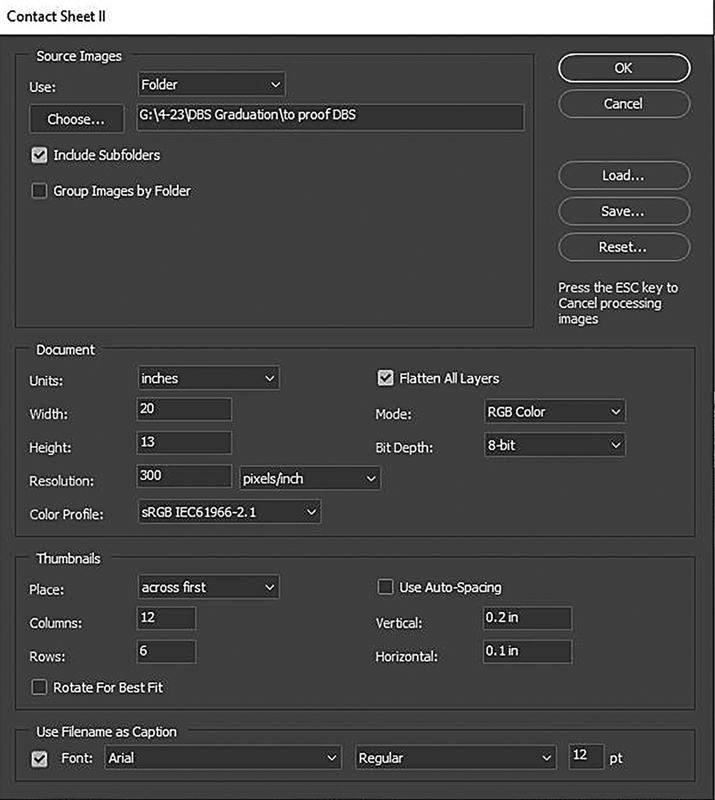
Let’s get started. Click on File>Automate>Contact Sheets II. Once there, you’ll find the dialog box illustrated in the above graphic. Here’s where you’ll layout the class composite with the height/width/resolution. You’ll also find options for number of columns and rows. To browse to the folder of images to be used for the composite, click Source Images>Choose. You can tweak the vertical or horizontal spacing between images in this dialog, too. For this composite, I chose .25 inch vertical spacing and .1 inch horizontal spacing. A test run or two will give you the basic idea of what numbers to use.
A good starting point regarding rows vs. columns is to use half has many rows as columns. For this composite, I’ve selected 12 columns and 6 rows. The composite stopped at 5 rows as all 60 images had been used during the creation process. Again, a little practice goes a long way.

In the dialog box you can select “Flatten all layers” for a finished, flattened document. If left unchecked, each student will be on their own layer making each easy to move around to clear space for the school’s name and logo. I’ve done it both ways. Once complete, your composite should look like the graphic above.
At this point, manually rearrange the images to clear a space in the middle for school’s name and logo. But there is one more thing I do before I commit to printing. I’ll save the composite as a PDF file and send it to the Administrator for proofing. Once she signs off on it, I’ll upload it to the lab and instruct the lab to have it dropped shipped to the school. Creating these composites for the school is more profitable than giving the school a percentage of the sale. It’s also quick and easy to do.
 Mark was 2014 TPPA President and is the author of TPPA’s Print Competition Guide Book. Mark represented Team USA at the World Cup of Professional Photography in 2020 and was on the Certification Commission that wrote the PPA Certification Exam. Mark owns a boutique studio in Lubbock, Texas.


