


 What do weddings, wars, and sunsets have in common? …fleeting moments. For photographers, however, these offer some of the most stressful conditions under which to shoot. For example, shooting sunsets is no big deal. But, if that sunset is a key component of a shoot that involves a subject that needs to be professionally lit, it is right up there with weddings and wars.
The photographic lesson I’m about to set down revolves around such an image that went so right after everything went so wrong. I created the above image during an assignment in Hawaii that involved lighting and capturing a series of images of Hollywood actor/writer, Sherri Synder. As the shoot unfolded, it quickly became an exercise in thinking on my feet and letting everything go that could not be changed or controlled, in order that I could concentrate on making a decent image.
To capture the fleeting beauty of a sunset, time is of the essence. So, if you are planning to light a person in front of such a spectacle, you need to arrive well before sunset to setup and work all the bugs out long before the magic moment.
This Hawaiian trip consisted of several real photo assignments that would also be captured on HD video for Adobe TV as an educational series on “Location Lighting Using Tethered Shooting with Lightroom.” For the project, we had a small crew consisting of: Rick Miller, Adobe USA; Megan Sinclair, cinematographer; local talent for hair, makeup, and assisting; and myself. Both Rick and Megan organized the locations, accommodation, car rentals, and lighting gear from California before meeting me in Hawaii. They did a great job setting it up. However, no amount of organizing could have prevented delayed flights and a last minute sick makeup artist, both of which put us some five hours behind schedule.
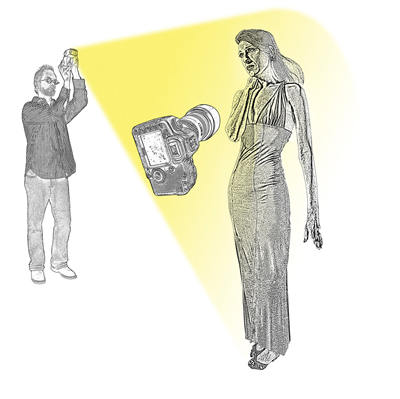
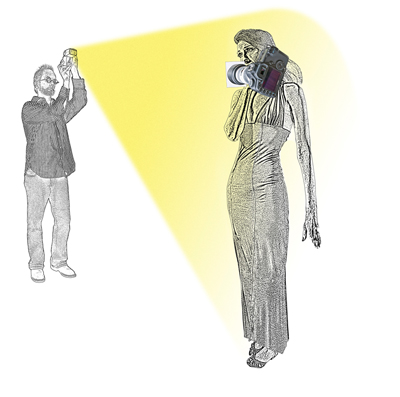
After much scrambling, we arrived at the sunset location 15 minutes before sunset. The race was on. We had a ton of lighting gear and no time to transport and set it up a quarter a mile from the parking lot over some rough terrain to the shoot site on a beautiful stretch of beach on Sand Island, near Honolulu. Determined to get something on this first day, we tore through the gear, dumping into my emptied camera bag only what we thought we would need: digital SLR camera, a couple of zoom lenses, a speed-light with radio slave, a roll of duct tape, a flash meter, and a flashlight. All of the real lighting equipment was left behind at the parking lot. Then, with Sherri already made up and costumed, we literally ran to the spot.
With the sun already set, Rick, in preparation for creating a mixed light image, assembled a speed-light and radio slave while I composed Sherri against the quickly fading sky. During these frenzied moments, I chose f5.6 as the perfect aperture for depth of field for this image. Next, I took a couple of in-camera meter readings to find an appropriate shutter speed for the f5.6 aperture setting (f5.6, 2 seconds at 100ISO) of the sky background. To dial in a suitable exposure on the speed-light, which Rick (now acting as a human light stand) aimed at Sherri, a flash meter with its incident dome directed toward this main light was brought into position next to Sherri’s face.
Unfortunately (and I will use that word a lot in this story), after taking the first reading, the read-out on the meter sputtered in and out of existence a couple of times as the poor thing’s life flashed before its eyes and then went blank… “Death by dead battery,” was the prognosis. We did have spare meters and batteries but, unfortunately, they were back at the parking lot with the rest of the gear. Since we were shooting digitally, we could rely on the LCD preview image on the back of the camera. But judging exposure and lighting ratio’s solely by screen previews, without meter readings to back it up, is less than optimum since our eyes are influenced by the surrounding environment brightnesses which effect critical visual judgment of preview screens.
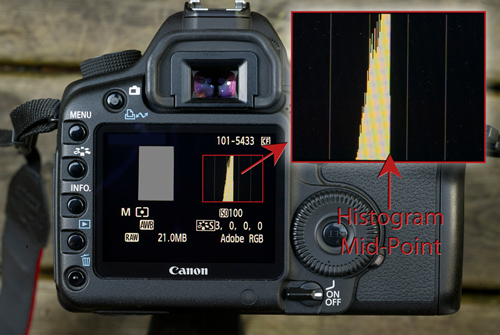
Accurate exposure is really critical in an image with high contrast subject matter and subtle shadow detail like the image on the title page. In my opinion, using the histogram to judge exposure in an image like this one, isn’t so hot either. It’s too interpretive and it tells you nothing about lighting ratios. You could argue that exposure could be corrected during processing (which it could) but, if you needed to brighten the exposure, this would surely create banding issues in the shadows since digital cameras do not assign much bit depth to dark tones.
This whole situation seemed like the perfect time to freak out. But, for some reason, I just “let go.” Maybe the laid back vibe of islands got through to my frenzied main-lander brain or, more likely, too many things had gone wrong and my brain said, “Enough!” and it let go. Anyhow, I completely relaxed, cleared my mind, and a few short moments later a solution popped into my mind.
Some time ago, while teaching a group of photo students about strobe/flash lighting, I came up with a metering solution for those who couldn’t afford flash meters. This temporary solution turned your digital SLR into an incident flash meter without using the in-camera meter at all!
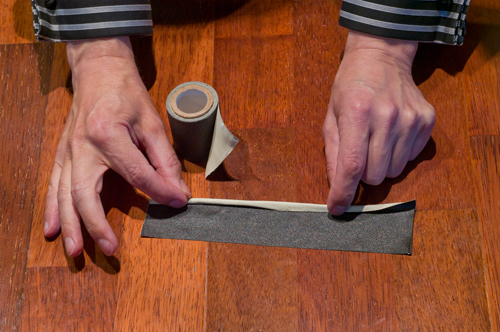
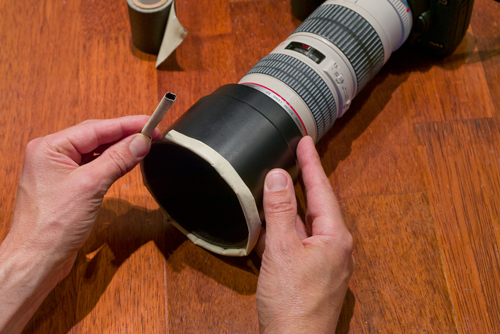
Acting on this memory, I made a homemade “filter holder” of rolled duct tape with sticky-side-out, wrapped around the front of the lens. With the tape in place, a blank sheet of clean white paper, torn from a notebook which always resides in my camera bag, was stuck to this “filter holder,” completely covering the front of the lens with clean, blank, unwrinkled white paper.
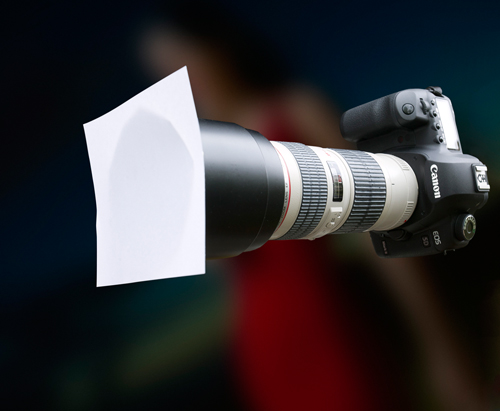
With the camera held next to Sherri and with the white paper end of this impromptu meter pointed at Rick’s speed-light, several exposures were taken. With each exposure, Rick varied the flash output with its manual output settings, creating a series of captures that look like solid grey swatches ranging from brighter to darker. Looking in turn at each image’s histogram on the back of the camera, I chose the image whose histogram spiked in the middle at middle grey. This method works only if the paper is the same density as the grey pigment on a middle-grey card.
Upon identifying the best exposure from the histogram, Rick reset the speed-light to the manual power setting that created that exposure, I removed the white paper from the lens and, with the help of a flashlight aimed at Sherri’s silhouetted face, auto-focused and then captured a series of images of Sherri.
It is funny how things turn out sometimes. With this shoot, everything seemed to be working against us. A photo shoot is wrought with an infinite number of variables and so you need time to work through them. In the end, I was pretty happy with the results of our efforts, even though it was too dark to get any video footage. I was also amazed at how fast the shoot came together. We managed to pull it off in just 7 minutes from arriving at the spot to final click of the shutter even though, at the time, it seemed like an eternity with the meter problems and with using the accurate-but-cumbersome white paper metering method. Also, I was really thankful to work with people like Rick who know their stuff and with Sherri who needed very little direction… simply tell her an emotion to portray and we were off and clicking.
A few points to wrap up with:
• I love the look of out-of-focus backgrounds and foregrounds because of the depth they lend to an image. Shallow depth-of-field is a strong creative tool for creating the illusion of depth (3D) in flat (2D) reproduction such as a photo. For that reason, we created the perfect exposure on Sherri by changing the speed-light power settings rather than the camera aperture. Keep in mind that the perfect exposure doesn’t have to alter camera aperture. The aperture can stay as is and the exposure can be dialed in by altering the light source power and/or changing distance of light source and/or, for constant light sources, changing shutter-speed.
• Hand holding a light source is fraught with danger. Rick had to concentrate on holding the speed-light in place. If his concentration wandered, the flash would point off the mark and our exposure on, Sherri would have suffered.
• What really makes the lighting work in this image is placement of the speed-light. If the flash had been left on-camera, the shadows would have fallen directly away from the camera creating flat lighting. In my mind, lighting should help create the illusion of depth in a photograph, not flatten it out. For this reason I worked with the flash off-camera and to one side. This positioning forced the shadows forward on Sherri. This light direction created a dramatic light pattern over her that portrayed the depth I was after. As for the shadows, some low level fill lighting at about 3 and 1/2 stops below the working camera exposure did occur from the overhead sky.
 Dave Montizambert will be teaching at the 2018 Texas School of Professional Photography. He lectures internationally on lighting, digital photography, and Adobe Photoshop. He is also a published author having written two books on lighting and digital photography plus numerous magazine articles on these topics in North America, Europe, Russia and Asia. Learn more at:
www.montizambert.com.


