


THE CHALLENGES OF WILDLIFE PHOTOGRAPHY
shutter speed and aperture
by Randy Dykstra
Everyone has seen the shows, Mutual of Omaha’s Wild Kingdom, Nature, Planet Earth and many more. Who cannot hear Marlin Perkins’ or David Aattenboruogh’s voice and not think of wonderful scenes of wild animals. People are amazed at nature photos found in publications like National Geographic. The world of animals entices a myriad of photographers. But what does it take to get great wildlife photos?
Being a nature and wildlife photographer, I’ve often been asked that question and my best answer may be to recite a quote first attributed to Arthur Fellig. “F8 and be there.” Although many have their own interpretations of this, mine is not in the literal sense. To me, it means “being prepared for your work ahead.” When a wildlife moment occurs, you can’t be fiddling with your camera controls re-adjusting them for the perfect exposure. You must be prepared ahead of time for the scene you are anticipating. Then, you must put yourself in a position to encounter the scene.
 We obviously cannot expect to photograph polar bears in south Texas, or lions in Alaska. You have to do the research to place yourself in position to see something awesome. As Nat Geo Photographer Jim Richardson once said, “If you want to be a better photographer, stand in front of more interesting stuff.”
Let’s start with the camera preparation. The best photographers spend 90% or more of their preparation time on getting “there” and getting the story. But that’s because they’ve perfected their craft to a point where controlling their camera is second nature. Your camera is a tool, or an instrument that you must master. A concert pianist doesn’t simply “go” and set the piano to “auto.” They master their instrument by learning the tonal scale and chords and then practicing until they can produce a masterpiece.
The same goes for your camera. You must learn how to use all its features and how it interacts with the surroundings. The more you use it the more it becomes second nature. As much as I know about this profession, I’m constantly learning more and alternate ways of doing things.
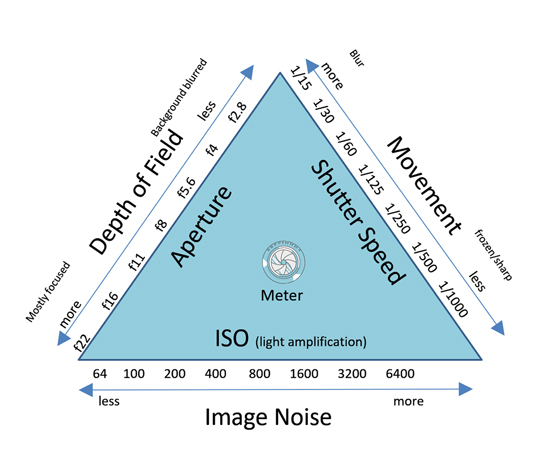
The Exposure Triangle – Understanding what each of the controls of an Exposure Triangle does in a selected environment is crucial for success. Then, understanding how our camera meters light is central to understanding how to manipulate those controls. Let’s talk about the aspects of each control in regards to wildlife photography.
First, let’s look at shutter speed or “exposure duration.” Shutter speed is needed to control movement. It can be used to freeze a scene or to blur it, implying to the viewer the sense of motion.
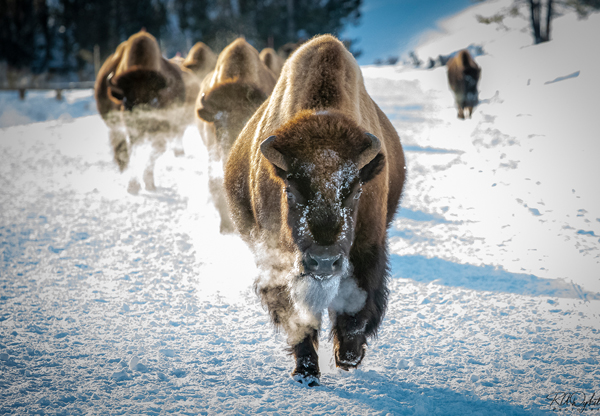 For most wildlife photos, you typically want to get your subject (or at least its face and eyes) tack sharp. Accomplishing that depends on the scene. Your first consideration is… “Is the animal moving?” Let’s take the simplest case where the animal is primarily stationary or at least stopping still for moments at a time. This could be as easy as just setting up shutter priory mode and dialing in a value. But what value? Being outside, the environment is ever changing. The sun could be coming in and out of clouds making the lighting look like a roller coaster. The animal may be near trees or other objects that create shadows. More than likely, the animal is a bit away from you so you are having to use telephoto lens. All these factors should go through your thought process “before” you find a 2000 pound bison staring you down.
With that said, wildlife photographers often hand-hold their camera system just for the convenience of moving it around at a moment’s notice. Most seasoned photographers have heard of the hand holding reciprocal of Focal length guideline: Your minimum/slowest shutter speed should be no more than 1/focal length in mm. If you have 200mm lens, the shutter speed should be 1/200 sec or faster. Now, let’s add in adrenaline at seeing a remarkable scene and the knowledge you may just be bringing home the next Nat Geo cover. All of these factors, for me, will cause me to double the focal length value before finding the reciprocal, thus the above situation now requires 1/400 sec or faster. But what happens the moment the animal decides it’s tired of your posing instructions? You have to deal with motion.
Consider for our purposes in keeping an image sharp, that motion is relative to the movement the light is moved across your sensor. Each point of light will create a tiny circle of light on your sensor and, depending on the focus point, the circle may be small and crisp or larger and moving.
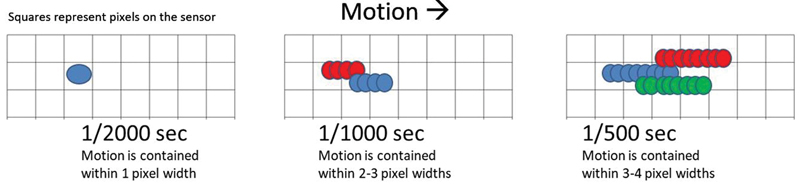
To have the sharpest image, you want to minimize the motion so a single point of light is contained within a single pixel. If a longer duration is allowed, the movement smears the point of light over adjacent pixels, causing blurring. Several factors change the relative motion:
1. The closer the object is to the camera, the faster its image moves across the sensor. This requires a faster shutter speed to freeze the action. As a guideline, as an object’s distance away from the camera doubles, you can decrease your shutter speed by a stop and vice versa.
2. The Focal length of your lens affects relative motion. A longer focal length means a smaller “Field of View,” meaning an object does not need to travel as far to move across the full frame. This translates into faster motion on the sensor. As a guideline, if you double the focal length, you must double your shutter speed to maintain relative detail.
3. Pixel density reduces the distance the point of light can travel before blurring to an adjacent pixel. Total megapixels is not a factor but the density into which they are packed is a factor. Most crop sensors, 20 MP or greater, have higher densities than 36-50 MP full-frame sensors. All crop sensors over 20 MP and full-frame sensors over 40 MP are currently considered high density. There is no true guideline for this, since sensors are so different. Just remember that high density sensors require a faster shutter speed to maintain same relative level of blurring (or non-blurring). However, the resolution increase more than makes up for this drawback.
With all these factors considered, here are some guidelines for starting points for your initial shutter speed setting for moving objects with a 300mm lens. Remember, these are NOT hard and fast settings and that you should test and adjust to get the best sharpness for the current environment and conditions you are photographing.
Animals walking = 1/800; Animals running = 1/1250;
Birds in flight = 1/2000; Fast erratic flight =1/3200
Each of these are then adjusted for the above-mentioned conditions. Remember it’s always better to start off a little faster than needed and slow down than the other way and miss shots due to motion blur. However, this has to be balanced with the other controls as we will discuss later on.
With experience, you will be able to accurately gauge your starting point. All this said, that magical moment when wildlife occurs in a blink of an eye, you really don’t have time to adjust and test before the moment is gone. You have to do your homework and practice and ingrain settings into your brain, and have them prepared and set prior to the euphoric moment happening.
The other side of the coin is Aperture. All but the very beginner of photographers know that aperture is a way of changing the amount of light that goes through our lens. Apertures are indicated by f-stops and that number is actually in the denominator of a fraction (1/number) and so it seems as if the numbers are backwards. Large apertures are f2, f2.8, f4, while small apertures are f16, f18, f22.
Aperture and shutter speed have a reciprocity relationship. In order to maintain the same exposure, if you increase shutter speed (make the duration shorter) you have to “open” up the aperture (make the hole larger to allow more light through the lens). A by-product of opening and closing the aperture is that (optically) this changes how much of an area is in acceptable focus. This area is known as “Depth of Field” (DOF).
Aperture is the main component in changing DOF. Controlling DOF helps us create isolation or not. The larger apertures (f2, f2.8, f4) are sometimes called “isolation exposures” because they create a narrow DOF which can be used to “isolate” your subject from the foreground and background. The small apertures (f16, f22) have been called “story telling exposures” since they provide a large DOF and all of the environment is in focus showing you the whole story. Then there are the middle apertures which well-known photographer Bryan Peterson refers to “Who Cares” because using these typically means DOF is not a major concern.
DOF is one of the most often misunderstood terms in photography. Many people mistakenly think DOF refers to the quality of the background or what is called “Bokeh.” DOF is the area of acceptable focus on either side of the focus plane. While aperture is the main control of DOF, there are other aspects which change DOF. The focal length of your lens affects DOF. The longer the focal length the less depth of field you have. Distance to your subject is also a concern. The closer your subject is to your lens the shallower the DOF. All of these factors need to be considered when making an exposure decision.
The problem comes about in the reciprocity relationship. We already discussed that typically we want a fast shutter speed to freeze motion and prevent any blur, which means we need more light through our lens with a larger aperture. That results in reduced DOF. We also want to try to fill the frame with the subject. Filling the frame means either moving closer or getting a larger focal length lens, both of which reduces our DOF. For example, a 200mm lens at f6.3 has almost 30 feet of DOF at 100 feet distance but only a little over 7 feet DOF at 50 feet. Get a larger focal length 500mm lens at the same f6.3 at 100 feet the DOF is about 4.5 feet. Move in closer to 50 feet and DOF is barely more than one foot.
Typically, we want to have a relatively large DOF… enough to keep most of the animals in focus… and so far all we’ve done is reduce the DOF. This is where the balancing act comes in setting up an optimal exposure with acceptable DOF. I like to look at my subject and see how big it is and what environment is surrounding it. If the environment is not distracting or, better yet, helping to tell the story, I’ll tend towards a deeper DOF. If, however, the background is busy and distracting, I’ll tend to use a shallow DOF but enough to focus the majority of the subject. So, if you want a fast shutter speed and a storytelling aperture, you had better hope for a lot of light. All this and we aren’t even going to discuss diffraction yet.
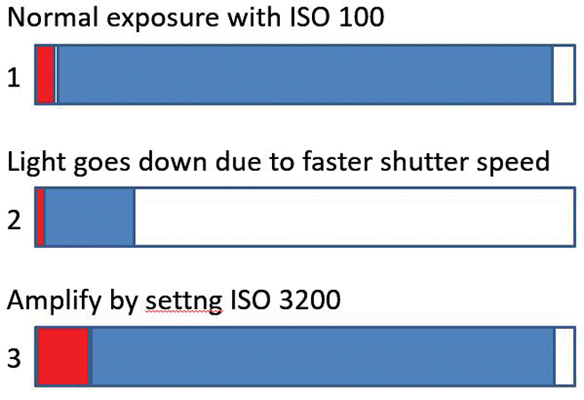
But “wait,” you say, “there are three sides to a triangle.” That is correct. ISO is the third leg. ISO started out as a standardization of the sensitivity of emulsion based film. With the introduction of digital sensors, it became a standardized scale for measuring sensitivity to light. Stay tuned and we will discuss this and more in a future article.
 As a photographer, you need to know your camera and learn when to switch modes to provide you with better results. This only comes with use and practice. Summing this all up, shutter speed is the wildlife’s photographers best friend and worst enemy, it can freeze your image sharp, but it robs you of light. As with all photography, decisions are made to isolate subjects or to tell a bigger story. But in order for these decisions to be made requires the knowledge of how the tool in use (your camera) operates and reacts to differing conditions and light. Hopefully, I’ve provided you with a few insights and that you learned a few things that will help you with your next foray into the field. Remember, go out and try different setting and practice taking shots with them. Before long, you will be coming back from every trip with several “Wall Hangers.”
 Randy Dykstra made a lifestyle decision a few years back, and turned his life-long passion for photography, the great outdoors, and science into a thriving vocation. He now leads incredible photography tours to exotic locales, educating and inspiring photographers of all skill levels. In addition to his role as tour guide and mentor, Randy also specializes in the post processing side of photography, via his Lightroom and Photoshop skills. He shares these skills through classes, training workshops, and speaking engagements. His photography is also available for purchase.
Randy also shares his knowledge via social means. He is Vice-president of the North Austin Photographic Society, organizer of two successful Meetup Groups, and administrator to a very large and active Facebook group. To find out more about his photography tours, workshops, and classes please visit his website at https://www.rdykstraphoto.com/.


