


 If you love nature, love photography, and love challenges and surprises, photographing with a camera trap may be right up your alley. I’m not talking about the various trail or game cameras that capture jpg or video, which may
be fine for scouting an area and discovering what wildlife subjects might be lurking about. No, I’m talking about using a regular DSLR and electronic flashes, all triggered by a tripping device using an infrared beam or lasers.
 Let’s cover the three ‘loves’ mentioned above. Loving nature – enough said, that should be a given for this type of work. Loving photography, that’s a given, too, but doing camera trap photography allows me to incorporate great lighting and compositions as I plan and set up my gear in a whole new way. If you love challenges and surprises, you’ll have plenty of both, as you work out where an animal may pass, and rig up the gear required for the shot. I’ll guarantee you’ll get plenty of surprises, as your camera trap may capture wildlife you had never expected.
I’ve always been interested in capturing wildlife behavior, especially activities that are rarely seen. In the 1970’s a photography magazine featured some incredible images produced by the first commercially available camera trap and I knew I had to have one. The product was the Dalebeam, and although somewhat crude by today’s standards it allowed me to capture owls flying at night, frogs jumping, and rodents hopping across logs. Other entrepreneurs subsequently built more sophisticated versions, leading to the state of the art equipment offered today.
The key to this type of photography is a reliable triggering device. If you’re handy, you might be able to make one yourself, but considering the time and effort involved, I’d suggest buying the gear. I use either a Range IR or a Sabre, both available from www.cognisys-inc.com. Either unit will fire a camera or a flash when a subject breaks their invisible infrared beams. Both units are small and quite portable, about the size of a pack of playing cards. The Range IR is powered by two AA batteries, while the Sabre uses a rechargeable battery.
The Range IR is extremely easy to use – just aim it in the direction you expect an animal to pass. If the Range IR is wired to a camera (via the appropriate cable) you must take into consideration the lag time of the camera. Lag time might be an unfamiliar term, but it refers to the time that elapses between the device being triggered and the camera actually firing. This can be as long as 1/10th sec for some cameras, long enough that a running squirrel or bobcat passes out of the frame before the camera fires. Cognisys explains how to determine your camera’s lag time, but in the field it’s a matter of trial and error, as your wildlife subjects will move at varying speeds. You’ll have to focus the lens and position your flashes at that location, and not necessarily at the point of intersection with the beam.
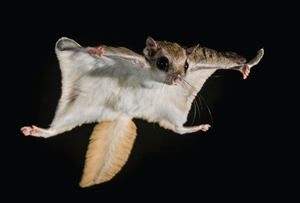 There is no lag time when a flash is connected to the Range IR or Sabre. When a subject breaks the beam, the flash fires, virtually instantaneously. To record an image, however, your camera must be on Bulb, or a very long shutter speed, to insure that the shutter is open when the flash fires. Obviously, you can only do this at night or in very low ambient light, but that’s the trick to photographing bats or moths or nocturnal insects.
The setup, in theory, can be quite easy, only requiring that a single infrared beam is aimed across the spot you expect the bat or bug to fly. For example, in Tanzania hundreds of Leaf-nosed Bats exited a large but narrow gap in a Baobob tree just after dusk, and the setup was simple. I positioned a Range IR’s beam to point straight up in front of the opening, insuring that at least half the bats passed through the beam. My setup would have made MacGyver proud, as I had my flashes mounted on small ballheads screwed into 12 inch long 1/4×20 metal rods that I lashed to a frame of bamboo poles braced against the twelve foot wide tree.
Using an electronic cable release I locked for continuous firing, I made three second exposures as the bats flew out for their nightly feed for the next two hours. As you might expect, not every frame had a bat, and some were poorly framed when an outstretched wing tip tripped the beam, but I still ended up with several hundred bat images, leaving me with the delicious problem of picking the cream of that lot!
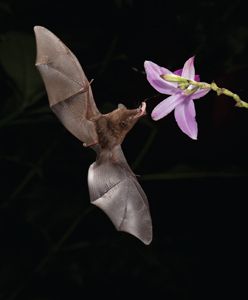
Don’t expect results if you simply set up a beam and hope that a bat will fly through. It won’t happen. A bat has to be going somewhere specific, like out of a roost hole or across a small pond for a drink, or visiting a flower for a sip of nectar. That’s how I shot the Nectar-feeding Bat. Earlier in the day, a staffer at a lodge in Costa Rica casually complained that his hummingbird feeders were drained nightly by those darn bats. What bats?!
 That evening I set up a Range IR and four flashes, this time mounted on light stands, around the feeder. Just after dark the bats arrived, by the score. After making multiple shots around the feeder, I substituted a flower sprinkled with sugar water, while bats swirled around me, sometimes colliding with my hands or head – you gotta love bats I guess.
While using just one beam certainly works, and is the way I do a lot of my camera trap photography, you have no control over the direction and little control over the precise position of your subject. An Ocelot in Brazil’s Pantanal or an Armadillo in a Texas backyard might pass anywhere within the length of the beam, which could result in the subject half out of the frame. If you’re planning for a head-on shot, you still might find you’re capturing only the back end. That’s when you’d want to use two beams, and that’s most easily accomplished by using the Sabres.
Two Sabres, the Cadillac of these devices, can be programmed so that a subject must cross both beams simultaneously, or break one beam first, with the camera or flash firing only after the second beam is broken. In that way, you can insure that your subject is travelling in the direction you wanted – unless it walks or runs backwards!
 Whenever I can, I’ll position the beam to cross a trail, for just as we like to walk the easiest route through a field or a forest, so too do most animals. At tourist lodges in Africa, Genets and Galagos, also known as Bush babies, often visit dining areas after dark for handouts or scraps. It’s a simple matter then to place a couple of those scraps in a photogenic setting, like a tree limb or an interesting, wild-looking trail. For mammal work, with the exception of the bats, I connect the camera to the Range IR or Sabre, so I must factor in the camera’s lag time as I focus and compose.
Once, in Brazil’s Pantanal, I was hoping to photograph a Jaguar walking down a trail. I set up for a side view, and crawled down the trail and through the beam to make sure everything was working. That confirmed, I headed back to camp. Unfortunately I didn’t account for the Jaguar’s faster walking speed, and all I captured was the back half of the two Jaguars that passed! Often you can slow down, or even stop an animal right at the beam by placing a little food or an odd scent. Although Ocelots and Jaguars eat meat, they’ll often stop to investigate the fruit and bananas I’ve placed as bait for deer or tapirs.
While all this might sound a bit complicated or involve a lot of effort, setting up the Range IR or Sabre and the camera is the easy part. What’s far more challenging is the lighting, at least if you want the image to be aesthetically pleasing. One on-camera flash will work, but results in flat, harsh lighting. I generally use several flashes, all off-camera, and triggered by Phottix Ares remotes, positioning the flashes as I might for portraits, with a key, fill, hair light, and perhaps a background light, if I use four flashes.
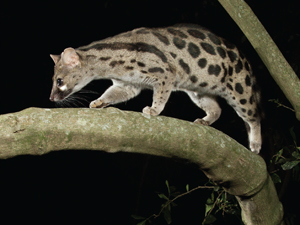
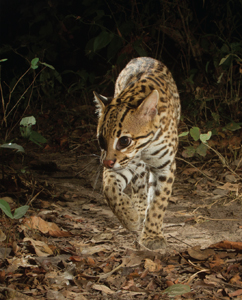 I’d suggest a minimum of three flashes for any set up. Two flashes are usually needed to properly illuminate the side of the animal that faces the camera. Sometimes I’ll use both front flashes as key lights, one on either side of the animal, and sometimes as a key and a fill. The third flash is usually positioned as a hair light. I like using a hair light or back light for nocturnal subjects, as it not only sets off the subject from the background but it also creates a dappled light appearance, as if the moon is shining brightly or shafts of sunlight are filtering in thin columns through a jungle canopy. The Ocelot (right) is a nice example of this. Nocturnal subjects look fine with a black, unlit background, so I may use a fourth flash to fill in the lower regions of a subject, positioning that flash fairly low to the ground.
I set my flashes on manual mode, usually at a lower power ratio to enable fast flash recycling. The camera is on manual, too, using the fastest flash synch possible and an exposure that will underexpose any ambient light to maintain a full flash exposure. Ambient light may still register in the background, but flash ghosting is minimized or eliminated.
One of the real advantages to this type of photography is it allows you to literally do two things at once. Once everything is set up, with flashes and beam positioned and the camera focused and set for the proper exposure, you’re free to move on to other chores. Since a lot of camera trap work involves nocturnal wildlife, I can be sleeping while the camera is working!
Some critics might argue that ‘you’ didn’t take the picture, the camera did, when using a camera trap. While that’s certainly true in the most literal sense, the planning involved, and the mastery of techniques that includes predicting animal behavior and position, attractive lighting, and composing for the best angle for the shot you envision, requires just as much skill, if not more, than what would be required if I were behind the camera. And some shots, like flying bats or very shy species, like Ocelots, might never be captured otherwise.
Weather and equipment security can be an issue. If rain is likely, I’ll simply cover the flashes, beam, and camera in Ziploc plastic bags. I cut a hole for the lens, mount a lens hood, and secure the bag via a rubber band. Equipment security is another matter, and I’d recommend leaving gear overnight only in areas where access is restricted or, if not, where the chances of having any nefarious passers-by are slim.
I’ve done this type of work in Texas, Arizona, at my home in Pennsylvania, and in Kenya, Tanzania, India, and Brazil. For these foreign destinations, where dangerous animals may be lurking, I set up these traps close to the lodge during daylight hours when I’m fairly safe. Once, though, in Brazil, I had a setup going in a forest and after checking the trap at dawn, I decided to let the setup go throughout the morning to see what might pass through. To my surprise, less than a half hour later, a Jaguar walked through the trap. I’m wondering if it was watching me the entire time. As I said, these camera traps yield some amazing surprises, and perhaps some chills as well.
Joe McDonald has been photographing wildlife and nature since he was a high school freshman and was selling his photos to the National Wildlife Federation. Soon after, he was represented by several different stock photo agencies, eventually being represented worldwide by over 18 agencies. Since then, he has been published in every natural history publication in the U.S., including Audubon, Bird Watcher’s Digest, Birder’s World, Defenders, Living Bird, Natural History, National and International Wildlife, Ranger Rick, Smithsonian, Wildlife Conservation, and more. He is the author of nine books and one e-book. Joe is especially well known for his expertise in electronic flash and using equipment for high speed flash and for remote, unmanned photography. He conducts a special Advanced Flash course nearly every year, covering all aspects of electronic flash and camera remotes. For more information, go to: www.hoothollow.com


