

")

Part 2: The 5 Tricks of a Fashion Shoot
 Fashion shoots are fun, but we need to go into the shoot with a system. Shooting fashion isn’t easier than other styles, it doesn’t mean just shooting thousands of haphazard images hoping something works, and it doesn’t mean we forget our training.
Instead as professionals we use our skills to set ourselves up for success. We get great images all shoot long, no excuses, and we do it quickly and by taking very few images.
So how do we do it? Here are 5 big tricks to a better fashion shoot.
1. You must balance the creative and the technical sides – We each have two sides to our brain, the creative and the technical, and in every photo shoot they war with each other, especially in a fashion shoot. Learning to balance these correctly will mean amazing results.
In a fashion shoot, the creative side wants to be a free bird and just do whatever. It wants to shoot hundreds if not thousands of images and just have fun, letting the technical side take the duty of sorting them all out later and fixing all the exposure problems and other issues. It doesn’t want to be technical or know stuff or have a plan, it just wants to shoot and have fun.
The technical side on the other hand wants structure, it wants things perfect, and wants correct exposures and poses. It wants to fix every detail, and constantly nags you about the placement of your lights and wonders if details of a pose are correct. It has a quest for perfection, but left unbalanced it returns rigidity.
Both sides of the brain alone are the death of a shoot, yet both are needed in harmony for a great shoot. Balancing them means having a structure to the shoot, yet allows for flow, letting little things go. It means noticing details, but only fixing the ones that matter, and it means knowing what matters. It means understanding your gear manually, so you can be free to create and not worry if things are working. It means feeling the shoot and not looking at the back of the camera, but instead interacting with the model and having fun. It means noticing the nuances of reflections in the eyes while you nudge a light, or how the slightest adjustment in a pose changes everything.
Learning to balance both sides of the brain means your images will be fun and full of life, but will also have perfect exposures and color balance. You’ll be able to pull out of the model a genuine expression, and your lighting will makes her eyes pop and skin glow without retouching.
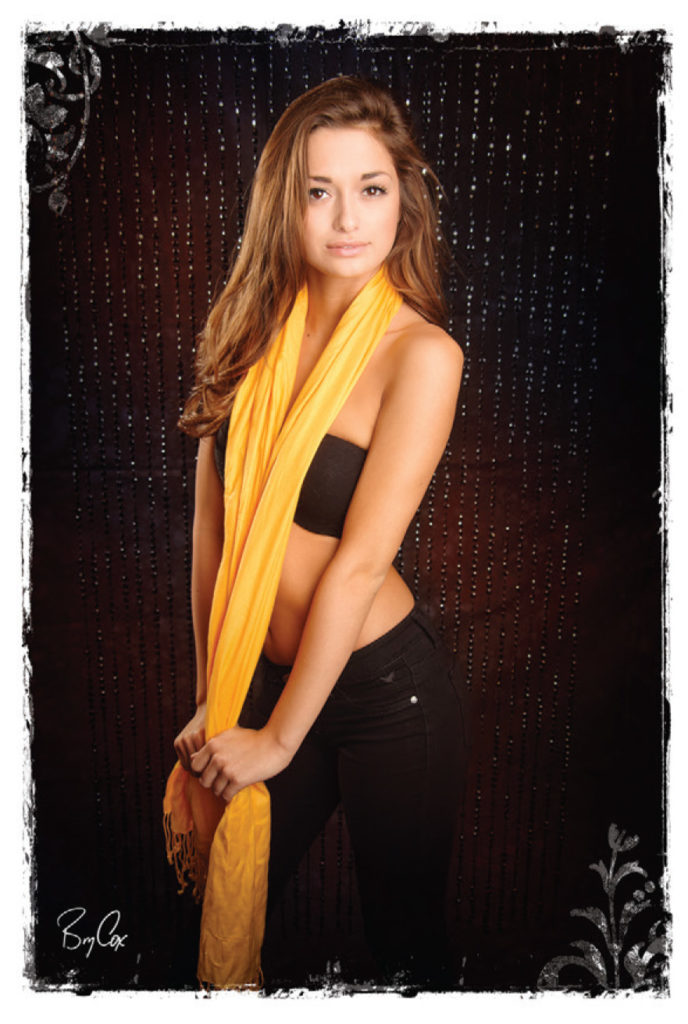
2. Think and shoot in short “Idea Sets” of just 3-5 images, no shot the same – You are not allowed to shoot the same thing twice. You must change every shot. The trick is to think in small changes and refinements for just 3-5 images, but then you must make a big change.
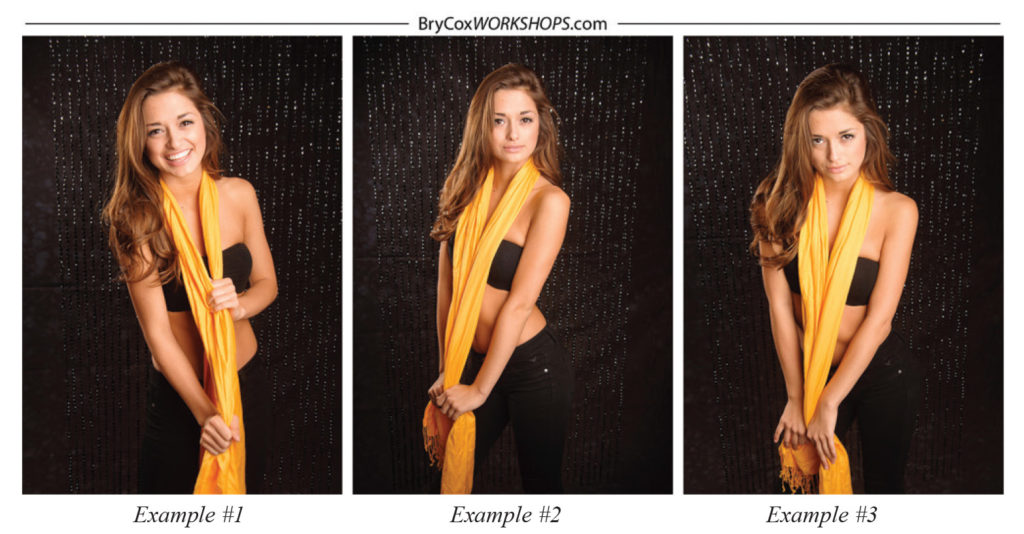 Start with a photo, then refine a small detail and shoot again, refine it even more and shoot again. If you need to refine and shoot one or two more times, that’s okay, but after 3-5 images you’re done and must shake that off and do something completely different. Now we start that process again for another 3-5 images. No image can ever be the same.
Slight refinements within an “idea set” can include changes in expression, very slight changes to the details of a pose, and slight adjustments to your camera position.
Big changes for a new “idea set” can include a complete change of pose, a new outfit, change of the hair, a different background, a new lighting setup, or even a change of lens.
Working like this is good for the creative side, the technical side, and it’s good for the entire shoot. The creative side likes flow and energy, and loves a challenge. The technical side likes structure and a plan, and the entire shoot benefits because we have an awesome variety of images with nothing being the
same.
3. Looking at the back of the camera is not allowed – If you want to get in the groove of a shoot, have excellent interaction with your model, get great expressions, feel in the zone, and be in balance with the creative and technical sides of your brain, then you can’t be looking at the back of the camera after every shot. We never shoot and look, shoot and look – that’s not allowed.
So go into your camera settings and turn off the ‘Auto-Preview’ setting. It should never be on. On the rare occasion when a client is off changing in another room and you need to see an image, there is a top-secret button on your camera that no one knows about called ‘Play’ that does the same thing.
When I train photographers, I share a lot of my tricks for fast lighting setups and perfect exposures. Use those tricks and trust that everything is working. Feel the shots internally as you’re taking them and notice every detail.
If you need to review an image, take a breath and calmly think back and review it in your mind. The more you pay attention to the details of the shoot and get into it, the better you’ll be able to recall nuances of the image from your own subconscious, including what flashes did during that split second. And as an added bonus, you’ll be amazed at how long your batteries last.
 4. You must understand posing, and see everything – Constantly ask yourself, “Does that work or is it distracting?” Remember that every part of a person’s pose either works for an image or it works against it and is a distraction. We want to remove distractions and also flatter, and the best way to flatter is to remember my one rule of posing: women need to conserve space visually in a photograph and men need to take up more space visually.
Our habit as artists must be to analyze every single area of every person before we take a photo. The more you do it, the quicker you’ll get. Soon, you’ll see every elbow, waist, and knee out of the corner of your eye.
5. Lighting must match the pose – I have a lot of videos and training on just lighting. But the quick summary is that lighting and posing must work together.
If I adjust a pose, I must adjust my lighting to match. If I move my lighting, then I must adjust the pose to match. Lighting must be manual, measured, and angled such that images look perfect, right out of the camera.
Lighting isn’t just about getting an exposure, but rather it’s about sculpting people, making their eyes pop, and skin glow. When you do it right, there is no need to retouch.
Coming up in Part 3 in this series, I’ll show these principles in action using more of this shoot that I did at Texas School as part of a large crowd demo in under 5 minutes. In that time, I created about 35 total images grouped in smaller idea sets. You’ll see them un-retouched, un-corrected, un-cropped, and grouped into sets, along with details on how and why I did what I did.
Of course, I teach all of this and more at Texas School. Come train with me, and in the meantime, check out more of my tutorials at BryCoxWORKSHOPS.com.
Good Luck and Happy Shooting!

In his class at the Texas School of Professional Photography, Bry will share his system to create images that are creative and emotional while being technically awesome. Your images will be different, fresh, and won’t require a lot of post-production work. “Celebrity Style Imaging” is the trademarked name of Bry’s studio because he photographs everyday clients the same way as VIP clients. Learn more about his class at Texas School.


