


")

")


Part 3: Fashion Skills in Action
In the last two parts of this series, I shared my one rule of fashion posing which is to make women conserve space visually so that every part of them looks smaller. I also shared my system of creating within short “idea sets” of 3-5 images, never shooting the same thing twice, making small and slight refinements within the set, but doing something different after about three shots.
We also talked about turning off the ‘Auto-Preview’ on your camera and never looking at the back, getting completely into the shoot, interacting with your model, and being aware of every detail. We also talked about letting little things go, balancing the war in the mind between the technical and creative sides of the brain.
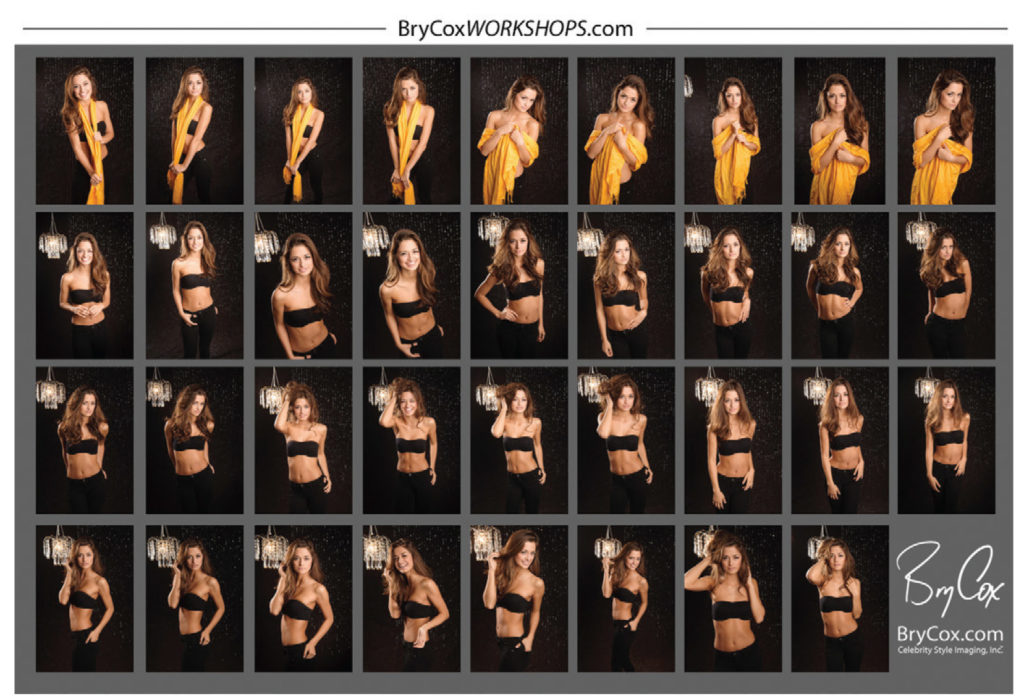 So let’s see those points in action using a shoot I did as a crowd demo while instructing at Texas School. The metadata shows under 5 minutes of actual shooting from the first shot to the end, and these all look good because of my normal pre-flight systems check that I teach, making my lighting, exposure, and color balance perfect in camera. So what you are seeing are un-retouched, un-corrected and un-cropped.
No matter the time, the goal is always quality not quantity. In this case, even in a short period of time and while teaching, I ended up with about 35 total images. Let’s zoom in and look at a few in the first “idea set.”
In saying hi to this model, I saw she had a scarf with her gear. Her in black with the background being dark, I thought the yellow would add some pop. I said, “Let’s use that scarf of yours. Wrap it around you and have fun with it…” She did and with a little interaction and teasing, I got a perfect, glowing smile, Example #1.
Her smile is genuine and her eyes are glowing. It’s a moment that works and is candid. Her wrists are bent in, making them smaller, her shoulders and hip are turned such that they are smaller.
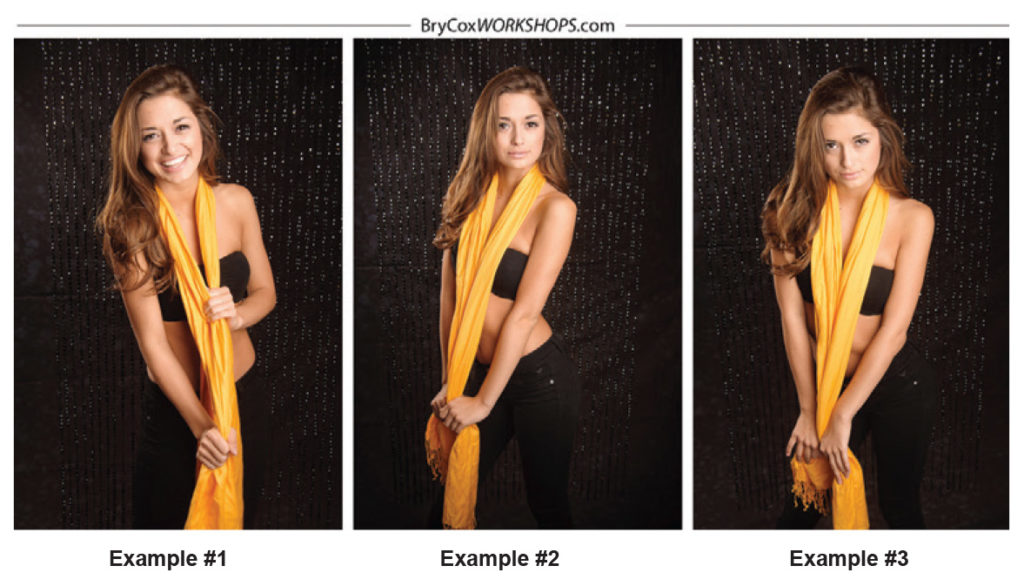 But I began to refine within the “idea set.” I turned her further away from my main light to shadow her stomach, making her look even smaller. I twisted her shoulder back towards me for curvier lines and a slimmer look. She naturally straightened her arms and bent in her wrists which was really good. I turned her head back towards her shoulder and said something for a serious expression and we have Example #2.
Notice that she is naturally standing on her front leg. I would normally change that, but in rare circumstances it works and here it works, so I let it be.
In general though, every woman looks better with the weight on the back leg meaning that her front knee is bent (the knee most towards you). Why? Because it makes her hips and waist look smaller visually, meaning we are conserving visual space to go back to my one rule of posing from Part 1. Smaller means thinner.
From there I wanted her to lean towards me and bring her chin down just slightly. She did, but leaned too much and brought her chin down too much and her wrists naturally straightened out, Example #3. There’s too much to fix, I was at the end of the set, and I already felt I had a clear winner. So I had her shake it off by changing everything and beginning the next new idea set.
To start this off I said, “What if you were wrapped in your scarf like you werecold.” I had her turn into my light and we have Example #4. It’s good, but could be better. I liked her head turned to the side but any more and I would have lost the back eye. Turning her head a bit more would mean her back eye would be gobbled up between the edges of her face and her nose. It was getting smaller too, so I turned her chin back towards me, Example #5.
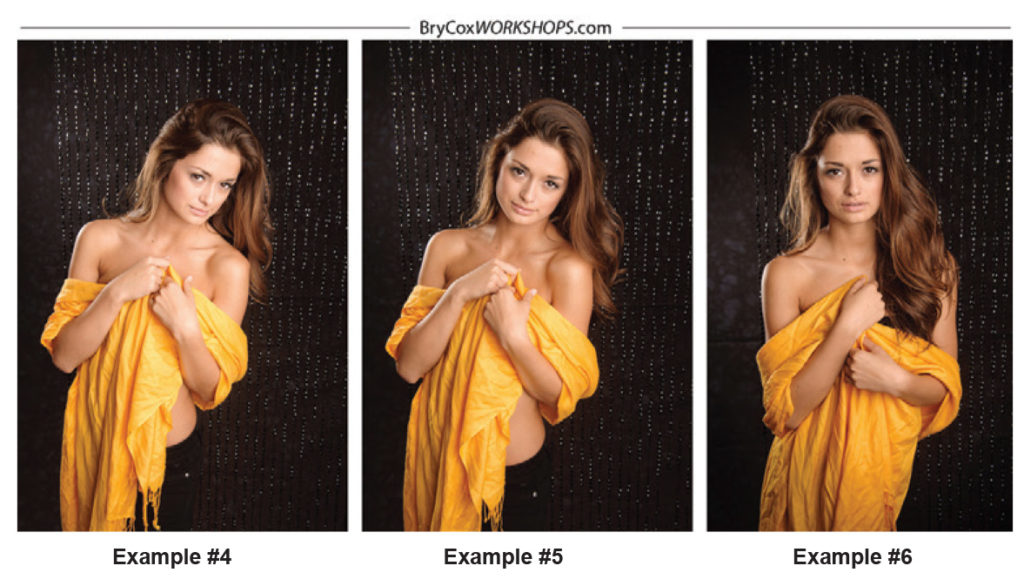 This was even better but I wasn’t sure of the expression or the wrists. I had her take a deep breath and shift her stance and arms. This slight refinement and lips open, and I have my clear winner of the set, Example #6.
For the next set, I got rid of the scarf. I started chatting and observing her natural stance. Her weight was on her back leg, her waist turned slightly, and you can see both sides of her waist (which keeps her middle section from being blocked up and looking thick). She’s playing with her hands wondering what to do with them, but it’s feminine and works. With the right interaction, she brightens up and we have Example #7.
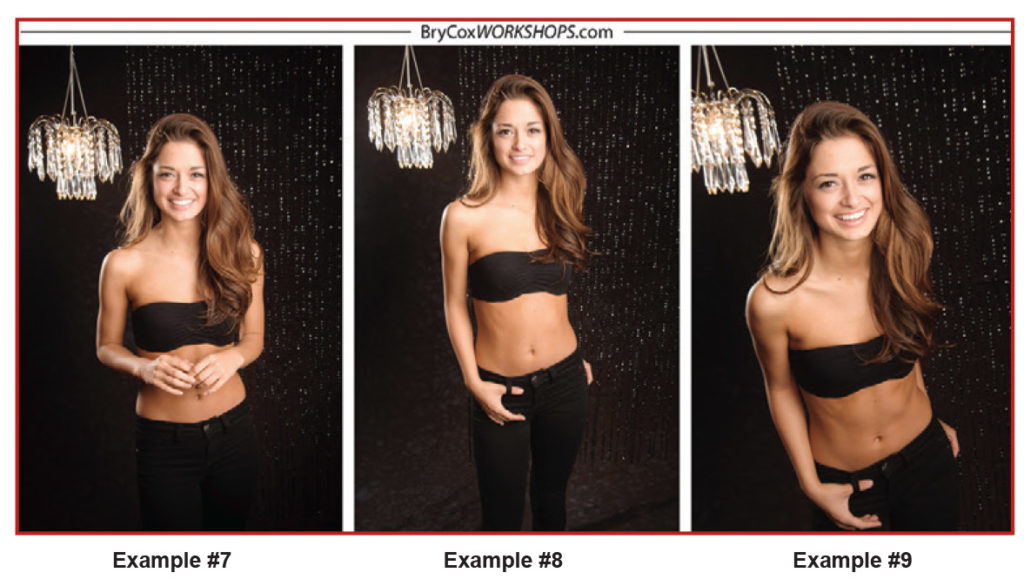 I then helped her with her hands and suggested putting one hand in her front pocket and one in her back. Her front pockets were fake though, so we hitched her thumb on her belt loop instead. Again, I’m trying to keep her arms from blocking up her body so she looks thinner, Example #8.
From there I refine by having her lean towards me. I stretch up for a high camera angle, said something that got a genuine laugh, Example #9.
Final Retouching – There are more images to share, and I’ll go through them in the final part 4 of the series. But let’s look at a couple of these finished and retouched.
Again, taking control of exposure and color balance at the time of the shoot may take a minute or two, but it saves me tons of time on the computer later. Computer time then becomes a breeze.
If you do what I teach, there is no need for adjustments. Lighting was specifically used to flatter and make her skin and eyes pop. That means I don’t need any over-the-top skin blur techniques and I don’t need to add fake catch lights in her eyes.
My computer time is just being picky to select favorites, and then jazzing them up a bit.
Compare these final versions to the previous un-retouched versions. I did some slight retouching, I created some color effects using light leaks from
my PowerPack Action Set, and I finished these off with some of my own custom edges from my Edgy Edges Collection. These are now signed, ready for printing.
Of course, I teach all of this and more at Texas School. Come train with me, and in the meantime, check out more of my tutorials at BryCoxWORKSHOPS.com.
Good luck and Happy Shooting!
In his class at the Texas School of Professional Photography, Bry will share his system to create images that are creative and emotional while being technically awesome. Your images will be different, fresh, and won’t require a lot of post-production work. “Celebrity Style Imaging” is the trademarked name of Bry’s studio because he photographs everyday clients the same way as VIP clients. Learn more about his class at Texas School.


