


 My assignment, besides creating images for every vehicle that crossed the dealership’s lot, was to create a special image for advertising once a week. This week, my client brought in an amazing 2015 Yamaha Star Bolt motorcycle that I knew right away would be perfect for lightpainting because it had very little chrome, lots of bright colors and nothing ridiculous done to it. It was just perfect for my style. For the location, I had access to a huge wash bay garage in the back and, while it would be extremely hot, it would make the perfect dark studio. After closing all the doors, it was time to go to work.
Lightpainting came to me out of necessity. At the time, I had a lack of funds and had only one AlienBee Strobe and one LumeCube LED light. This forced me to be creative in my thinking and, with a background in Photoshop, it did not take long to come up with a solution. Before long, I fell in love with the unique style, options and the creative look. With only one light source, it is possible to create layers to light any subject from multiple angles, giving the look of using several lights. Although watching a few tutorials was helpful, my technique was the result of trial and error.
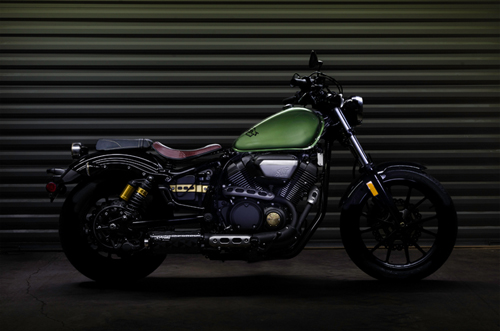
Once the “dark studio” room is locked down, the camera was placed on my trusty tripod. First rule: Once you create the first image, you can never move the camera. To avoid “camera shake,” the camera is put on a timer of nine images with a 3 second delay in between. I only used a LumeCube LED light for this painting. The bike was positioned at 90 degrees so that it could be framed easily as if it was created for a magazine layout or advertisement spread. It was then centered in the frame of the garage door for an easy and clean background.

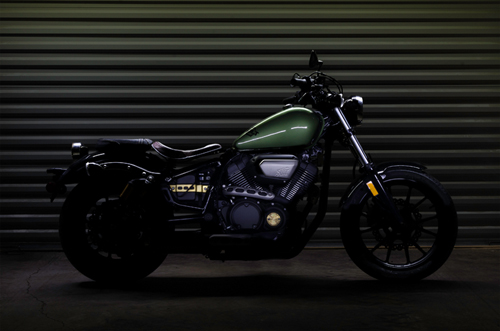
The first image (upper right) is always done using no light at all so I can see if I am pulling any ambient light and to test all of my settings. For this image, my settings were as follows: Camera, Nikon D610 with a 35mm f/1.8 prime lens, Aperture f/16, Shutter Speed 8 seconds, ISO 100. Almost all of my lightpaintings are created at ISO 100. The LumeCube is attached to a cheap Walmart extendable selfie stick. Simply unscrew the cell phone adapter and screw the LumeCube in. This is very effective for getting your light up high over the subject and is easy on the back if you need to get low for lighting.
Every image I create has completely different settings because there are so many factors in this style including, location, ambient light, effect, color of subject, concept and so much more. There are no real “go to” settings and it is always decided in the moment. After shooting about 18 images, I knew it was time to head to the computer for some editing. Also, by this point, I was covered in sweat and could barely breath. Summer is really hot in Louisiana.
All 18 images were imported even though I would only use 5 to 8 of them. But it is always better to have too much than to not have lit everything and be forced to re-create or go “crazy” in Photoshop to correct the error later. Next, I go through every image, selecting the ones I will use, starting with the background base image.
In Lightroom, I then straighten the image by cropping and use “enable profile corrections” in order to correct any problems. Next, I sync all of the images to be used before transferring them to Photoshop. “Command-E” on a Mac automatically exports to Photoshop. In Photoshop, I quickly cloned over the brick on the ground and the kickstand for the bike. Yes, this is not possible in real life but it makes it all look better in my opinion.

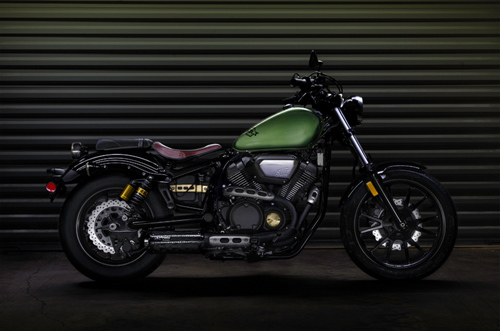
Layer 1. I used this image to pull in all the highlights from the top of the bike, across the handlebars, tank, seat and rear fender. I created a layer mask and inverted it to black. With the brush tool set to white I painted back in the sections and highlights that I want. These are the steps from now on for every layer. Pick image, export to Photoshop, place as layer on top, create layer mask, invert to black and use a white paint brush and brush back in what is useful. Then REPEAT steps slowly as you progress through as many layers as it takes.
Layer 2. Next, I used some of the tank and side of the bike to make the next layer. The engine was lit well and I started to notice that the tank was going to be harder than previously thought. Being the only truly shiny/reflective part on the bike. I would have to slowly correct this over a few different layers while lighting other sections of the bike at the same time.
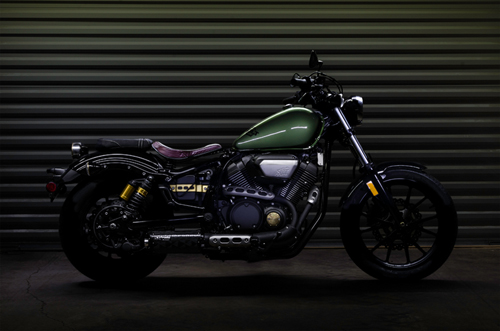
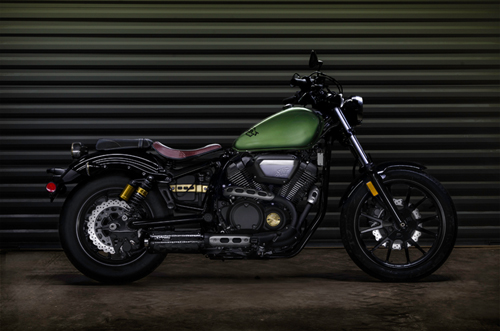
Layer 3. I used the LubeCube at waist level in this image and allowed the light to fall off even lower on the bike but tried to keep it off the ground. The more you are able to control the light while photographing your subject, editing is easier. Yes, get it right in camera and you will have a lot fewer headaches on the back end.
Layer 4. Now I continue to work on the tank to remove the unwanted highlights while leveling off the tank and balancing the color, while correcting the lighting on the seat, rear seat and rear fender. Some layers may be very minor but mean a ton to the final result.
Layer 5 was simply to finish correcting the tank and adding back some shadows that naturally will fall under the tank.
Layer 6. I used the light at knee level pointing directly at the bike in this image in order to fill all the gaps, details and to get sharp even highlights across the face of the engine while adding lighting to the tires, brakes and suspension of the bike. In the end, you still need the lighting to be balanced. Also, while lighting, walk at a steady pace holding the light in straight flowing motions in order to get these clean highlights. If you move the light source up and down or in circles, you will see these motions in the highlights and final images and they are very hard to recover from.
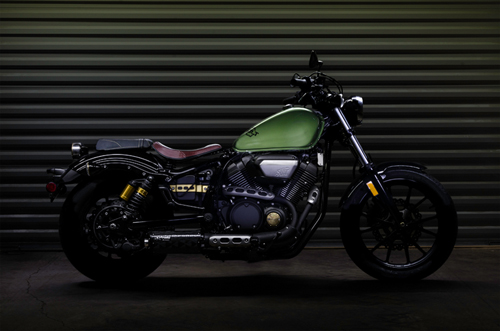
Layer 7. While it may look minor here, I brought in a whole new floor. I cloned, dodged and burned and worked on the perfect tone. This helped to form the perfect shadow under the bike and to remove any unwanted parts of the floor. I wanted it to be seen but not really noticed. From there I painted it in just like every layer above.
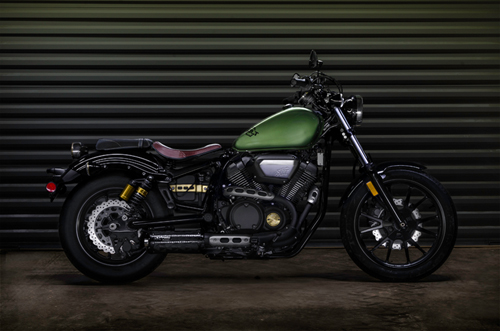
Layer 8. I added a few more reflections and highlights to the front wheel fender and removed a few in other areas. Then I painted in some of the darker places on the handle bars to lighten them up. Not much in this one.
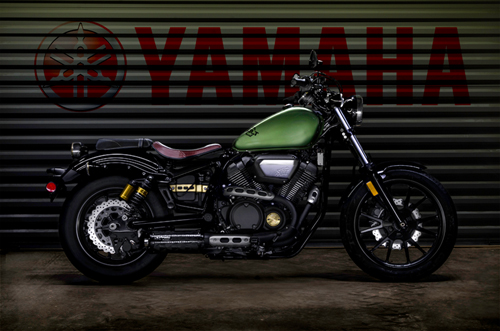
Layer 9 (title image). Finally, I took a picture of a sticker at the dealership and brought it into Adobe Illustrator, cut it out and created a PNG. That file was then brought into Photoshop and layered onto the garage door. I want the look of a magazine advertisement and I think I accomplished just that.
Everything was saved as a PSD and sent back to lightroom for some final adjustments. My final pass consists of clarity, opening some shadows and some contrast before calling it a day.
Lightpainting is nothing new. Photographers have been doing it for a very long time. Your light source can be as simple as a flashlight. Although it is a technique that can give a new look to your imagery and can set you apart from your competition, it does take a little practice to develop your own technique and style. My suggestion is to begin with something small in order to get the hang of it. The more you work at it, the easier it becomes.
 Jeffrey Eatley was born and raised in Cajun County, Louisiana, and has spent the last ten years learning and challenging himself as a creator. He loves to create the impossible, tell stories and chase the dream, and completely relies on his passion and drive which has brought him clients like, RatRod Magazine, GoRving.com and many other magazines. Jeffrey’s largest accomplishment was working for Shell/Pennzoil at SEMA, the largest automotive trade show in the world and then as the Pennzoil 400. His current project includes documenting everything he does on his new YOUTUBE Channel, AutoFocus 247.


